

The Graduate’s Guide to Synthetic Biology
“The trouble with having an open mind, of course, is that people will insist on coming along and trying to put things in it.”
Introduction
Congratulations! You’ve done some, or all, of your graduate degree in Biology, which means you’re probably brimming with knowledge of peptide and nucleotide mechanics. If you’re really lucky, you’ve also had extensive practical experience in the laboratory. If so, perhaps you should find your way across to the “All Protocols” page.
However, if you’re like me, and a shocking number of graduates out there, you’ve ended up with a shiny degree and disappointing lack of PRACTICAL EXPERIENCE.. You did the experiments, you poured the gels and then you promptly forgot the ratio of agarose to TAE. Your restriction digest went perfectly in the lab class… but already you wonder what the name of the buffer that went with EcoRI was.
Sound familiar? Well you’re in the right place friend. Whether you’re just starting your honours project or striking out as an independent researcher – this resource will be expressly designed to help YOU apply the knowledge of your degree where it matters most. In the lab!
If something seems super obvious and boring, skip it! This resource is intended to be comprehensive enough to fill any gaps in your knowledge, not a prescriptive step-by-step guide. YOU are the greatest expert in what YOU know, so you have my permission to skip sections at will. Now… onto the guide!
Synthetic Biology Skill Tree

The Sterile Workspace
The first thing you’ll need in order to do synthetic biology is personal protective equipment (PPE) and a sterile workspace.
The most basic PPE you should have on hand for Synthetic Biology includes;
Equipment: Gloves
Equipment: Lab Coat
Equipment: Goggles
Any time you work with a potentially hazardous reagent, put on your PPE to protect yourself from your work. Always be aware of the potential hazards of every reagent you work with!
To create a sterile workspace, you’re going to need a spray bottle containing 70% ethanol and a flame. Spray down your workspace and wipe it dry with a paper towel. Next, spray your hands and wrists; it will dry out your skin, but not do any damage. Gloves are useful if you do this regularly, but also pose the risk of melting on to your hands if they get too close to the Bunsen. Spraying your bare hands with ethanol will be enough to prevent contamination, but not disable RNAses – which will only become a problem further down the road.
Next, light your lighter or match and then turn on the gas of your Bunsen. Hopefully your high school chemistry teacher lectured you on this, but this order of operations is important – don’t let out a big cloud of flammable gas before sparking your lighter! While you can use improvised sources of flame such as a camping stove or a blow torch, a portable Bunsen burner is best. If you’re lucky enough to work in a space that has ready to use gas outlets, you won’t even need to pay for a portable Bunsen!
If your workspace looks something like this… you did it!
As with anything you do in the lab, there’s nothing like having a perfect protocol to follow each time. If you ever need to set up a sterile workspace, revisit this protocol page to remind yourself what to do;
Protocol: The Sterile Workspace
You’ve now created a sterile workspace, but how does it work? Ethanol kills the bacteria on the bench and on your hands – while the Bunsen flame creates an updraft in the air around your workspace. This is your CONE OF PROTECTION – and the size of it is dictated by how hot the flame is. I generally consider anything within two feet of a roaring blue Bunsen flame to be safe from contamination. More details on creating a cheap and easy sterile workspace can be found on the following pages;
Equipment: Bunsen Burner
Equipment: Disinfectant Spray

There are more engineered ways for producing a sterile workspace. If you’re lucky enough to have a large budget or access to a well funded lab, you may find yourself using a Laminar Flow Hood or Biosafety Cabinet;
Equipment: Laminar Flow Hood
Equipment: Biosafety Cabinet
Before we start culturing, it’s time to figure out a strategy for sterilising your media. There are three main strategies for sterilisation;
Autoclave – These high pressure steam sterilisers are the gold standard for sterilisation of media. They can cost more than AU$2,000 second hand, so they’re unlikely to be useful for solo projects. If you’re at a community lab and can share the cost, this should be one of your first investments. It can be quite astounding just how much stuff you’ll need to sterilise just to keep everyone in a community lab supplied with fresh reagents.
Pressure Cooker – Many solo synthetic biologists do all of their work using a simple pressure cooker on a gas stove. I personally find these spooky and generally fear that they’re prone to blowing up in my face. Try to get one large enough to hold several bottles at once, the volume of the vessel will dictate how much of the day you spend just sterilising stuff.
Microwave – If the two above options do not appeal to you, there is the option of sterilising in a microwave. Any old microwave will do, and it’s generally held that 900 W for 10 min will be enough to sterilise your media. Some bacterial or fungal spores might survive this treatment however, so you should incubate a couple of plates (Room Temperature [RT] and 37°C) after using this method to see if anything grows on them. If they last a week without any apparent growth, you can assume the microwave sterilisation protocol is sufficiently robust for your purposes.
Equipment: Autoclave
Equipment: Microwave
Once you’re able to create a sterile workspace and sterilise media; you’re well on your way to becoming a completely independent scientist! To that end, it’s time to learn how to mix our own media and pour our own plates. But what kind of media…? To figure that out, you’re going to have to make your first important decision:
Host Selection Criteria
(You can skip this section if you’ve already chosen a target or plan to work in E. coli (good choice!))
Want to know something extremely unsexy about synthetic biology? For most of the time, the sum total of your life’s work will look to the layman like this:
If you imagined that this guide was going to let you give yourself super strength, or create a glowing rabbit – TURN BACK NOW. Soon, maybe, later… we will have the power to manipulate genetics with a flick of the wrist, but we aren’t there yet. Legal and ethical reasons aside, our understanding of the sheer complexity of life is still nascent. You’re going to want a simple, single-celled organism to work with. For a more detailed break-down, check out this page:
Synthetic Biology Host Selection Criteria
Made your choice? Excellent. I’d personally recommend anything that can hold and utilise a plasmid, such as Bacteria or Yeast. It is important to choose a non-pathogenic strain, the last thing you want is to become infected by your own work. Try to source a well characterised strain from a respected laboratory or supplier.
Choosing a single-celled target allows you far more power of manipulation over DNA at this stage of technological development. This guide will not involve many ‘In vivo’ experiments, instead we’ll be slaughtering our bacteria in order to extract the sweet, sweet plasmid DNA within. The power of ‘In vitro’ synthetic biology is that we can separate DNA and RNA for manipulation without worrying about killing the already deceased bacteria.
Now read the above paragraph, but replace the word “bacteria” with the words “bunny rabbits”, and this should help you understand why you won’t be working with higher-order mammals. If not, you’re a monster but I respect your honesty.
As mentioned in the Host Selection guide, a very important step while choosing your target organism is legality. I can’t answer this for every country, so spend some time googling your government’s stance on genetic manipulation. The language of these laws can be quite dated – such as Australia’s Gene Technology Act (2001). If you’re worried, try calling your country’s regulator (in Australia this is the OGTR). The well trod path will often be the easiest answer (K12 derived E. coli strains) but worry not; we will teach you to do miraculous things in this admittedly dull-to-the-naked-eye organism.
Culturing Conditions
All protocols henceforth will deal primarily with Escherichia coli (E. coli). If you’ve chosen to work with something else (such as Yeast or Bacillus strains), the methods contained within will still be useful. However, you may need to innovate on the fly.
The secret to doing this is to KNOW YOUR ORGANISM. Spend some time googling culture conditions, ideal media, growth curves, morphology – anything that might be useful for improving your success rate. Then, if my protocols tell you to incubate at 37°C, but you know your critter grows best at 30°C, you’ll already be able to make the expert’s decision to optimise your method!
Common Culturing Conditions
Equipment: Incubator
Equipment: Hot Water Bath
I’ve already stated the implication of this, but here we go again: The well trod path will often be the easiest. An abundance of literature on culturing conditions will help you breeze through these early chapters and on to more advanced techniques. A novel bacteria that is both difficult to culture and poorly understood will be an uphill battle.
But a word of hope to the innovators out there: nature holds many juicy mysteries to uncover. Perhaps the platonic ideal of a synthetic biology host already exists somewhere in nature, and we fools who toil with E. coli work in the ignorant bliss of a so called superior understanding.
Mixing Media and Pouring Plates
I’m unsure how, but I finished my degree having never poured an agar dish. Most new lab members arrive with a vague memory of doing it in the first year, but from pre-prepared media. Here’s a guide on mixing media and pouring plates;
Protocol: Mixing Media & Pouring Plates
Of course, you’ll probably want to save money by mixing your own media rather than buying the expensive premix. Here are some simple protocols for mixing your own LB (Luria-Bertani) media and agar:
Protocol: LB Liquid Media
Protocol: LB-Agar Media
This will be your stock standard E. coli media, but don’t be afraid to hunt down other recipes…
This is the first time you’ll be using a lot of equipment, so here’s a breakdown of what’s new:
Equipment: Petri Dishes
Equipment: Glassware
Equipment: Tubes & Tube Racks
Equipment: Weighing Scale
Equipment: RO/MilliQ Water
Equipment: Pipetteboi
Equipment: Fridge & Freezers
Equipment: Liquid Waste
Sometimes you’ll want to add antibiotics to your media. This requires the creation of an antibiotic stock solution, which is kept in the freezer.
Antibiotic media is biotech on easy mode. Just a few drops of this secret sauce is enough to purge your media of (almost) anything that doesn’t have your chosen plasmid. The one caveat to this blissful state is that the mixing of antibiotic media/agar requires the one thing biologists fear most of all – MATHS. Worry not however! We’ve thought ahead to ensure that once you mix the tube of antibiotic stock, all the maths can be left at the door.
Protocol: Antibiotic Stock Solutions & Dilutions
Equipment: Ice Machine & Box
Equipment: Vortex
Last but not least, the most important tool in your arsenal;
Equipment: THE Micropipette!

Penicillin – the happiest accident of all?
Okay you’ve just made some really tasty microorganism food for your chosen critter, now you must learn to defend it from the wider world. For some microbiologists; Sterile Technique is more than just jargon, it’s a way of life. It’s also the first thing a nosy onlooker will comment on – so knowing WHY we use this technique is just as important as learning HOW to do it. It can feel superfluous to aim for perfect technique when working with antibiotics (because it’s easy mode) but I recommend you go through the motions anyway. But it’s also worth remembering that failure at sterile technique can yield fascinating and bewildering results; I’m sure that Alexander Fleming and Bob Ross would agree that “we don’t make mistakes… just happy little accidents”
Sterile Technique, aka. Aseptic Technique is the core discipline of microbiology. It is one of those easy to learn, hard to master skills that you could refine for your entire life without perfecting. I draw criticism from time to time for a misplaced hand, a handle touching glass, or for not wearing gloves at every single moment. I don’t take this criticism to heart, and neither should you if your mentor ever scolds you for technical errors. You know it is coming from a good place – they’re just trying to help you minimise the chance of a non-experimental variable affecting your results.
Technical errors only matter if they bring non-experimental variables into the mix
Success in synthetic biology is measured by the quality of your results, measurable through a number of robust protocols that you will soon learn. If you’re getting contamination on your plates, unexpected morphologies or weird growths – that is a clear sign that your sterile technique needs work.
However, if you’re able to reliably grow plates without contamination and verify the results of experiments through PCR and restriction digest; the original set up and quality of your space does not matter. The nuances of your technique do not matter. If it works for you and you can show results – don’t let anyone get you down.
One of my mentors has recently had her GARAGE in Australia PC1 approved, allowing her to do various gene editing experiments… in a GARAGE. Her technique is obviously outstanding, and she regularly produces reliable and interesting results.
Another hero of the DIY biology world; David Ishee, has been working to genetically modify dogs to fix a number of negative mutations brought about by generations of selective breeding. He revels in the joy of success using a rudimentary setup and I can’t deny that watching genetic modification occur in a converted tool shed is a compelling sight.
The point is, government willing – you can do biotech anywhere. How important technique is to your result is actually a factor of experimental design. I’m going to be starting us off with basic ‘plasmid’ work using antibiotic media. This really is biotech on easy mode. In a lot of cases, you could probably cough on your antibiotic-plate and it would have zero impact on the colonies that are growing.
So if you want to become a really bad-ass microbiologist, practise on media without antibiotics with just a Bunsen burner. Become the master of your organism, ensuring it grows only when and where you want it to. Become the master of your media, protecting your organism from all outside contaminants.
If this is your first time, don’t feel intimidated by these techniques honed by wise and ancient scientists over the last century. Working with antibiotic media and plasmid DNA is akin to bowling with the bumpers up. Your mistakes are rarely costly and more often the fault of the antibiotic rather than yourself as a scientist.
I’d like to take this chance to give you the first of many reminders to come; that Positive and Negative controls will be your second set of bumpers in this extended bowling analogy. When things go tits up, you’re going to be glad you included both control plates to identify the problem. In this case, your negative control would involve the addition of bacteria without a plasmid onto an antibiotic-plate. If the plate gets growth, you’ll know the antibiotic is borked and your experimental plate is no longer trustworthy. More on that later, for now – head over to the Sterile Technique page to learn more about this core discipline.
Protocol: Sterile Technique
Back so soon? Or did you read ahead before checking out the sterile technique information? Well I’ve got some good news for you – nested within Sterile Technique was some other core tools of microbiology – and these are literal tools, not just an abstract set of skills. So, just in case you missed it in the shuffle, lets learn how to use…
Equipment: The Inoculating Loop (or Wand)
Equipment: The Inanimate Glass Rod
Holy moly, you’re now self-sufficient! Just a bit of protein, yeast extract, salt, water and agar – that’s all it takes to get E. coli to grow. With merely a flame and some ethanol, you’re able to create your own controlled environment. Add in 3 tools and you can now do all the poking, prodding and squirting you want. It’s magnificently simple, and cheap as chips – so watch the guides and don’t fall into the trap of buying pre-poured plates!
DIY Buffer Mixing
Well you’re pretty self-sufficient, but there’s still a lot of resources you’re going to need to buy if you wish to work with DNA.
Buffers are mixtures of chemicals that contain competing molecules which allows the liquid to resist changes in pH. We use them for nearly everything, but the prices for even the simplest buffers can be outrageous from commercial suppliers, not to mention the lead time on shipping. As such, learning to mix your own buffers can be a time and money saver. But.
DIY buffer mixing is a different beast entirely from pouring your own plates, carrying significantly more dangers as you handle deadly compounds in their pure form. That said, it’s going to save you A LOT OF MONEY. If you’re a solo hobbyist who will struggle to source their own pure Hydrochloric acid or Guanidine Thiocyanate, I recommend you buy your buffers pre-mixed. It will cost you more, but save on headaches caused by supply chains and chemical fumes. However, if you’re in a small community lab such as I am used to; then mixing your own buffers can cut thousands from your budget – just be sure to suit up in your PPE!
Protocols: DIY Buffer Mixing
Equipment: pH Meter
DNA101
We’re now entering the section of the guide with required knowledge about DNA structure and interactions. Read the DNA101 guide if you feel like your DNA knowledge needs an update. If you feel confident in your theory, feel free to skip to the next section.
Theory: DNA101
Purification of Genomic DNA
Genomic DNA is the core code of any organism and depending on the species it can come in a variety of forms and be located in a variety of places within the cell. As humans, our genomic DNA is encoded as 46 chromosomes located within the nucleus. We pass this genomic DNA to our children via 23-chromosome gametes (sperm or eggs). We share variations of this system with all other Eukaryotic organisms, from Bakers Yeast to Blue Whales. The other two Domains of life are known as Prokaryotes, a group that can be divided between Bacteria and Archaea. These domains differ in many ways. Prokaryotes, lack a nuclear membrane and simply leave their genomic information floating around within the cell. This “bacterial chromosome” is most often a giant circle of DNA consisting of several hundred-thousand to several million nucleic acids.
Viruses and bacteriophages don’t get included in the above discussion because they lack the replication machinery necessary to be classified as “life”. They do however have genomes, which come in an even wider variety. Single-stranded DNA, Double-stranded DNA, RNA-only, some bacteriophages even have genomes larger than small bacteria!
The purification methods required to purify genomic DNA will vary based upon the genome type. This protocol page will help you decide on a genomic DNA extraction protocol that matches the needs of your experiment;
Protocols: Genomic DNA Extraction
Equipment: Heat Block
If you’re using E. coli, lucky you – the genome is a nice and simple 4,583,637 base pair (bp) single chromosome that replicates using binary fission. There is an easy ‘boil purification’ method that requires minimum reagents which will allow you to extract it for analysis. BUT! Before you jump right in to slaughtering your bacteria in a heat block, ask yourself – what do I want to do with this chromosome afterwards? Chromosomes are really hard to get back into a cell once they’ve been extracted. Furthermore, most cells already have a chromosome, so adding a new one in will likely lead to confusion (read: death) for the cell.
Fortunately, nature has handed us the perfect tool for ‘gently’ adjusting the genetic expression of bacteria, yeast and potentially even higher order organisms; THE PLASMID.
So with that teaser of what you’re about to learn, I offer you these protocols for extracting Genomic DNA. Put them in your back pocket for when you’ve learnt about Plasmids, PCR and Agarose Electrophoresis. “Genomic DNA Extraction” is the sort of protocol you rarely need until you absolutely do. Until then, it’s time to become a master of plasmid manipulation.
PLASMIDS101
If you’ve ever written computer code, you could imagine plasmids as “add-ons” or “plugins” – files that you attach to a larger program to change its function in some way. But as a warning, don’t lean too deep into that allegory, as my professor Dom told me;
“Writing computer code is easy, everything is laid out nice and simply on a silicon computer chip. Synthetic biology is a different beast entirely, it’s like trying to write code inside of a burrito”
Inside this “burrito” are thousands of intersecting cellular messages that slip and slide over each other in their haste to perform their multitude of functions. Simply the presence of a surplus of one molecule may turn on several enzymatic pathways, leading to a cascade of unpredictable results.
Theory: Plasmids101
You’re about to barge into this complex system with new code, rewiring systems on the fly to suit your desires. If you aren’t careful, you’ll do this with little care for the ability of your organism to survive. In synthetic biology, it is very possible to be catastrophically successful within an experiment e.g. you produced a huge amount of green-glowing protein, but all the cells died during the first generation.
Fortunately for you; the manipulation of bacteria using plasmids is now a 30-year-old discipline and you’ll have plenty of excellent examples of success and failure to learn from. Thanks to technological developments such as CRISPR/CAS9, you also will be able to use plasmids to make extremely selective modifications to the aforementioned genomic chromosome without ripping it out of the cell first. Nice! Those of us in the profession now refer to plasmids as “Backbones” and have developed a comprehensive understanding of which backbone suits which situation. You can learn more on the following page;
Theory: Backbone Selection
It’s time to synthesise your growing knowledge of your target organism with an understanding of plasmids and their interaction with your target. For your first experiments with plasmid work, try to pick a simple plasmid with a high copy number and an easy to source antibiotic. I recommend pET-15b or any pSB1C3 plasmid from iGEM.
Purification of Plasmid DNA
aka. Miniprep / Ethanol Lysis
The Plasmid Miniprep is the premier method for purifying plasmid DNA for experimental work. I would regularly perform this protocol three times a week and I’ve found it can be easily done in under two hours with the right set-up. It involves some seriously nasty chemicals, which you’ll be familiar with already if you’ve mixed your own plasmid miniprep buffers. If you haven’t, be sure to check out the videos for Buffer N3 and Buffer PB so that you understand the risks of guanidine exposure. If you purchased a commercial miniprep kit, then you’ve already skipped the deadliest part! Some of the buffers are still dangerous though, so be sure to read the provided MSDS thoroughly.
Take a read through the protocol to get a feel for it. Note that it may require 1-2 days of microbiology set-up to ensure that you have a fresh, pure colony to purify;
Protocol: Miniprep/Ethanol Lysis Purification of Plasmid DNA
Equipment: Centrifuge
Equipment: Silica Spin Columns
Equipment: Oven
Equipment: Nanodrop/Qubit
To summarise this protocol; you will pellet the cells using a centrifuge and then resuspend them in a new buffer. You will add a lysis buffer to break open the cells to release the DNA and RNA, then you will leave it for 10 minutes so that an enzyme known as RNAse will break down all the RNA to prevent it from being purified with your plasmids. After 10 minutes, you’ll neutralise the lysis buffer with neutralisation buffer and spin the tube to pellet all the cell debris. You will then extract the excess liquid (supernatant) which now contains solubilised plasmid and add it to the silica purification column. You will then spin the column to push the liquid through the silica filter, which will capture the plasmid DNA. You will then “wash” the column with chaotropic agents to neutralise proteins that might damage your plasmid and wash a second time with ethanol to wash away the proteins and salts, leaving the plasmid DNA still on the filter. You’ll then use an oven to evaporate the ethanol, leaving dried plasmid DNA on the filter. Finally you’ll add a buffer that will solubilise the plasmid and allow it to escape (elute) the filter when you spin it in the centrifuge, leaving you with purified plasmid DNA to leave in the freezer. To recap the steps involved;
Pellet/Resuspend cells
Lyse Cells
Neutralise Lysis Buffer
Wash (Chaotropic Salt)
Wash (Ethanol)
Evaporate in oven
Elute into fresh tube
Note that in addition to the buffers, you’re also going to require a silica purification column and capture tube for this experiment. Keep in mind that not all columns are the same and you should be using one that is an appropriate grade for the size of plasmid you are purifying. Using the incorrect column may lead to low/zero yields.
The most important piece of lab equipment for this protocol is the high-speed centrifuge. While it is possible to do this protocol with centrifuges that can only reach ~2,000g, you will struggle to obtain a clean supernatant after the neutralisation step. I’ve done it, but it requires deft pipetting skills. This might be a protocol you remember from university, if only because you spent 30 minutes waiting in a line for the centrifuge between each step. If you share a lab space with others, be sure to warn them that you’ll be using the centrifuge for a while if you plan on performing a miniprep today!
But what to do with your newly purified plasmid? A good start is to try determine how many copies of the plasmid you’ve purified, a number generally measured as concentration within the elution buffer (If you’re lucky enough to own some form of nanodrop, you can attempt to quantify the yield using that. However despite the reassuring nature of a technologically assisted number, I find that the results from these devices can be unreliable. As such, I believe the best method for judging the yield of plasmid DNA is an agarose gel!
Once quantified, (or without quantification if you’re feeling really wild) you’ll likely wish to know how to insert your purified plasmid into a new host to provide it with the instructions encoded within. You’ll have to use a new host because you just killed the old one in order to extract the plasmid. In-Vitro Synthetic Biology is not very kind to it’s hosts, which is why I want you to stick to single-celled organisms and leave the bunnies and humans alone.
Plasmid Insertion
Heat Shock? Electroporation? GENE GUNS? This is gonna be great…
Yet I chose the boring title of “Plasmid Insertion” for these protocols, burying the lead. Click right on through to pick your new favourite way to shoot tiny packets of DNA into single-celled organisms.
Protocols: Plasmid Insertion
I’d highly recommend Chemically Competent cells and Heat Shock for first timers as these protocols require the least investment.
NOTE: This is the first protocol in the guide that may be considered Genetic Modification in your jurisdiction. Consult your local legislation and contact any governing institutions to ensure your space is adequate and registered if your government requires it to be. In Australia, this means a PC1+ space approved by the OGTR and that plasmid insertion can only be performed on a list of approved organisms. As a transient non-genomic modification, it is considered an edge-case example of GM and unregulated in some jurisdictions, but better safe than sorry.
Agarose Gel Electrophoresis
GELS, GELS AND MORE GELS.
I hope you like gels, because this will be your bread and butter until sequencing drops in price by a few more orders of magnitude. Agarose electrophoresis allows you to measure the length of DNA fragments by comparison to a size standard. It is an artform similar to Sterile Technique - easy to learn, impossible to master. This section and protocol will focus on the mixing, loading and running of the agarose gel itself, but note that the next section on illumination & photography is equally critical to obtaining the best results. A badly illuminated photo of a perfect gel will still look terrible.

To perform this protocol, you’ll need a power pack and wires at the very least. It is possible to build your own electrophoresis chamber, such as the one I built in the picture above - but note that the electrodes can be expensive. These are typically made from platinum wire, but I’ve heard anecdotal evidence that a graphite electrode will do the job at 1/10th the price. I will try test this when I get a chance.
If you don’t have access to a laser cutter and 3D printer to make your own chamber, there are plenty of commercial options - however be warned that there is some serious price gouging in this area. There isn’t much difference between my DIY setup and a super expensive electrophoresis kit - so I’d recommend you choose based upon price.
You’ll also need Agarose (not agar) and TAE buffer
Protocol: Agarose Gel Electrophoresis
Equipment: DC Power Supply
Equipment: Gel Tray & Bath
Equipment: Illuminator
Equipment: Imaging Enclosure
Agarose electrophoresis works because DNA has a linear negative charge thanks to the phosphate groups on the backbone between each base-pair. Each phosphate group contains a single negatively charged oxygen ion, meaning that every additional base adds one additional negative charge. This prevents variation in the charge-length relationship and allows us to use an electric current to drag DNA strands through a gel in a predictable manner.
Smaller DNA fragments run faster.
Since they are smaller, they slip through the agarose gel at a faster rate than longer DNA fragments. We can alter the density of the gel to accentuate this difference. A gel with a high concentration of agarose provides a better resolution between large DNA fragments and a low density gel provides the best resolution for small fragments.

Either way, we use a DNA ladder containing 10-15 fragments of a known size to provide a quantified size comparison for our unknown fragments. My ideal setup uses a 100 bp ladder (First lane) and a 1 kb ladder (final lane) on either side of a gel in order to cover the full spectrum of possible fragment sizes.
I’d recommend starting with a commercial ladder, since you want a reliable size standard to kick off with. However it is possible to make your own DNA ladders through the restriction enzyme digest of plasmids, such as this open-source option from Penn State University.

The method for staining your gel is also an important consideration to think through before you start, since a pre-stain must be added before the gel is set. I find that pre-staining is perfectly acceptable for obtaining results during my day-to-day activities, but it is true that a post-stain protocol is preferable for obtaining those ‘publication-quality’ gel images. If you’re struggling to pick between the two, start by pre-staining since it is faster and easier. If your gels are consistently blurry or running unevenly, consider an overnight post-stain instead to see if that fixes the issue. You can find more info on which DNA stain to use on the Gel Illumination & Photography page, but know that Thiazole Orange is my new darling. It is safer than EtBr and the DNA runs better than Gel Green/SYBR.
The DNA stain is only one of the dyes involved in Agarose Electrophoresis, you also have to use a Running Dye. You’ll find a range of running dye options on the Agarose Electrophoresis protocol page, but note that the dual role of this dye is to make the DNA sink down into each well and to give you a method for visually tracking the progression of the DNA while the gel runs. The running dye doesn’t intercalate (bind) with the DNA as the staining dye will, so it will run at its own speed independent of the DNA. This will help you save time and avoid stopping & starting the electrophoresis to check the progression of the DNA, which carries a risk of damaging/dropping the gel each time. I almost always use 6x Purple loading dye as it seemingly comes with every useful enzyme and ladder I order from NEB.
You can mix the loading dye with your sample directly, but this isn’t recommended since it commits you to using all of the sample for the agarose gel. Instead, you can put down 12 x 2-3 μl dots of Running Dye onto a piece of parafilm and then mix 5-7 μl of sample with each dot before loading them onto the gel. Keep sufficient distance between each dot so that the liquids don’t combine and be really careful while pipetting not to add bubbles. To get rid of bubbles, tilt your pipette to a ~45° angle and try suck up only the liquid while skirting around the bubbles. If you’re forced to load an extremely persistently bubbly sample, try load it a bit at a time, lifting up the pipette each time a bubble is about to be pushed out. This will minimise the amount of sample that is pushed out of the well.
Pouring the gel is easy and well explained in the protocol, just add the molten agarose in a smooth motion and add the comb. Use masking tape to seal leaky chambers.
The biggest struggle for most new synthetic biologists is the loading of the agarose gel. Most university students have a few scarring memories of being forced to take their turn loading a gel in front of a class and completely screwing it up. Don’t worry, me too. Here are some tips that helped me conquer my fear;
Find a good seat that is an appropriate height for the lab bench.
Ensure you have both elbows steadied against the table and find a comfortable method for steadying your micropipette.
I like to steady the other end of the pipette with my second hand, pinching the end just above where the tip connects.
Others prefer to steady their loading hand by gripping it at the wrist, holding the pipette with just one hand.
One student of mine swore by the “praying at the altar” strategy for loading, whereby you plant both elbows on the bench and grip the pipette at the top with both hands. He got great results, so who am I to judge?
It doesn’t matter which style you choose, just that it keeps your hand steady.
Bubbles are your enemy, but practise with pipetting up and down on the parafilm can remove all but the most stubborn bubbles.
Your pipette tip should be deep enough into the well that none of the sample will puff out, but not so deep that you puncture the bottom of the gel.
Very gently add the sample with your pipette, depressing your thumb until all of the sample is added,
If you get small ‘tails’ of sample coming out of the well: Try to gently lift upwards until the pipette tip is out of the sample, but not out of the well. Lift your thumb to bring a bit of running buffer into the pipette tip so that the surface tension of your DNA-dye sample doesn’t drag a small tail of sample up and out of the well. You can then lift the pipette tip completely out without dragging any sample with you.
Change pipette tips every time you switch samples. This is especially important for your DNA ladders - once contaminated they’re practically useless.
With practise you’ll be able to load all 12 lanes of a gel in less than 10 minutes.
After running a gel and observing a specific DNA fragment, you may find yourself needing to purify it from the gel. This is quite easily done, using a SUPER DEADLY BUFFER or regular non-absorbent cotton wool. I’ll let you decide which you’d prefer;
Protocol: Buffer QG Gel Purification
Protocol: Cotton Wool Gel Purification
Regardless of your desire to cut out a gene, you’re definitely going to need to illuminate the gel - and most likely take a photograph. Time to switch gears and dive into a little bit of physics.

Image captured on a Biorad transilluminator. One of the first gels I imaged on my own, using what was once top-notch equipment.
I was never allowed to touch the “fancy” transilluminators during my university course, our classes were relegated to watching the lab technicians do it for us - which really lent the entire process an air of mystery.
If I’d known I could take far better images of gels with a few LEDs, a black enclosure box and a smartphone camera - I’d have been a lot less impressed.
The Gel Illumination & Photography page has a bunch of tips for optimising your gel imaging, and a link to one of the greatest synthetic biology blogs on the internet - Flowers for Everyone by Sebastian S. Cocobia.
You should also know that during their life, everyone drops at least one gel while carrying it to the transilluminator. Let me warn you now so that it stings a little less when it inevitably happens to you. Once burnt by the tragedy of seeing a whole day of work smashed into smithereens on the lab floor and knowing that you now have to clean up your shame, you’ll carry your gel a little more carefully.

Image of gel taken using a Samsung S8+ smartphone camera using 3D printed light enclosure and Orange filter over a cracked, second-hand UV light box. Despite using my own phone and a jerry-rigged setup, the quality of the image is far better than those I was able to take in the commercial machine. Also far less fiddling around with corporate software.
Restriction Enzyme Digest of Plasmid & Insert DNA
Optional: Dephosphorylation & Purification
Warning: We are now entering the section of the guide that is considered Genetic Modification in most jurisdictions. If you’re unable to work in a legal, registered space - please skip ahead to the sections on PCR and Sequencing to learn more about how to unpack the wonders of the genetic world around you without directly modifying it.
If you do have access a legal workspace (minimum PC1 in Australia), then you’re ready to start manipulating the plasmid DNA you’ve just purified! The use of restriction enzymes to digest DNA is slowly being phased out in favour of more reliable assembly methods such as Gibson Assembly or Golden Gate Assembly - but they’re still an excellent tool for learners. You are welcome to skip ahead to the more advanced assembly methods, but keep in mind that you’ll need to learn some advanced PCR skills in order to succeed. Be sure to read the preceding chapters on Primer Design and Flanking sequence addition.
If you are keen to invest a bit of money and buy some restriction enzymes, you’ll need to decide which ones to use. You’ve hopefully learnt how to use Snapgene/Benchling or another .DNA viewer during the DNA101 course, but if you haven’t - now is the time to download a program and practise!
If you haven’t picked a plasmid yet, you can get some ideas about what to look for from this page;
Theory: Backbone Selection
Ideally you will have a perfectly quantified plasmid sequence (free download from AddGene) for your plasmid, which you should now open up in your .DNA viewing program. The following example images will be screenshots from Snapgene since I find their interface to be the most visually clear.
When you first open up your plasmid file, it might look something like this - which is so chaotic that it makes my head spin. We’re interested in the Restriction enzyme binding sites (black lines around the outside) but because it is set to (All Commercial), we see every possible binding site - even those that occur 10+ times in the plasmid…

(click image for sequence download)
Let’s cut down on that complexity a bit by narrowing down the binding site selection function to only include unique cutters, i.e. enzymes that bind/cut the plasmid in only one location and nowhere else. This will narrow our options down from 666 to 46, but ensure we aren’t slicing our plasmid into a million pieces.
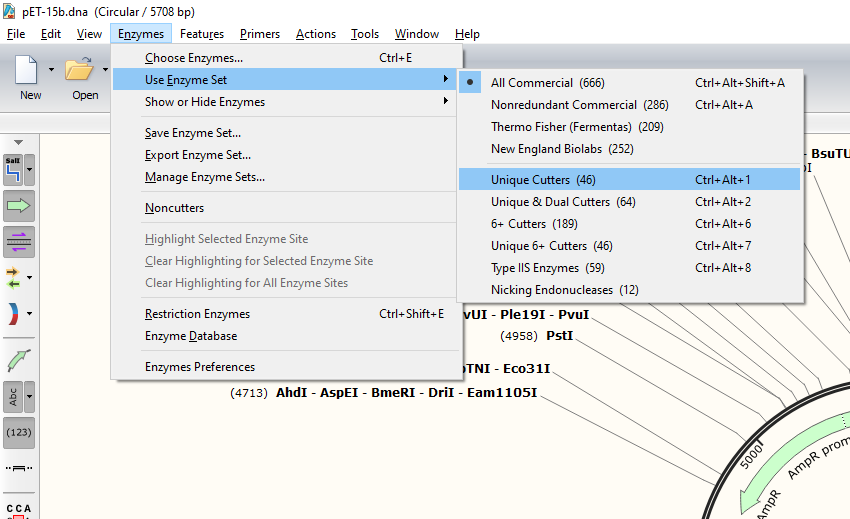

(click image for sequence download)
There, much better. We can also now very clearly see a couple of Multi-Cloning-Sites (MCS) emerge between the lac operator and the T7 terminator. Multi-cloning sites are regions that contain several common restriction enzyme binding sites that can allow for the easy insertion of a gene.
But what gene? What shall we try insert into this plasmid and where exactly should we insert it? Since we used this plasmid in the Open Insulin experiments, I’ll use our insulin gene as an example here. For tips on your own gene design, check out this page on designing the perfect sequence for inserting into a plasmid, aka. Gblock;
Theory: Gblock Design
Or you can wait until you learn about flanking sequence addition in order to ‘lift’ genes out of their natural environment to save on synthesis costs. The drawback of this option is that you lose out on the efficiencies of codon optimisation.
For this example, we have a entirely synthesised DNA strand coding for the cytoplasmic expression of insulin. The original design of this sequence can be credited to our PI Dr. Nicholas Coleman and our 2017 iGEM team.

Take note of the XbaI site in the Biobrick prefix and the BamH1 site just after the Biobrick suffix. Then go back to the pET15b image and try find these matching sites on the pET15b plasmid. If you read both the Backbone Selection and Gblock Design page, you will hopefully understand the decision making process behind cutting with these exact enzymes. Our finished product will contain every important piece of transcription and translation machinery necessary to achieve protein expression.
Now let’s try assemble them in the Snapgene viewer;
You’ll then be brought to the assembly interface, where you should try perform the following steps;
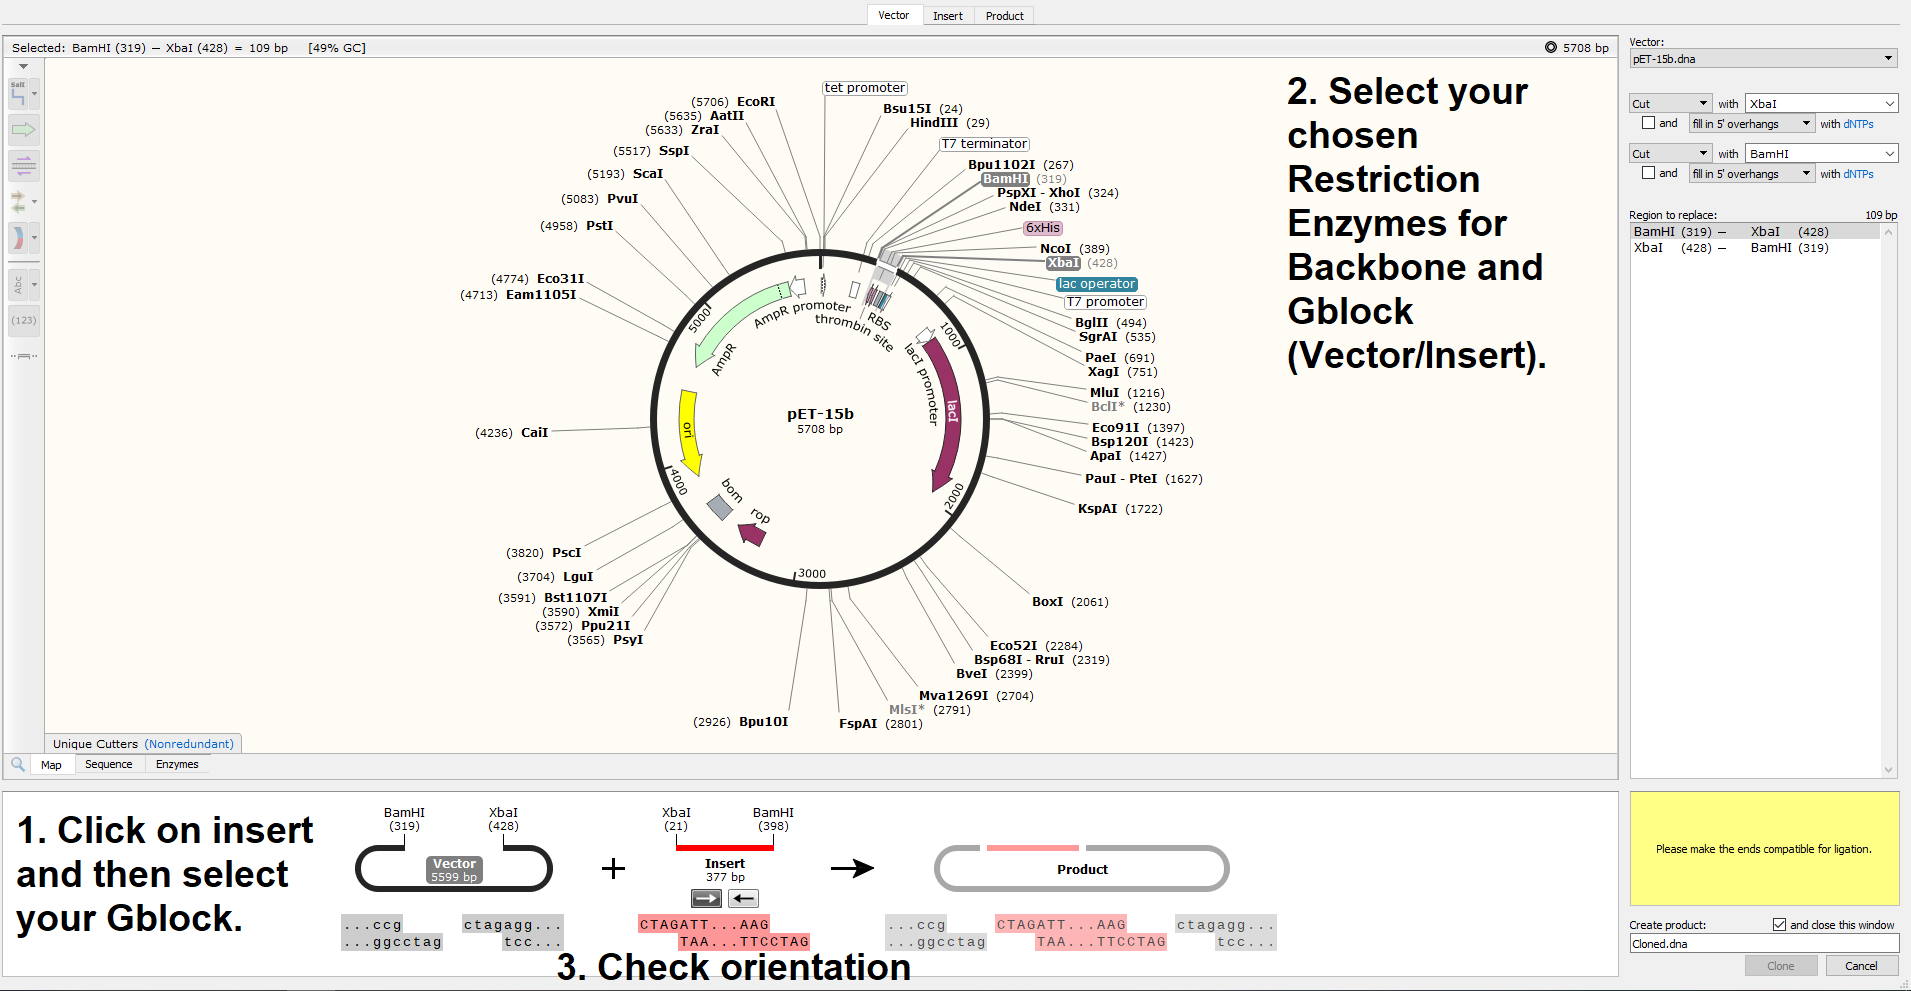
If you look closely at the sticky ends in the above screenshot, you’ll see that they’ve been successfully cut to be compatible when the insert is flipped, but the orientation of the Gblock is incorrect in the program. This is excellent, as it means that there is no risk that our Gblock will be inserted backwards. Once I click the -> button below (Insert 377 bp) to flip the sequence in Snapgene, this happens;

A lovely clean ligation! Let’s have a look at that finished product;

Now that the design theory is out of the way, you’ll need to know how to perform the actual experiment in the lab. The following protocol will explain to you exactly what you need for a Restriction Enzyme digest of your plasmid and insert DNA. Keep in mind that restriction enzymes are extremely heat sensitive and need to be kept on ice or in the freezer at all times. They’re in glycerol so don’t need hand-thawing. A lab manager cries every time you leave a restriction enzyme on the bench - get that ice bucket and keep it topped up with fresh ice.
Protocol: Restriction Enzyme Digest of Plasmid & Insert DNA, Optional: Dephosphorylation
Dephosphorylation is only necessary for blunt-end or single-enzyme digests.
It may be necessary to inactivate those Restriction Enzymes after digest, especially if you plan on performing a ligation without any purification. You can follow this protocol, but don’t forget to check whether your enzymes can actually be heat inactivated before attempting this;
Protocol: Heat Inactivation of Restriction Enzymes
If you’re unable to perform heat inactivation because the enzyme is somehow robust enough to survive 80°C, you can perform the following column purification protocol instead. It isn’t strictly necessary and I’ve succeeded in the past without inactivation or purification… but you should at least keep this protocol in your back pocket for those tricky ligations that persistently fail.
Protocol: Column Purification of Restriction Enzyme Digest
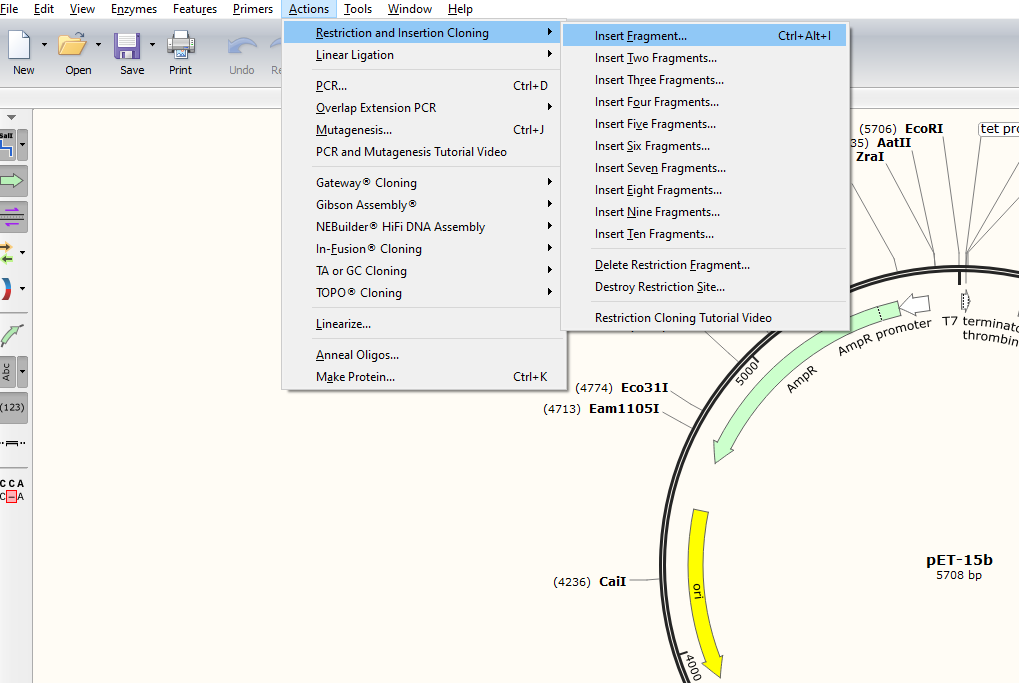
That’s it for the cutting of DNA, time to proceed to the gluing!
Ligation & Troubleshooting
Ligation uses an enzyme known as T4 DNA ligase (stolen from a T4 Bacteriophage) to glue DNA back together after you cut it apart (ligase repairs breaks in the backbone). T4 DNA ligase requires the 5’ ends of DNA to phosphorylated, so if you’re inserting a PCR fragment or have dephosphorylated your backbone to prevent self-annealing, you may need to include a DNA kinase in your ligation protocol.
T4 DNA ligase also requires ATP to function, which is kept in the T4 DNA ligase buffer. This is the most thermosensitive of all the thermosensitive compounds that you will encounter in this guide - 1-2 defrost cycles and it is DONE. So you need to aliquot ligase buffer into tiny little tubes with 10 µl in each, then store them in a bag in the freezer. Only remove one at a time, keeping the rest frozen. T4 DNA ligase itself is as thermosensitive as any other enzyme, but not as bad as its buffer. Don’t hand thaw it and keep it on ice at all times that it is out of the freezer.
Non-homologous sticky ends significantly improve the success rate of ligation and prevent the insertion of your gene in the reverse direction - so always try to design your digest with this in mind.
Protocol: Ligation & Troubleshooting
It may seem ominous that this is the first protocol that includes “Troubleshooting” in the title, but fear not! This is simply to remind you of the importance of including controls during the set-up of your ligation reaction! You’re going to need to know that colonies growing on your fresh plate are reliable and that means including the following control plates;
Negative (no plasmid) – Zero colonies tells you if the antibiotic plates are still fresh/
Positive (uncut plasmid) – Lots of colonies tells you that the plasmid stock solutions and competent cells are fresh.
Digest (cut plasmid) – Very few colonies tells you if the restriction enzyme is working or defunct
Ligation (cut, religated plasmid) - Many colonies lets you know if the ligation reaction is working.
Dephosphorylation (cut, dephos, religated plasmid) – Optional control if you are using a single enzyme/blunt end ligation. Very few colonies lets you know that the dephosphorylation has worked.
The perishable nature of synbio consumables requires you to continuously debug your reagents while your experiment proceeds. This may seem frustrating, but it’s better than spending a month wondering why your reaction keeps failing, not knowing that all your enzymes have denatured.

This is how I organise my lab freezer to help prevent novice hands from spoiling my expensive enzymes. An enzyme freezer MUST NOT have a defrost cycle. The easiest way to check if your freezer is appropriate is to check for large amounts of ice buildup. Lots of ice = probably doesn’t have a defrost cycle.
After the ligation reaction, you’ll need to insert your ligation mix into a new host. As such you should use one of these two protocols;
Protocol: Heat Shock of Chemically Competent Cells
Protocol: Electroporation of Electrocompetent Cells
If you’re using any antibiotic except for Ampicillin, your cells will then need to recover for 1 hour in plain liquid LB media. You will then transfer this liquid culture to an LB-agar-antibiotic plate and incubate overnight. If you need to review any form of sterile transfer, remember to use this page;
Protocol: Sterile Technique
You will then leave your plates in the incubator, cross your fingers and toes and pray for growth on your agar plates. While you go home to pray for success, let’s review the Polymerase Chain Reaction so you feel prepared to screen your clones tomorrow!
Polymerase Chain Reaction (PCR)
it’s a really important reaction.
Do you ever just flex on people by saying that you can stitch together millions of base-pairs of DNA into perfect replicas of any template you wish? I do, and it feels great.

The Polymerase Chain Reaction uses a specific cycle of heating and cooling to induce a protein (DNA polymerase) to replicate a template of DNA that you provide, in a region between two primers that you also provide. It can then use this newly created stretch of DNA as a template for the next cycle of the reaction, resulting in exponential doubling. By 25 cycles you have millions of copies that can be clearly seen on an agarose gel, or be purified for sequencing or use in a reaction.
It’s also a really easy protocol. You set up the reaction (minus your independent variable) in a master mix, then distribute it between the number of reaction tubes you planned for. You add your independent variable to each tube and then slap it into the machine and program the thermal cycles. You can then go have a sandwich while the machine does all the work!
This protocol is really heavily loaded on information, but I recommend you read it in full to properly understand the significance of each component in the Master Mix and the X/Y thermocycler reaction variables.
Protocol: Polymerase Chain Reaction (PCR)
Equipment: Thermocycler
The thermocycler/thermal cycler will be the biggest barrier to entry for many aspiring synthetic biologists. Rest assured that there are cheapish options available, but my favourite method is always to scout university waste dumps for still-functioning equipment. There are still old thermocyclers from the 1990’s that perform admirably, so keep an eye out for a cheap second-hand option.
One thing that isn’t covered in the PCR document is the subtle (and extremely frustrating) art of primer design, so let’s figure out how to design primers.
Primer Design
Primers are short sequences of DNA, normally ~15-30 bp that you will use to kickstart your PCR reaction. They’re surprisingly cheap, often costing <$20 for a supply that will last you years. You’re going to want to design primers in pairs, one annealing on the top strand and one on the bottom, with their 5’>3’ sequences facing each other.
The biggest challenge with primers is designing them so that they prefer binding to your template, rather than to themselves or each other. I’ve had many a month ruined by primer dimers (where the PCR just bonds the two primers together and amplifies a tiny ~50 bp region over and over) in my PCR reactions, so follow the above guide carefully and explore the tools available for modelling primers.
Once your primers are ordered, you may need to spend some time figuring out what the ideal annealing temperature (X) is for your reaction. The easiest way to do this is with a gradient thermal cycler. If you’re lucky enough to have one of these devices, read the next section. If you’re stuck with a regular thermal cycler - accept your fate and prepare to spend 3-5 days running the same reaction over and over in order to find the correct value for X.
Theory: Primer Design
Gradient PCR
A gradient thermal cycler runs the same reaction, except with slightly different temperatures in each column of wells, increasing in a gradient. This allows you to test up to 12 temperatures at once and determine the optimal annealing temperature for future PCR reactions with this primer set. You can get around the need for a gradient thermal cycler with diligent work, running the same reaction with a different annealing temperature (X), day after day.
However, a gradient thermocycler is a quality of life upgrade that I’d recommend splashing the extra cash if you’ve the resources. I did manage to eventually find a gradient thermal cycler that a university had thrown out, but they’re much rarer than regular thermal cyclers - which are often thrown out after the university upgrades them with a system capable of running a gradient PCR.
Protocol: Gradient PCR
Confirmation of Edits
Good morning, did you have a good sleep? Hopefully you dreamed sweet dreams of a successful ligation after a night spent studying up on the Polymerase Chain Reaction. It is time to get back into the lab and see if there are any colonies on your ligation plate! Or perhaps you’re just reading along and dreaming of the day when you have a space you can legally create GMOs within, or you’ve got a space and you dream of the budget for restriction enzymes and ligase... Regardless, these Confirmation of Edits protocols are universally useful, so you’ll find yourself returning here for all kinds of experiments as you progress as a synthetic biologist. Whether you’re performing Gibson or Golden Gate Assembly, screening species in the wild, or curious if the plasmid you’ve been sent is indeed what it claims to be - at some point you will need to lyse a cell, extract its DNA and analyse it with PCR, Restriction Enzymes or Sequencing.
If you do indeed wake up one day to come into your lab and you do find colonies on your ligation plate… HOORAY! You might have successfully inserted your gene into the plasmid, causing the cell to express a protein. If you used an indicator protein, such as GFP - you will be able to see the bacteria that have changed colour and know that you’ve been successful. This is by far the easiest way to screen successful recombinants, but including a big fluorescent/chromatic protein is not particularly good for your host. It certainly wont’ be useful if you’re attempting to efficiently produce protein for industrial use.
As such, most of the time, your successful colonies and your false positives will look identical. You need to be certain that you haven’t been tricked by undigested plasmid entering your reaction mixture, contamination by a different plasmid, etc.
Your first step should be to check every control plate and ensure that the amount of growth on each corresponds to the expectations explained in the Troubleshooting section of the Ligation page.
If your plates pass that test, the next step is to perform what is known as a Patch Plate and Colony PCR. In short, you number and circle each colony on the plate, then draw up a numbered grid on a fresh antibiotic plate. Using a sterile pipette tip, you pick up each numbered colony in turn, dip it into PCR master mix with a specific primer pair and then transfer each colony to its corresponding square on the grid. In a single protocol, you will have created a lovely organised plate of potential candidates and have a PCR running that will screen each to see if it contains your Gblock in the correct place and orientation. Also it wouldn’t be synbio if you didn’t also have to run a gel…
Protocol: Patch Plate and Colony PCR (Junction & Spanning)
Protocol: Agarose Gel Electrophoresis
As explained in the protocol, candidates that produce a band of the expected size will then be screened to ensure the other junction is also correctly aligned. At this point a spanning PCR is more of a novelty than necessity, but it will be useful for the Sequencing protocols below.

The next step for proving a plasmid is really what it claims to be is to digest it with restriction enzymes and analyse the resulting bands to ensure they’re of the expected size. You can use the “simulate gel” function in Snapgene or simply calculate the resulting band sizes yourself by looking at the .DNA map.
Because restriction enzymes are more fussy than polymerases, you will need purified plasmid rather than whole colonies for this procedure, so this protocol will require a plasmid miniprep… and another gel.
Protocol: Plasmid Miniprep
Protocol: Restriction Digest Analysis
Protocol: Agarose Gel Electrophoresis

If gels really aren’t your thing, then you’ve been born during the right time in history! The price of sequencing is dropping at an incredible rate, it’s still not dirt-cheap - but with the average price now <0.10c bp, you can honestly consider sequencing as an alternative to screening everything yourself. That said, you can save a lot of money by only sending off your best candidates which means at least some form of preliminary screening.

The Carlson Curve is synbio’s own Moore’s Law. The exponential cost decrease may have slowed in recent years, but when the next generation of sequencing technologies comes online we’ll see it drop another order of magnitude. Compared to an entire human genome, a plasmid is extremely easy to sequence.
Whether you wish to sequence a plasmid directly, or run a PCR and sequence the amplified band - this protocol will help you send off a purified product with a sequencing primer that a 3rd party can then sequence for you;
Protocol: Preparation for External Sequencing
The holy grail for any synthetic biology lab is to gain access to in-house sequencing technology, which has been on the verge of being affordable for a while now. Second generation sequencers (e.g. Illumina) required a significant capital investment ($50,000). Meanwhile the third generation sequencers, (e.g. Oxford Nanopore) require less initial investment, but cost a lot to run - with flow cells still in the $500 range. The newest ‘flongle’ flow cell is promising, but I’m still waiting for in-house sequencing to be within my hobbyist budget. I recommend you keep an eye on Oxford Nanopore and purchase a Minion once the flow cells become cheap enough. I’ll be doing the same and when I do, I’ll write a perfect protocol for you. Until then, check out their website for resources on how to perform your own in house sequencing.
External Protocol: In-House Sequencing (Oxford Nanopore)
Once you get your sequencing results, you’ll need to interpret them;
Protocol: Interpreting Sequencing Results
Flanking Sequence Addition
This is a really neat PCR trick that can be applied in a million different situations. Because 3’ Homology is much more important than 5’ Homology, we can design primers with 5’ overhangs, effectively adding whatever we want to the end of a DNA sequence. This protocol is limited to the addition of DNA to the ends of a sequence, but can be used to ‘lift out’ a gene from a plasmid or even an environmental sample - adding restriction enzyme sites for insertion into a new plasmid.
Protocol: Flanking Sequence Addition
Alternatively you can create the flanking sites necessary for Gibson Assembly or Golden Gate Assembly. These are more advanced assembly protocols that offer unique advantages over restriction enzyme digest and ligation. Once you know how to add flanking sites to a sequence, you’re ready to upgrade to one of these new protocols. It’s not compulsory to leave RE digest behind, but in the long-term a universally applicable assembly protocol will save you time and money.
Gibson Assembly
This is a fancy plasmid assembly protocol that replaces traditional restriction digest and ligation. This guide is mostly based on AddGene & New England Biolab (NEB) resources, because they’re the main suppliers I have access to in Australia. I’ll add more specific tips if I ever get my hands on the money to buy their kit which is currently AU$351 for 10 reactions.

Despite the cost associated with using patented technology, it is indisputable that single-step cloning is the future of plasmid construction. Traditional restriction enzyme digest and ligation haven’t quite been relegated to the dustbin of history, but these longer multi-step protocols will be phased out eventually.
If you expect to be well financed in perpetuity, you could consider skipping them entirely to focus on single-step assembly protocols.
If you’re scraping by like myself, you should balance the expected cost of buying these kits against the number of restriction enzymes you expect to eventually purchase. If you’re buying more than 20 restriction enzymes, you may want to make the switch.
A significant advantage offered by this assembly technique is that you can reportedly assemble up to 6 DNA fragments at once. I’d love to test this claim myself, however I’ve certainly read plenty of papers with 3-4 DNA fragments assembled using this technique. This can potentially save weeks or even months for a projects more complex than (gene + backbone = completed plasmid).
A great deal of this protocol is dedicated to the primer design, since that’s the major mechanism that allows for the scarless assembly. Be sure to revise your primer design skills before diving into this protocol;
Protocol: Gibson Assembly
An assembly protocol will only be as successful as the parts that you’re assembling. Don’t forget to use these resources if you decide to design your own parts;
Protocol: Backbone Selection
Protocol: GBlock Design
Golden Gate Assembly
Despite being an older protocol than Gibson Assembly, Golden Gate Assembly still has some competitive advantages and should be considered as a possible alternative upgrade from traditional RE digest & ligation. Golden Gate Assembly is a specific type of Restriction Enzyme Digest that uses Type IIS restriction enzymes (cuts occur outside of the recognition sequence) to create a “scarless” ligation.

This original definition of “scarless” from 1996 is a bit outdated, as some sequence is indeed removed from the final product, unlike in Gibson Assembly. Fortunately this removed sequence is external to your target region and also happens to be the region the enzyme is bound to - so ligation can begin immediately without the need for a purification step to remove the restriction enzyme. This was the first method that allowed researchers to organise multiple gene fragments into a specific order to create a plasmid in a one tube reaction. It can still compete with Gibson assembly as it allows for the assembly of >10 fragments simultaneously, while Gibson is limited to <6.
Protocol: Golden Gate Assembly
An assembly protocol will only be as successful as the parts that you’re assembling. Don’t forget to use these resources if you decide to design your own parts;
BACKBONE SELECTION
GBLOCK DESIGN
Site Directed Mutagenesis
Utilise your skills in PCR and Primer Design to make an almost perfect copy of your gene, except with a single point mutation that you’ve intentionally introduced. You can create a mutagenic fragment using a megaprimer and then assemble it with a backbone, or complete a ‘round-the-world’ site directed mutagenesis to make your own backbone as well.
This is technically genetic modification, even though you are only making changes to a transient plasmid. Remember that laws and regulations may apply in your area and consult your local authorities before you start!
Protocol: Site Directed Mutagenesis
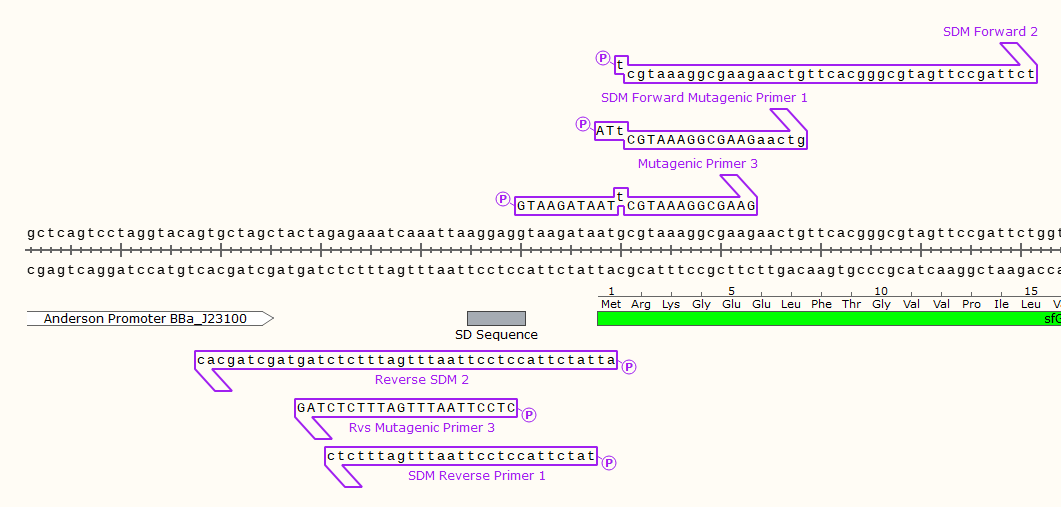
Example: 3 pairs of mutagenic primers for a round-the-world SDM PCR. Note that only 2 primers would be used at a time, these designs were the product of trial and error. Primer set 3 produced the desired product, disabling the start codon of the downstream GFP gene.
Proteins101
Whether you’ve mastered every technique of DNA manipulation, or are simply attempting your first experiments to produce Green Fluorescent Protein - a working knowledge of protein mechanics will serve you well. The aim of this 101 guide is to fill you in on everything that you need to know about the wonderful world of proteins so that you may successfully produce them in the lab. Due to the sheer scope of the protein-world it will not be a completely definitive guide, so you should also attempt to read more widely to augment your knowledge. However you should certainly understand enough by the end of the guide to perform all of the following protocols to produce, purify and observe proteins.
Induction of Protein Expression
Proteins can be produced selectively (induced) or all the time (constitutive). Constitutive expression has the drawback of slowing growth and the overall efficiency of cells as they struggle to cope with the additional load of producing your protein while trying to grow and divide. Inducible expression skirts around this challenge by allowing the researcher to dictate exactly when protein expression occurs - ideally during the exponential growth phase of the cells.
An efficient induction system is described as ‘tight’ and less efficient systems are ‘looser’. For most inducible expression systems, you want 'tight’ induction. For help designing an inducible expression system, review the guides on Backbone Selection and Gblock Design.
Once you have decided upon the ‘How?’ for your inducible expression system, the next important question is ‘When?’. This will be organism specific, but for E. Coli the traditional method for measuring cell growth and selecting an induction time is an OD600 measurement. This is the “Optical Density” of the cells at a wavelength of 600 nm, a measurement that tells you how much light is blocked by the cells as they grow. This does require a spectrophotometer, which can be expensive to purchase - but is relatively easy to DIY. Alternatively you can stick your thumb in the air and induce protein production when it ‘starts to look a bit cloudy’. Just don’t expect to have the most efficient protein production rates.
Protocol: Induction of Protein Expression
Equipment: Spectrophotometer
When attempting to grow your cells up to the induction concentration, all you really care about is speed - so you should try to grow your cells at their optimal temperature with shaking to provide oxygenation. E. Coli = 37°C, ~100-200 rpm. You can significantly increase the dissolved oxygen by shaking the cells in a flask with baffles on the bottom because science (fluid interface dynamics are a deep rabbit hole that you’re welcome to explore in your own time).
However once protein production is induced, you may wish to drop the temperature to encourage slower folding of the protein. This can be important for minimising the amount of misfolded protein in the final yield, but is only necessary for more complex molecules with disulphide bonds (such as proinsulin). Shaking is still very important to ensure adequate oxygen is provided to the cells.
Cell Lysis
Once you’ve produced a useful protein within your cells, you need to extract it. Unfortunately for your host cell line, this means busting open the cellular membrane to extract the delicious protein held within. As the old saying goes, “there are many ways to skin Escherichia Coli.”
Protocols: Cell Lysis
Equipment: Bead Beater
Affinity Tag Purification
After Cell Lysis, you’re left with Cell Slurry - basically everything that was inside the cell, but now it is outside of the cell. If you used all the right enzymes during lysis, you’ve already disabled any proteins that might harm your protein of interest - but you still need to recover it from the miasma of cell gunk currently surrounding it.
This is an extremely difficult task if you didn’t include some kind of affinity tag during your Gblock Design. An ideal affinity tag is translated on the C- or N-Terminus of your protein, with some kind of cleavage tag separating it for easy removal downstream. The affinity tag binds to a specific substrate (e.g. The His-tag binds to Ni-NTA Agarose) and the rest of the gunk is washed away in a series of steps. You then add a new chemical (e.g. Imidazole for the His-Tag) to detach your protein of interest from the binding substrate into a seperate tube from the rest of the slurry. At a large scale, this process is best done with an FPLC (Fast-Protein Liquid Chromatography). An HPLC can be used for analytical purposes, but is less useful for purification.
This is a low cost, low yield protocol for the purification of proteins using a centrifuge. I have yet to find a way to cheaply build an FPLC, and the cheapest second hand one available is $20,000. These machines and the purification columns they use are still too expensive for your average self-funded scientist. Fortunately there are workarounds, which you can find here;
Protocols: Affinity Tag Purification
Car9 is provided as an alternative to His-Tag because the silica substrate used to purify this affinity tag is reportedly far cheaper than the His-Tag substrate. Ni-NTA agarose is prohibitively expensive, which may account for the price tag on some biological medicines. You may wish to consider the cost of the purification substrate during your Gblock Design.
Author’s Note: I’m currently in a debate as to whether it is possible to cleave proteins directly off the binding column, leaving the tag behind and allowing for simple purification of the protein. Please let me know if you try this and succeed!
Proteome Analysis
SDS-PAGE
Sodium Dodecyl Sulfate-Polyacrylamide Gel Electrophoresis
If you thought loading an Agarose Gel was a delicate and nerve-wracking experience, you’re really going to hate this part. SDS-PAGE is a method for quantifying proteins, measuring their size by size-based chromatography. Unlike DNA, proteins don’t have a linear negative charge - so the protein must be denatured and then wrapped in a sheath of negative ions. This is the smelliest protocol, and probably the most technically challenging. If you can regularly succeed with SDS-PAGE gels, Interns and Lab Managers alike will beg you to come do their work for them. But they won’t invite you to parties because you’ll reek of β-mercaptoethanol.
Protip: Use a denaturing agent like DTT so that you don’t smell like month-old-fish.