
GBlock Design
How to make a gene fragment that works!
Note: Gblock is a registered trademark of IDT. Check out their website!
Synthetically constructed genes come by many names, such as Gblock, Oligonucleotide or Gene Fragment. Gblocks are a double stranded sequence of DNA, constructed by a synthesis company according to your order. This has historically been extremely expensive, because phosphoramidite chemistry is an imperfect process and ordering Gblocks longer than >1kb was prohibitively expensive. As long-chain synthesis begins to dominate the market post-2020, the cost of Gblock synthesis should be within the budget of most hobbyists.
Ordering a gene to be synthetically constructed is an extremely exciting process, putting your money on the table and betting on a sequence you’ve written yourself… or carefully copy-pasted from somewhere else. This page should describe all of the critical parts that you might need to include in an ordered Gblock and tips to improve upon a design that ended up being faulty. Design, Build, Test, LEARN!
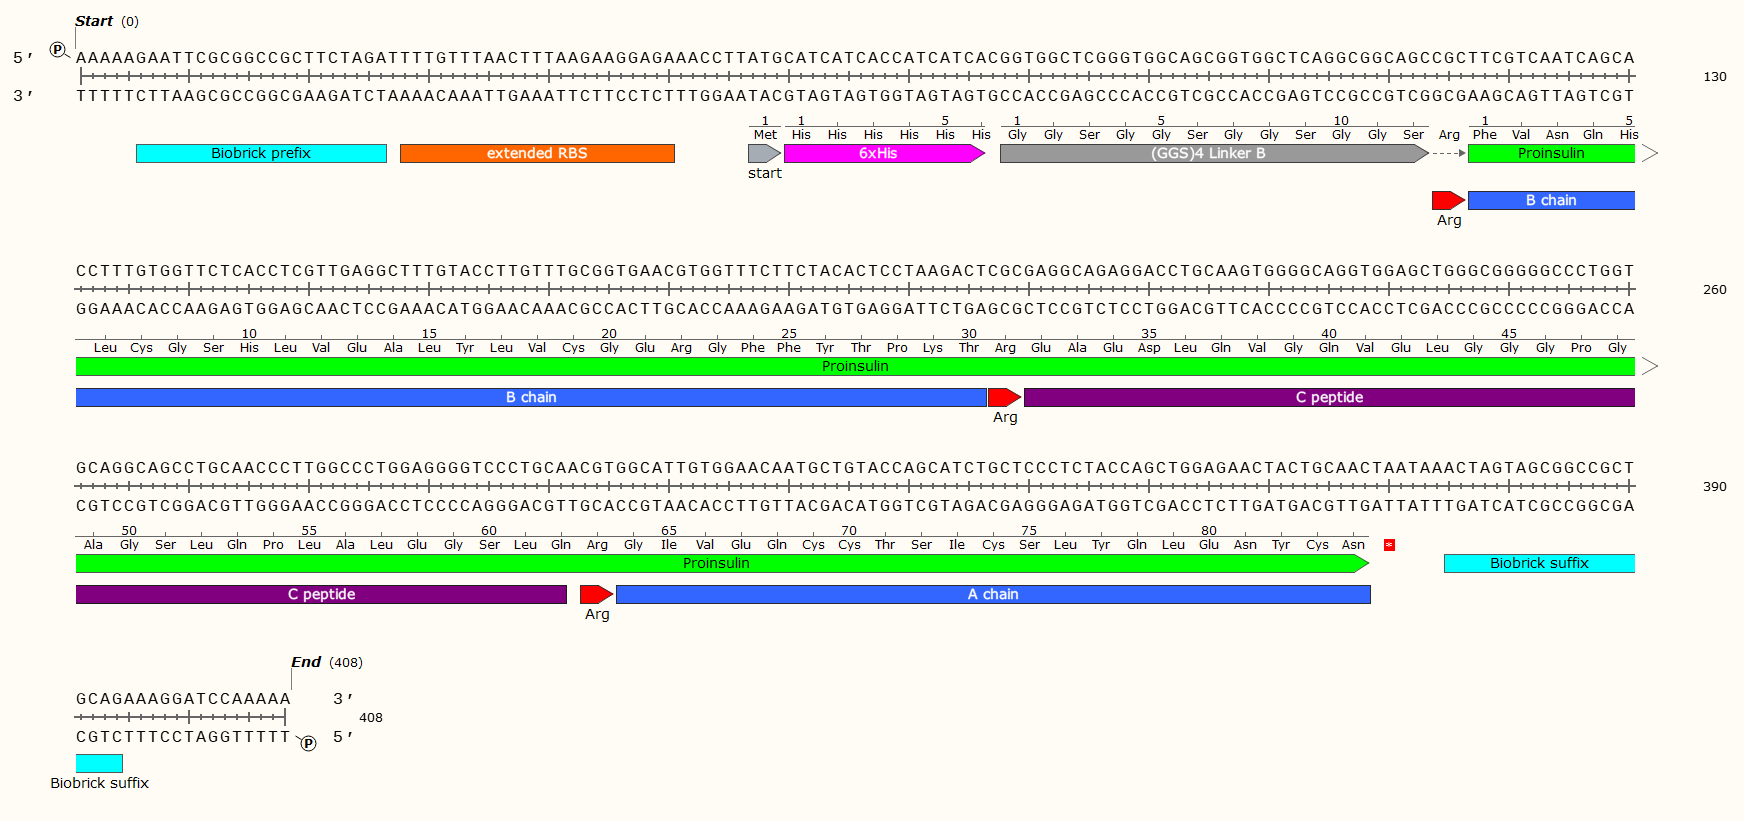
Example: A 408 bp GBlock that codes for the production of Human Proinsulin in E. Coli. Post-synthesis enzymatic cleavage of the Arginine (Arg) residues with trypsin will remove the C-peptide, leaving just the A+B chains - Human insulin. But that doesn’t matter right now! Look at all the pretty genetic parts!
Open Reading Frame
The Open Reading Frame is the region of DNA that the Ribosome will convert from mRNA into protein.
This is the region containing the gene that you’re hoping to work with (Gene of Interest). It likely codes for a protein of some kind, unless you’re working on something more esoteric, such as changing regulatory pathways.
Examples of a Gene of Interest: Insulin, Green Fluorescent Protein, Cas9, etc.
The Gene itself should contain a few essential parts;
A Start Codon at the start of the translated sequence (DNA/mRNA):
Start: ATG/AUG
This signals the start of an Open Reading Frame (ORF)
One of these Stop Codons at the end of the translated sequence (DNA/mRNA):
Amber: TAG/UAG
Opal: TGA/UGA
Ochre: (TAA/UAA)
These signal the close of an ORF
They are represented by a * on Snapgene (see image below)
Note that some of the upstream and downstream DNA may be transcribed, but not translated. These extra ends on the mRNA strand help the Ribosome to attach and start translation.

From Start Codon to the Ochre Stop Codon, this open reading frame should be transcribed and translated if inserted into the correct plasmid/genome.
Affinity Tag - If you wish to purify the protein after synthesis, you may wish to consider including a 6 x Histidine Tag or Car9 tag to allow for efficient purification. This should be inserted so that it is attached to the N- or C- Terminus of your Protein of Interest. You may wish to consider including a linker or specific cleavage region between the Tag and protein, to allow for simple removal of the tag after purification, e.g. TEV protease. Amino Acid sequences for purification;
6 x Histidine Tag: HHHHHH e.g. Nucleic Acid code; CATCATCACCATCATCAC
Car9 Tag: DSARGFKKPGKR

The Arginine is not necessary for most experiments, and may even have been a mistake here. We later replaced the Arg with a TEV protease sequence. The GGS4 Linker is a repeating sequence that will ensure the His-Tag sticks out of the molecule and can be caught on the purification matrix.
Fusion proteins - You can line up two genes one after another inside the same ORF to produce them together. This can be especially useful for visualising in-vivo protein expression. Simply fuse a green fluorescent protein upstream of your gene of interest. Note that this will noticeable decrease protein synthesis efficiency.

The addition of Ecotin and the Ecotin signal peptide commands the cell to send the protein to the periplasmic space. This is ideal since Insulin requires an oxidative environment to fold correctly.
Be sure to codon optimize everything! (read on for more info)
It can be a problem if your Gblock design contains unintended Open Reading Frames. You can use software such as Snapgene/Benchling to check for random start codons that might appear in your sequence and use your codon optimisation tools to remove them.
There are 6 possible reading Frames of any sequence of DNA, 3 forward and 3 reverse. This provides DNA code with an insane amount of complexity.
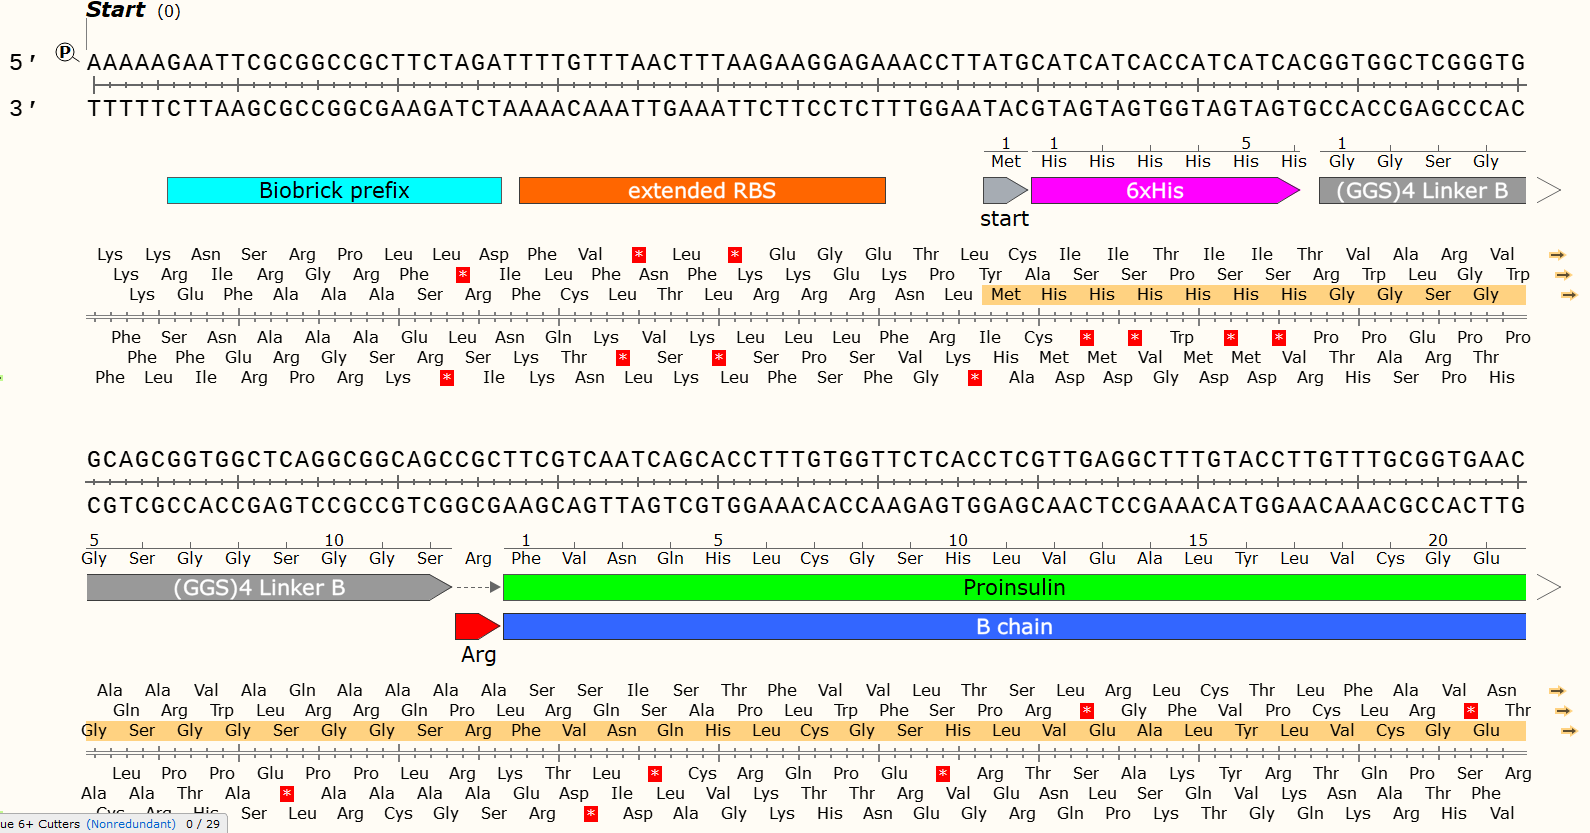
ORF highlighted in Orange. The code can only be read in one frame, in one direction - thanks to the RBS and start codon. DNA is ALWAYS read 5’ -> 3’, but can be read on either strand and therefore in both directions.
Ribosome Binding Site
As the name suggests, this is the upstream region of the transcribed mRNA that the Ribosome will bind to in order to initiate translation. RBS are particular to the world of Prokaryotes, in Eukaryotic organisms such as humans the ribosome is recruited by a special 5’ cap that is added after transcription.
The classic and most well known RBS is the Shine-Dalgarno Sequence: 5'-AGGAGG-3'
There are a variety of Ribosome Binding Sites to be found in nature and their ‘strength’ has an impact on protein production rates. You generally want to start with a ‘strong’ Ribosome Binding Site as this will help improve protein transcription.
Bacteriophage T7 Gene 10 Extended Ribosome Binding Site: 5’-TTTGTTTAACTTTAAGAAGGAGA-3’
A general rule of thumb is that the RBS should be 6-7 bp upstream of the start codon.

Promoter Sequence
The role of the promoter sequence is to initiate transcription by the RNA polymerase, thus everything downstream (in the 3’ direction from) the promoter will be converted into mRNA.
The region between the promoter and the start codon will not be converted into protein. It is known as the 5’ Untranslated region or 5’ UTR.
This is one of the parts that might already be included exterior to the multi-cloning site of your plasmid backbone. You don’t want to double up on promoters, so be certain to take existing backbone parts into consideration when working on your design.
A gap of up to 100 bp between the Promoter Sequence and the RBS will be fine, but try to keep it in the 20-50 bp range.
Terminator Sequence
The terminator sequence is encoded so that it forms a robust stem-and-loop structure that will cause the RNA polymerase to detach from the strand of DNA and release the mRNA product.
There are two broad categories of Terminator sequences, Rho-Dependent and Rho-Independent. Rho-dependent terminators are host specific so make sure that the specific rho factors are abundant in your host organism. To avoid problems here, synthetic rho-independent terminators (see e.g. iGEM rep.) can be favored.
This part may already be included in the plasmid backbone, be sure to check that you aren’t adding in an unnecessary terminator. It shouldn’t cause any issues, unlike a double promoter sequence, but it’d be embarrassing to explain to your mentors.
Prefix & Suffix
The Prefix and Suffix are a region that should be designed based upon your desired plasmid backbone and cloning protocol. The goal is to create a region that can be easily inserted into your backbone in the correct orientation.
Most plasmids will work well with iGEM’s standardised Prefix and Suffix
You need to select enzymes that don’t appear inside your Gblock (use “unique cutters” function on Snapgene)


Image source: https://parts.igem.org/Help:Assembly/Scars - Ahh, the ol’ classic iGEM plasmid. Takes me back…
Your ordered Gblock will scarlessly ligate to the backbone in the region you wish to insert it. No need to add a prefix and a suffix, except to provide space between the parts ligated adjacent to one another.
Use an online tool, such as this one provided by NEB, to design your flanking regions.
Codon optimization
While it is incredibly useful to have a universal code for translation (thankyou nature!), not all species produce the same quantity of tRNA-Amino-acid complexes. This can become a frustrating bottleneck for protein production, so performing codon optimisation allows you to change the DNA code to match the preferred codons of your chosen host organism, without affecting the end-state protein sequence.
This is best done with software, and you’ve got a range of options to choose from. Some good choices include;
Phosphorylation
Phosphorylation is the addition of phosphate groups to the 5’ ends of your Gblock. These phosphates form part of the DNA backbone after ligation. It is very useful to phosphorylate your Gblock if you plan on performing a sticky-end restriction enzyme digest, as it allows you to skip the phosphorylation step.

The -(P) represents an extra phosphate on the end of the DNA chain. Keep in mind that there are actually phosphates between all of these molecules, in the ribose-phosphate backbone.
Phosphorylation is not necessary for Gibson assembly.
Genomic Integration
Some Gblocks are prepared such that they will be genomically integrated. Unless you’ve access to a fancy delivery method such as gesicles, you’re likely going to need to ligate the Gblock into an integrative plasmid, then heat-shock the plasmid into your host.
The system of integration you choose will heavily dictate your design, but take this as a reminder to check that all the components you intend to insert into the genome are in the region that will be transferred. There is no point inserting a gene into the genome if there isn’t a nearby RBS.
Operon
If your experiment involves simple constitutive (always on) expression, you don’t need to worry about Operons.
However if you’re looking to have inducible control over protein production, you may also need to order a Gblock with an Operon Binding Sequence around the promoter.
Example Gblocks:
Have some fun playing around with these open source sequences. Original design by my 2017 iGEM team at the University of Sydney, with oversight and ultimate design decisions by Prof. Nicholas Coleman;
Design, build, test, learn
Gblock design won’t always work out the first time, and I’m here to tell you that this is okay. Synthetic biology is exciting because it employs a Design > Build > Test > Learn model, every iteration of design should be moving you closer to a successful prototype.
It’s still expensive to fund your own exploits in synthetic biology, which is why you should start by working with sequences of DNA that have already undergone this refining process. Once you’ve worked with and observed the nuances of various promoters, ribosome binding sites and genes you’ll feel comfortable risking your money on something you built yourself.
The only way you can fail the “Test” step is if you fail to Learn and Design around that failure. Persist and you will be rewarded!

Author’s Note: Gblock synthesis should be the most regulated part of the industry and should never be decentralised. Doing so poses an extreme biosecurity risk. We have a responsibility as a synthetic biology community to preempt the actions of those with ill intent. The only way to do this is by strictly monitoring the manufacture of oligos.
Acknowledgements:
https://teaching.ncl.ac.uk/bms/wiki/index.php/Rho_dependent_termination
https://www.genscript.com/gensmart-free-gene-codon-optimization.html
https://bmcbioinformatics.biomedcentral.com/articles/10.1186/s12859-015-0743-5
Pascal Schönberg - Biohacking and Genetic Design Network - Rho-Dependent Factor tip off.