
Backbone Selection
Picking the right plasmid for the job
“Backbone” is a nickname for a plasmid. A plasmid is a circular sequence of double stranded DNA. This circular nature allows for “supercoiling” - whereby the plasmid gets wrapped up really tightly, small enough that it can slip through the cellular membranes and into the cytoplasm of cells.
If you came here from the GBlock Design page, you’re likely wondering which plasmid is going to be best for your experiment. Plasmids are ubiquitous and infinitely varied in nature, so you’ve got plenty of options to choose from. However there is nothing like a well quantified and reliable plasmid with a handily placed Multi-Cloning-Site (MCS) that you’re really familiar with. It really cuts down on primer and restriction enzyme expenses.
If you want a plasmid, there’s no better place to shop around than AddGene. They charge a flat rate ($US 75) for plasmid sharing and are willing to deal with small labs that have a proven biosafety record. I also think that they have some of the most interesting and accessible educational resources available for free on their website, so be sure to explore it fully after reading this guide! AddGene traditionally ships plasmids inside living bacteria as an ‘agar stab’ which is a handy way to get a free strain of lab E. coli too. However shipping it within an organism makes it a controlled substance in some jurisdictions, so be sure to consult your national regulator before making an order!
On the other hand, dried plasmid material on blotter paper appears to be a completely uncontrolled substance by international regulators. It isn’t considered living or a GMO and can be legally shipped internationally. There appears to be a largely untraced peer-to-peer plasmid sharing community and you may be able to source plasmids from a friend without any cost.
Even narrowing down the world of plasmids to the AddGene catalogue can be a bit overwhelming, so this page will largely focus on a couple of my favourite plasmids;
Example 1; pET-15b

Example 1: pET-15b (Click image for file download - view on Snapgene/Benchling/etc)
Example 2; pUS24X

Example 2: pUS24X (Click image for file download - view on Snapgene/Benchling/etc)
Plasmid backbones aren’t the only way to insert a GBlock into a cell - but they’re certainly one of the easiest to work with. There are numerous ways to insert a Gblock into a backbone, some of which are described on other protocol pages;
Restriction Enzyme Digest and Ligation (old faithful)
Golden Gate Assembly (slightly newer old faithful)
Gibson Assembly (the shiny future of synbio)
This page will focus on the selection criteria for a good plasmid backbone, but keep in mind that your assembly protocol should also play a role in plasmid selection - especially when ensuring the MCS is a match to the Gblock Prefix and Suffix.
Backbone Features:
Origin of Replication (ori)
The origin of replication is the region of plasmid DNA that the host organism uses to determine how many copies to make during everyday life and during reproduction. The most important feature of an ori is the “Copy Number” - how many copies of the plasmid the cell will be commanded to make. This copy number will be influenced by the actual size of the plasmid/gene insert and the culturing conditions, however we can still separate origins into three broad groups;
Low Copy Number: 5-20 copies of the plasmid e.g. pSC101
Medium Copy Number: 20-100 copies of the plasmid e.g. pBBR1
High Copy Number: ~500-700 copies of the plasmid. e.g. ColE1/pMB1/pBR322/pUC
The copy number influences the quantity of plasmid, which doesn’t necessarily increase the quantity of protein produced! A high copy number is excellent for creating lots of plasmid that is easy to purify and visualise on a gel, but more plasmid material doesn’t lead to higher levels of protein expression and can possibly create a burden on the host. The promoter and regulatory systems (described below) will influence the quantity of downstream protein, but the copy number will have minimal influence.
While it is critical to think about the copy number of an origin, is not the only important feature. Traditional theory states that Origins of Replication (ori’s) compete for resources, which means that it is extremely hard to reliably maintain multiple plasmids with the same ori within the same cell. I have read plenty of anecdotal evidence that it is possible to maintain two plasmids with matching ori’s in the same cell line, at least temporarily - but you should still try to ensure that you use different ori’s if your experiment requires multiple plasmids.
Likewise, ori’s come in ‘incompatibility groups’ which will compete for replication resources. If you wish to insert multiple plasmids into the same cell line, theory recommends that you use ori’s from different incompatibility groups. I’ve always used this resource from AddGene to determine whether my ori’s are compatible;
Incompatibility Group A:
pMB1
pBR322
ColE1
puC
Incompatibility Group B:
p15A
Incompatibility Group C:
pSC101 (Note: Abysmal copy number, expert level ori)
I have read additional anecdotal evidence that you can ignore the incompatibility groups of ori’s and still succeed, but this should be investigated more thoroughly before you risk your experiment by not taking incompatibility into account. That said, overtly focussing on the compatibility group and ignoring the plasmid copy number of pSC101 is a major reason why my first CRISPR/CAS9 experiment fell into development hell.
The good news: Most of the time you’ll be performing single plasmid experiments, so you can ignore the incompatibility groups and simply ensure you get an origin of replication that suits the needs of your experiment. I tend to default to high copy number pUC type ori’s because they are so easy to work with.

Example 1: ori; high-copy-number ColE1/pMB1/pBR322/pUC origin of replication
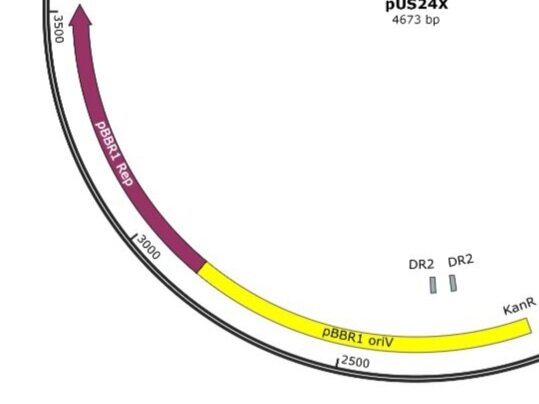
Example 2: pBBR1 oriV; replication origin of the broad-host-range plasmid pBBR1 from Bordetella bronchiseptica; requires the pBBR1 Rep protein for replication. pBBR1 Rep; replication protein for the broad-host-range plasmid pBBR1 from Bordetella bronchiseptica
Antibiotic Resistance Gene
The antibiotic resistance gene is the critical piece of code that you will use to ensure your gene is retained by the cell. The antibiotic resistance gene has two equally important functions;
Selection; After the heat-shock reaction, you will be growing your cells on media containing antibiotics. Only microorganisms that successfully took up the plasmid will be able to express the resistance genes encoded by the plasmid and survive plating. Most antibiotic resistance genes take ~1 hour to be expressed at sufficient levels for the cell to be able to survive on media containing antibiotics, which is why we allow for a 1 hour recovery step during the protocol.
Ampicillin resistance is an exception, since it’s mechanism of action (transpeptidase inhibition) occurs later in the cell cycle.
Maintenance; Once the plasmid is inside the host, you have to ensure that it stays there. If your gene of interest is significantly burdensome to the host (e.g. forcing the cell to produce heaps of glowing protein), it will have an evolutionary tendency to reject the plasmid and ‘spit it out’. By inserting an antibiotic resistance gene on the same plasmid as your gene of interest and growing the plasmid on antibiotic media, you force continued maintenance of the plasmid at the correct copy number across multiple generations.
An important implication of this; growing a plasmid-containing cell line on non-antibiotic media may cause the loss of plasmid material after a few generations.
Antibiotic resistance genes used for lab experiments come from a pool of defunct antibiotics that no longer provide effective medical treatment because resistance is widespread in the global population. This implies that you can encounter contamination even on well made agar plates - but I find it is rare. You can find out more info about mixing antibiotic stock solutions on this protocol page.

Example 1: AmpR; Resistance to Ampicillin conveyed by β-lactamase gene

Example 2: NeoR/KanR; Resistance to Neomycin & Kanamycin conveyed by aminoglycoside phosphotransferase gene from Tn5.
Multi-Cloning Site (MCS)
The MCS is a useful tool for assembly protocols that rely on specific sequences existing in a specific location, especially the restriction enzyme digest and ligation protocols. It is a short sequence of DNA that contains multiple restriction enzyme binding sites. Using plasmids with standardised MCSs allows you to save on restriction enzyme costs and means that you can standardise the prefix and suffix used in your Gblock design.
Golden Gate Assembly and Gibson Assembly involve the creation of bespoke flanking regions and don’t necessarily require a specific MCS. However an MCS won’t cause any issues and can be useful for providing some space in the sequence for primer design.
You don’t need to insert your Gblock between the two MCSs, but it is generally recommended to do so when starting out. Inserting a gene between the MCSs of a well understood plasmid allows you to minimise the number of potential variables that might prevent your experiment from succeeding.
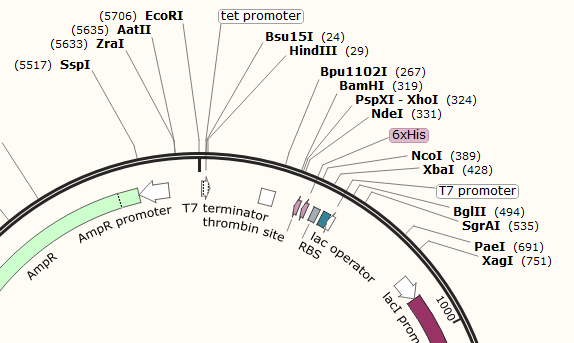
The two MCS in pET-15b are not marked as features, but can be seen between the EcoRI-HindIII (MCS1) sites and between the BamHI-XbaI (MCS2) sites. The advantage of spread out MCS such as this is that you can decide which parts of the backbone to use and which to replace with your Gblock. For example an XhoI-HinIII digest will use the full T7 induction system, while an XbaI-EcoRI digest will allow you to replace the T7 induction system with something constitutive (always on) as well as introducing a new RBS.

MCS1 and MCS2 are clearly placed so that any Gblock insertion will replace the blue (amilCP) protein in the correct orientation. This provides a useful visual screen of potentially successful assemblies. This system is less flexible and requires the use of the upstream cumate operon after assembly.
Promoter and Terminator
The role of the promoter and terminator sequences is to encourage the plasmid host’s RNA polymerase to successfully perform transcription. Both are necessary for any successful protein expression experiment.
The role of the promoter sequence is to initiate transcription by the RNA polymerase, everything downstream of (in the 3’ direction from) the promoter will be converted into mRNA.
The region between the promoter and the start codon will not be converted into protein. It is known as the 5’ Untranslated region or 5’ UTR.
The region between the stop codon and the end of the terminator sequence is also transcribed yet untranslated, known as the 3’ UTR.
The terminator sequence is encoded so that it forms a robust stem-and-loop structure that will cause the RNA polymerase to detach from the strand of DNA and release the mRNA product.
Focus on the promoter and terminator surrounding the two MCS, these are the ones you must design around. You should decide whether you wish to use the existing promoter and terminator on your plasmid, or cut them out and replace them in your Gblock Design.
With both of these plasmids, it is highly recommended to use the existing promoter and terminator set - since they’ve been designed to work with the specific protein induction system. While it would be possible to excise them and replace them with new sequences, it would probably be easier to just buy a new plasmid fit for the task.
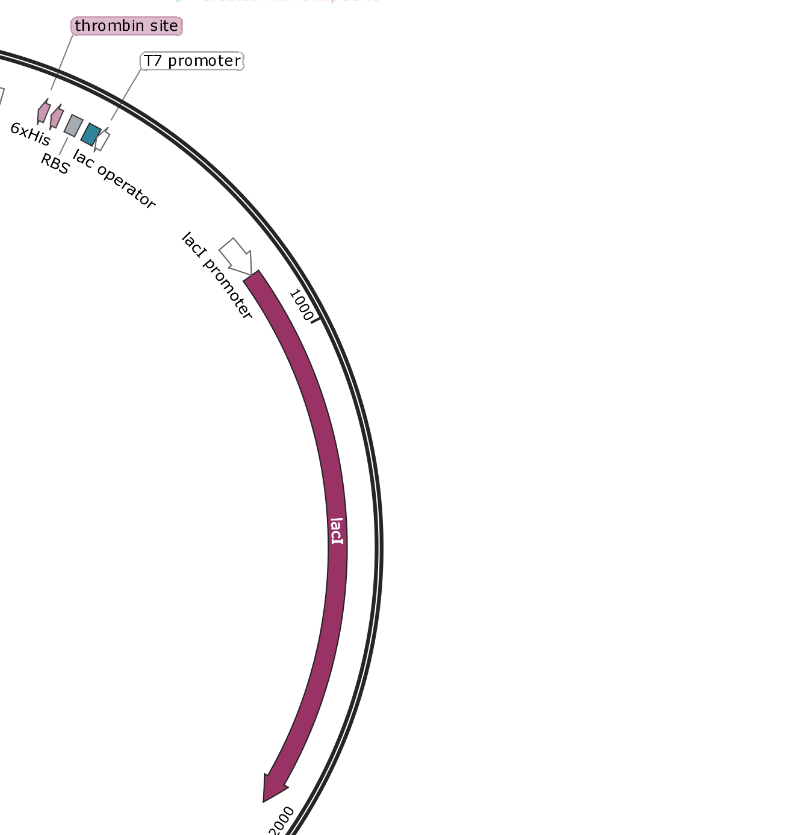
pET-15b - T7 Promoter and T7 Terminator - These are part of the T7 Operon system, which uses lacZ induction by IPTG to drive protein expression. It is an older system that has some leaky expression.
If you wished to use this plasmid backbone for a task that did not involve T7 induction, it would be recommended to cut around the promoter and terminator to insert your own.
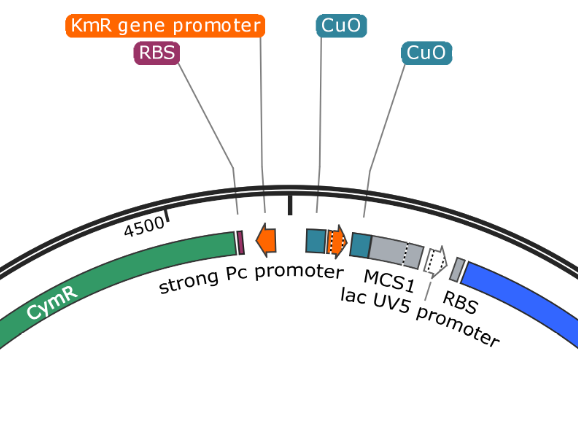
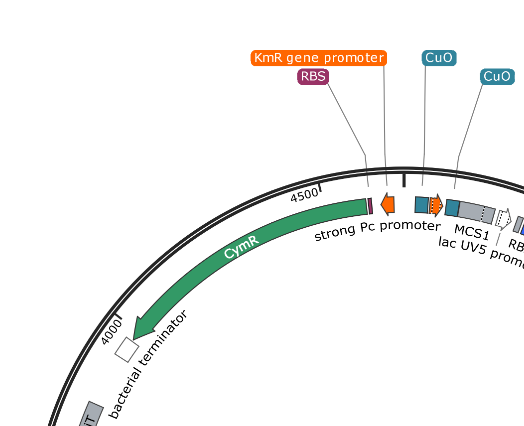
pUS24X - Strong PC Promoter and His Operon Terminator - This promoter and terminator set is more generic, but the placement is very specific. The Strong PC promoter is between the two Cumate Repressor binding sequences, which will mean that it will be unable to function until cumate is added.
Note that there is a second promoter and RBS inside (lac UV5 promoter) that ends with the same terminator. This is the blue protein that is constitutively expressed when nothing has been inserted into the plasmid. The clever nesting design by Mark Somerville will mean that this promoter and RBS is removed when something is inserted between the two MCS and the cumate controlled promoter will take over.
Also note that the terminator

pET-15b promoters: The AmpR and lacI promoters have no surrounding regulatory genes and are always on. The T7 promoter is followed by the lac operator and may not work based upon the folding of the DNA around that sequence. If there is no Lactose/IPTG present, it will not be able to function. This promoter is rather specific to the T7 system and may not function separated from its regulatory framework.
pUS24X promoters: The strong PC promoter occurs twice in pUS24X, however the CymR promoter is constitutive and unaffected by any regulatory genes. The other promoter is between the Cumate Operon Binding Sites and will only function if these sites are not chelated (bonded) by cumate.

pET1-15b Terminators: The T7 Terminator is rather specific like its promoter. While it may work perfectly should you attempt to repurpose pET15b, it should probably be kept with the rest of the T7 system. There are some useful restriction sites on either side of the terminator that allows for some flexibility. While every transcribed gene on the plasmid should have a promoter and terminator, not everyone remembers to annotate properly. As such there are a couple of unannotated terminators on the pET-15b plasmid, perhaps you could try track them down using BLAST!

pUS24X Terminator This terminator is rather cleverly designed to work for the existing constitutive expression of the blue protein and to act as a terminator for your gene of interest after insertion. AND it is acting as the terminator for the antibiotic resistance gene that is running in the opposite direction. Brilliant!
Regulatory Genes
When teaching bacteria to produce proteins using plasmids, we are generally interested in two forms of expression;
Constitutive: Always on, the protein is continuously made until the cell runs out of resources or dies from the workload.
This is relatively easy as you just need an appropriate promoter, terminator, start and stop codon to make it all work.
The issue is that forcing a cell to constantly make a foreign protein may not be good for its health.
Selecting moderately weak promoters for constitutive expression may actually improve yield
The lacUV5 promoter in the pUS24X protein is an example of constitutive expression. Without any modifications, this plasmid will cause the host to always turn blue from the protein it is told to produce. With modifications, the promoter and sequence for production of the blue protein will be removed, allowing for naked eye screening.
Inducible: Can be switched on/off by the addition of a chemical signal.
This is an excellent way to produce an extremely large volume of protein very quickly. Inducible expression allows you to grow your cells to a large volume, then command them all to simultaneously switch from growth to production of your protein of interest.
To do this, we can employ regulatory tools at various stages…
Inducible Regulation generally occurs at the level of Transcription and/or Translation. There are exceptions, but let’s focus on these two for now:
Transcription - Transcription regulation in prokaryotes generally involves inhibiting the capacity of the RNA polymerase to bind. This is most often done by the creation of a chelating agent that will bend the promoter/start codon DNA around itself - cutting off the polymerases’ access or bumping it off the strand. Both plasmid examples contain an example of Inducible Transcription-Level regulation.
pET-15b - T7 Induction System - Based upon the lac operon, this system involves the constitutive expression of the lac repressor protein. This protein binds tightly to the 25 bp lac-operator-sequence, effectively rendering the surrounding DNA inaccessible to any polymerase. When lactose (or IPTG) is added, it successfully competes with the operator sequence for the repressor. This allows the DNA to unwind and the RNA polymerase can get to work.
pUS24X - Cumate Operon - This is a very similar system that provides even tighter control over expression, possibly because the Cumate Operon binding sequences flank both sides of the strong PC promoter. The Cumate Repressor tightly binds to the CuO (repressor binding sequence) and prevents access to the promoter.
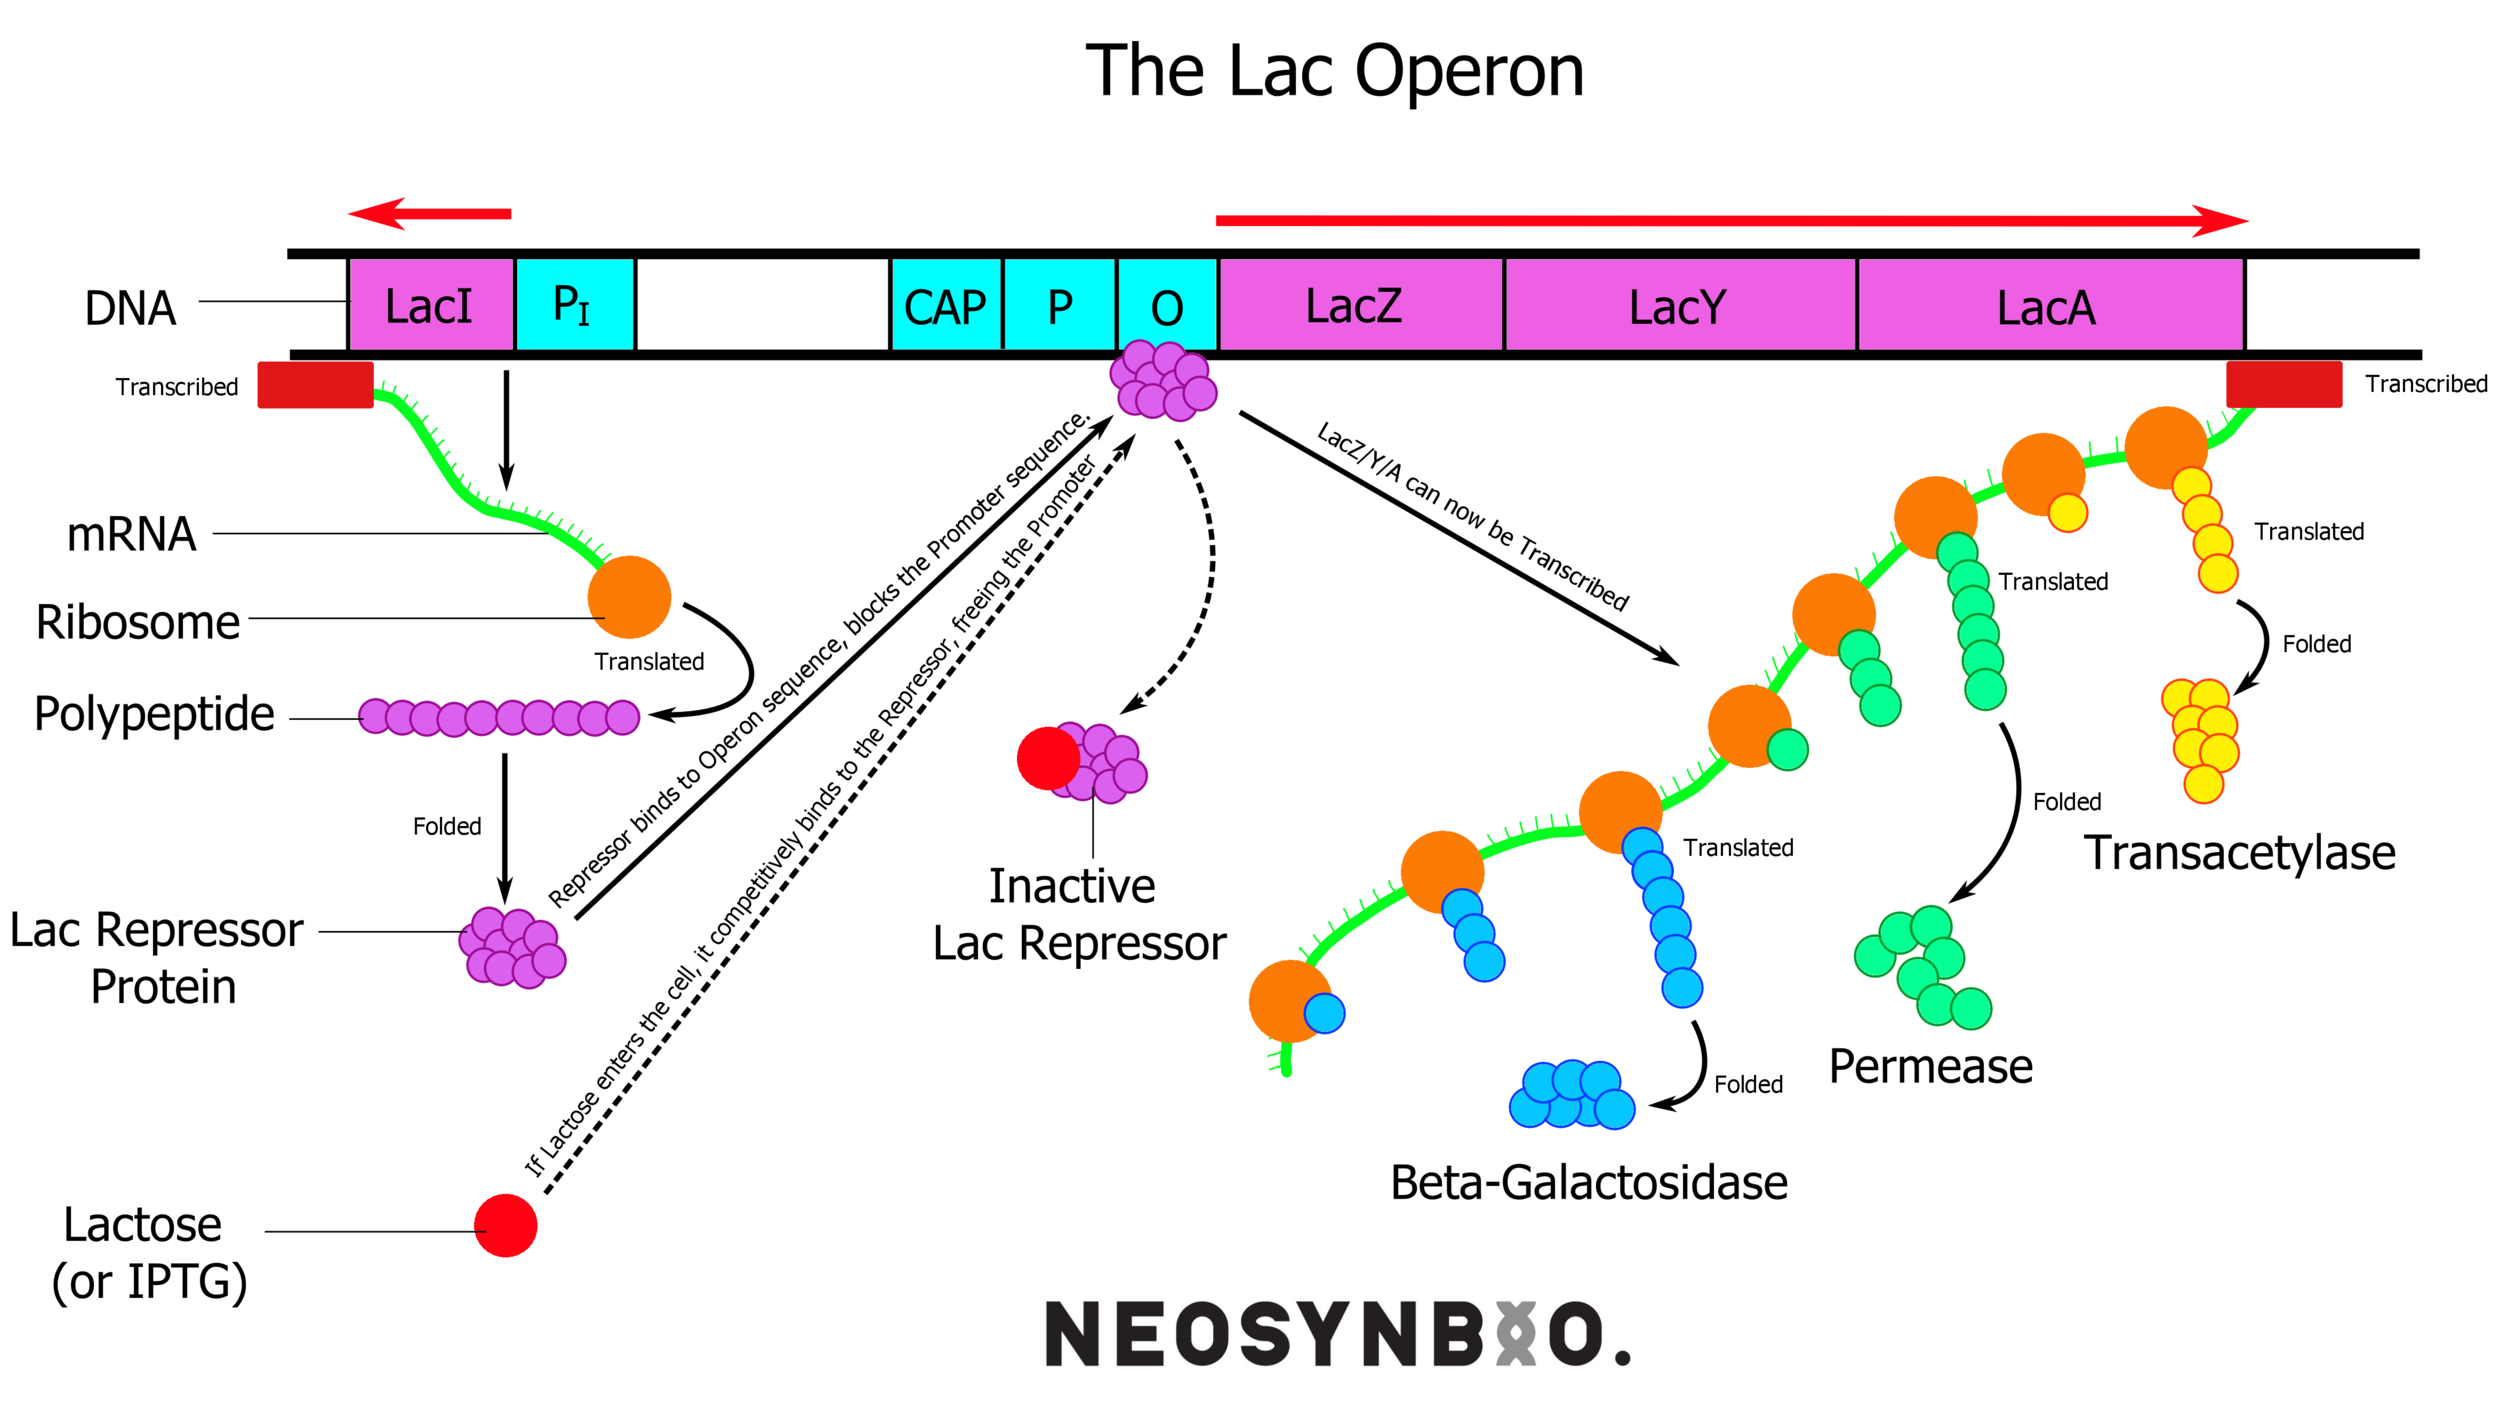
lacI (lac repressor) is always on, and binds to the lac operator. Lactose/IPTG compete for binding and free up the promoter for the RNA polymerase to bind.
The CymR (cumate repressor) is always on and binds to the CuO (Cumate Operon Binding Sequence) sites, potentially forming a hairpin structure, but certainly blocking the promoter from functioning. The addition of Cumate (Cumic Acid)
Translation - Translation Regulation generally involves controlling the level of production of specific proteins, rather than the binding of DNA. Think of this as taking a step further back in the regulation system, regulating the regulators. It is more advanced but allows for extremely interesting design possibilities;
Repressor Inhibition - If we were to replace the constitutive promoters of the repressor proteins with a second inducible promoter, we could control the production of the repressor protein. By switching off production of the repressor protein, you effectively cancel the effect of the T7 or Cumate induction systems, turning them constitutive. This creates some very interesting design implications. I’ll eventually be writing a page on Genetic Logic Gates and will hyperlink it here if I remember. Remind me if I don’t! Until then, you can read more here;
Transactivator Protein Induction - According to the original paper, the Cumate Operon has a second possible function that I must admit even I find hard to understand. To quote; “In the transactivator configuration, a chimaeric transactivator (cTA) protein, formed by the fusion of CymR with the activation domain of VP16, is able to activate transcription when bound to multiple copies of CuO, placed upstream of the CMV minimal promoter. Cumate addition abrogates DNA binding and therefore transactivation by cTA.”
In short, you can reverse the function of the Cumate operon by producing cTA, which is itself a fusion protein with the existing repressor.
This is a remarkably adaptable system, but I think I’ll stick to using it as a standard translation level induction system.
Codon Optimisation
You may find yourself in a situation where you wish to switch the host species of a plasmid. This can be expensive and has a low chance of success, but if you do so - be sure to codon optimise the plasmid! Not all species produce the same quantity of tRNA-Amino-acid complexes. This can become a frustrating bottleneck for protein production, so performing codon optimisation allows you to change the DNA code to match the preferred codons of your chosen host organism, without affecting the end-state protein sequence.
You will also likely need to replace the origin of replication since this is the predominant factor that determines whether the host will reproduce the plasmid across generations.
Codon optimisation is best done with software, and you’ve got a range of options to choose from. Some good choices include;
Integrative Plasmids
Some plasmids can be used to integrate a gene into the genome of the host, inserting the gene and being removed rather than sitting around as an intergenerational DNA appendix. Some legal jurisdictions may consider this a different form of genetic modification since it is less transient, but this will vary country to country.
One example of a well documented integrative plasmid is pPIC9K, an integrative plasmid for the yeast Pichia Pastoris. Check out this resource by invitrogen for more information!
You can also check out the open-source information about pUS248 secretory expression on our 2017 igem website. Unfortunately this plasmid is under IP protection and so I can’t share any specific examples.
Plasmids on an Agarose Gel
Plasmids can supercoil, which means that they run strangely on an agarose gel. You can generally expect 2-3 bands on an agarose gel run from a plasmid miniprep.
Most of the time, the fastest moving band will be the supercoiled DNA, The slower moving band the relaxed DNA. Two bands for plasmid DNA is perfect.
A third band, moving slower still will appear as the DNA slowly degrades, made up of ‘nicked’ DNA.
Incubating too long during the plasmid miniprep may permanently denature your DNA, causing the apparition of a cursed fourth, rapidly moving band of circular, single-stranded DNA. Reduce the reaction time of the lysis step during your miniprep if this band appears.
