
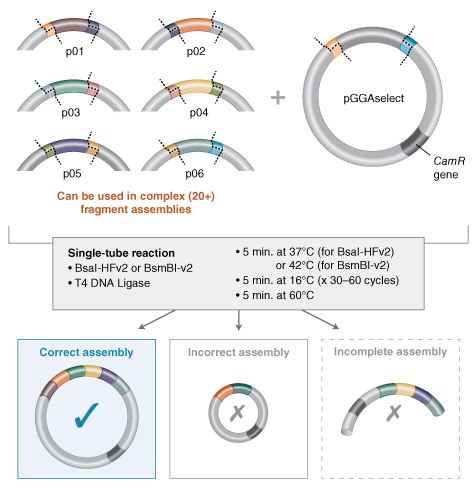
Golden Gate Assembly
Design Considerations:
Developing the correct overhangs for Golden Gate assembly can be very tricky without software. NEB have a Golden Gate assembly tool that can help facilitate your design.
Equipment & Consumables:
Nanodrop or yield results from Agarose Electrophoresis
Insert Fragment PCR Reaction(s)
Golden Gate Assembly mix (or) Enzymes/Buffers required for Golden Gate Assembly;
T4 DNA Ligase Buffer (extremely heat sensitive, will not survive multiple heat/thaw cycles, be sure to aliquot into separate tubes before use)
T4 DNA Ligase (extremely heat sensitive)
BsaI-HFv2 (relatively heat sensitive)
Chemically Competent Cells (DH5α or similar transformation strain)
Sterile LB-Agar-Antibiotic Plates, corresponding to the resistance gene you’re working with
Heat Block (42°C & 50°C)
Can use thermal cycler at a single temperature instead.
Ice in Ice Box
Protocol:
Set up the following reaction mix on ice:
X µl DNA Insert PCR reactions (150 ng of DNA each or 2:1 molar ratio, insert:plasmid)
1 µl (~75 ng) Vector/Plasmid/Backbone
Or Golden Gate kit pGGA destination plasmid
1 µl Golden Assembly Master Mix
Use 2 µl for assemblies of > 10 inserts.
If you’re using enzymes instead of master mix:
Insert + Plasmid (2:1 molar ratio)
2.5 µl T4 DNA Ligase Buffer (extremely heat sensitive, will not survive multiple heat/thaw cycles)
0.5 µl T4 DNA Ligase (extremely heat sensitive)
1.5 µl BsaI-HFv2 (relatively heat sensitive)
Make up to 20 µl of dH2O
20 - X - 2 dH2O
Mix gently by pipetting up and down. Tap on the bench or briefly centrifuge (1 sec) to ensure no bubbles in the reaction mixture.
Transfer the reaction tube(s) to a thermal cycler and run the following program:
(5 min 37°C → 5 min 16°C) x 30 cycles
5 min 60°C
If you’re running overnight, add a Hold at 4°C. The next morning, briefly heat the reaction to 60°C before proceeding.
Tactical Nap Opportunity
Add 2 µl assembly reaction to 50 µl thawed chemically competent cells and allow to sit on ice for 15-30 minutes.
Make sure you include a positive and negative control (2 µl uncut plasmid, 10 µl dH2O)
Take your esky of ice over to the 42°C waterbath or 42°C heat block. Put tubes in a floatie (or) hold in the water bath (or) push tubes into the slots of the heat block. Allow 45 seconds for heat shock. (Plus or minus 10 seconds, this needs to be exact!). Then transfer the cells straight back onto ice (embed into ice, as above, don’t just rest on top).
Allow transformation mixtures to sit for 2 min on ice, then add 1 ml sterile LB broth to each tube. You can also use more fancy media (e.g. SOC or SOB), but there is not that much difference.
Incubate on 37°C shaker for 1 hour. Put the tubes horizontal so they get good shaking action. eg. put the tubes laying flat on the shaker platform and masking-tape into place. Make sure the lids are tight! You can incubate without shaking, and you can incubate for less time (30 min), but it won’t work as well in these cases.
The role of this ‘recovery’ step is to allow the cells to create the proteins required for antibiotic resistance.
Recovery is not necessary for Ampicillin resistance plasmids. Proceed to plating.
Label the LB-antibiotic plates before starting the next bit; you need two plates for each ligation condition or plasmid type, since we will plate out two different cell concentrations of each to ensure we get countable/pickable numbers of colonies. Double check the plates to ensure you are using the correct type of antibiotic(s) for the type of plasmid(s) you are using.
Pipette 100 µl of the first cell suspension onto one LB-antibiotic plate (label ‘100 µl’ in addition to other info) and spread it over the plate using the glass rod (liquid > solid) Sterile Technique.
Spread 100 µl of the remaining samples, each onto a separate, appropriately-labelled plate.
Centrifuge all the tubes at ~15,000 rpm for 1 minute in a micro-centrifuge. Pour off most of the supernatant into culture waste (being careful not to touch the tubes on the edge of the culture waste bottle). Leave a little bit of liquid behind (about one or two drops).
The purpose of this spin and second plating is to ensure you avoid getting too few colonies or a confluent lawn when you check your plates tomorrow.
Vortex the cells in the remaining liquid for about 10 seconds, until they are not sticking to tube anymore, and you have a nice smooth, even, cell suspension.
Pipette the cells from the first cell suspension onto the appropriate pre-labelled LB-antibiotic plate (label with ‘pellet’ in addition to other info), spread plate as above. Repeat for the remaining samples and controls.
Incubate all plates at 37°C overnight. Note that for some plasmids and ligations, it may be beneficial to instead try room temp for 2-3 days – this lowers the copy number of pUC type plasmids, and is useful to allow retrieval of clones that might be toxic to the host.
If you get nice discrete colonies on your target plate and nothing suspicious on your positive and negative control plates, you can proceed to the Confirmation of Edits protocols.
Positive control should have many colonies/a confluent lawn of growth.
Negative control should have no growth.
Check Ligation Troubleshooting for more advice on rectifying unpredicted results on control plates.
Acknowledgements: