
Agarose Gel Electrophoresis
I hope you really like gels, otherwise you chose the wrong industry…
Equipment and Consumables:
P2 or P20 Micropipettes and Tips
DC Power Supply capable of between 50-300V + Red & Black cables
Heat Resistant Gloves
I find standard gardening gloves to be excellent.
Transilluminator (with wavelength corresponding to your intercalating dye adsorption spectrum)
Agarose
One of either TBE/TAE/LAB Buffer Stock solution
TBE: 20X stock = 1.78 M Tris base, 1.78 M boric acid, 40 mM EDTA (adjust to pH 8)
LAB: 25X stock = 250 mM lithium acetate, 250 mM boric acid
TAE: 20X stock = 800 mM TRIS base, 400 mM acetate, 20 mM EDTA (adjust to pH 8)
One of either 0.5x TBE Buffer Solution or 1 x LAB Buffer Solution or 1 x TAE Buffer Solution
0.5 x TBE buffer, and 1% agarose will be fine. However, if you are trying to separate very small DNAs (<500 bp), you can increase up to 2% agarose, and if you are trying to separate large DNAs (>5 kb), you can decrease down to 0.7% agarose. Using 1 x TAE instead of 0.5 x TBE will also allow better resolution of large DNAs. If you need to cut out DNA from the gel for cloning or sequencing, you need to use 1 x TAE instead of 0.5 x TBE (borate interferes with later enzyme reactions). More info below.
Newbies: Just use 1 x TAE solution as it is the safest and easiest to mix.
100 bp DNA Ladder (and/or) 1 kb DNA Ladder (as appropriate for your samples)
Samples you want to run on the gel, e.g. PCR Reaction
Sample Loading Dye;
6x Purple Loading Dye
Bromophenol Blue
Xylene Cyanol
Cresol Red
Parafilm
Intercalating DNA Staining Dye
Ethidium Bromide (EtBr) - Possible Carcinogen, if you’re using EtBr common practise states you should keep all work to a certain area of the lab and sacrifice any equipment used to be “EtBr Equipment”, up to and including the pipettes.
Thiazole Orange - Safe and cheap alternative for EtBr!
GelGreen - Safe but expensive alternative!
GelRed - Safe but expensive alternative!
SYBR Safe/Green - Safe but expensive alternative!
Post Stain Solution: 10 µL of conc. dye in 100 mL RO water.
More info Below.
Ice in ice box
Post-Stain: Rocking Table, Plastic Tray capable of holding gel and Aluminium foil
Protocol:
Start by using the number of samples and wells available in your gel electrophoresis chamber to write down a “Load Order” of samples. Remember to leave the first (and possibly last) lane free for your DNA ladder.
Example 6 Lane Load Order:
1: 1 kb Ladder
2: pET15b Plasmid Uncut
3: pet15b Plasmid XhoI Digest
4: pet15b Plasmid BamHI Digest
5: pet15b Plasmid XhoI + BamHI Digest
6: 912 bp PCR of gene insert
Decide what agarose concentration and running buffer are appropriate to maximise band resolution. For many gels, 0.5 x TBE buffer, and 1% agarose will be fine. However, if you are trying to separate very small DNAs (<500 bp), you can increase up to 2% agarose, and if you are trying to separate large DNAs (>5 kb), you can decrease down to 0.7% agarose. Using 1 x TAE instead of 0.5 x TBE will also allow better resolution of large DNAs. If you need to cut out DNA from the gel for cloning or sequencing, you need to use 1 x TAE instead of 0.5 x TBE (borate interferes with later enzyme reactions).
The size of your casting tray will dictate the amount of buffer to add to the conical flask in step 5. Then just use a w/v % calculation to determine how much agarose to add.
e.g. For a 50 ml 1% gel, Dissolve 0.5 grams of agarose in 50 ml TAE.
e.g. For a 70 ml 2% Gel, Dissolve 1.4 grams of agarose in 50 ml TAE.
Decide whether you need extremely accurate band-sizing or not. If you do not, (most of the time) you can put the detection dye (GelGreen, EtBr) into the gel, aka. Pre-Staining. Use steps marked as such. If you do need high accuracy, instead skip these steps and perform the Post-staining steps . (see later sub-section on buffer and staining options for gel electrophoresis)
Set up your gel-casting tray, this may involve using masking-tape on the ends of the tray, or placing in the plastic end-formers if you have a fancy tray. Place the well-former (comb) such that it is level and straight, and sitting ~2 mm above the base of the gel forming unit. It is crucial that the well formers are NOT TOUCHING the casting tray – in that case, your wells will have holes in the bottom and you will lose your samples. See picture:
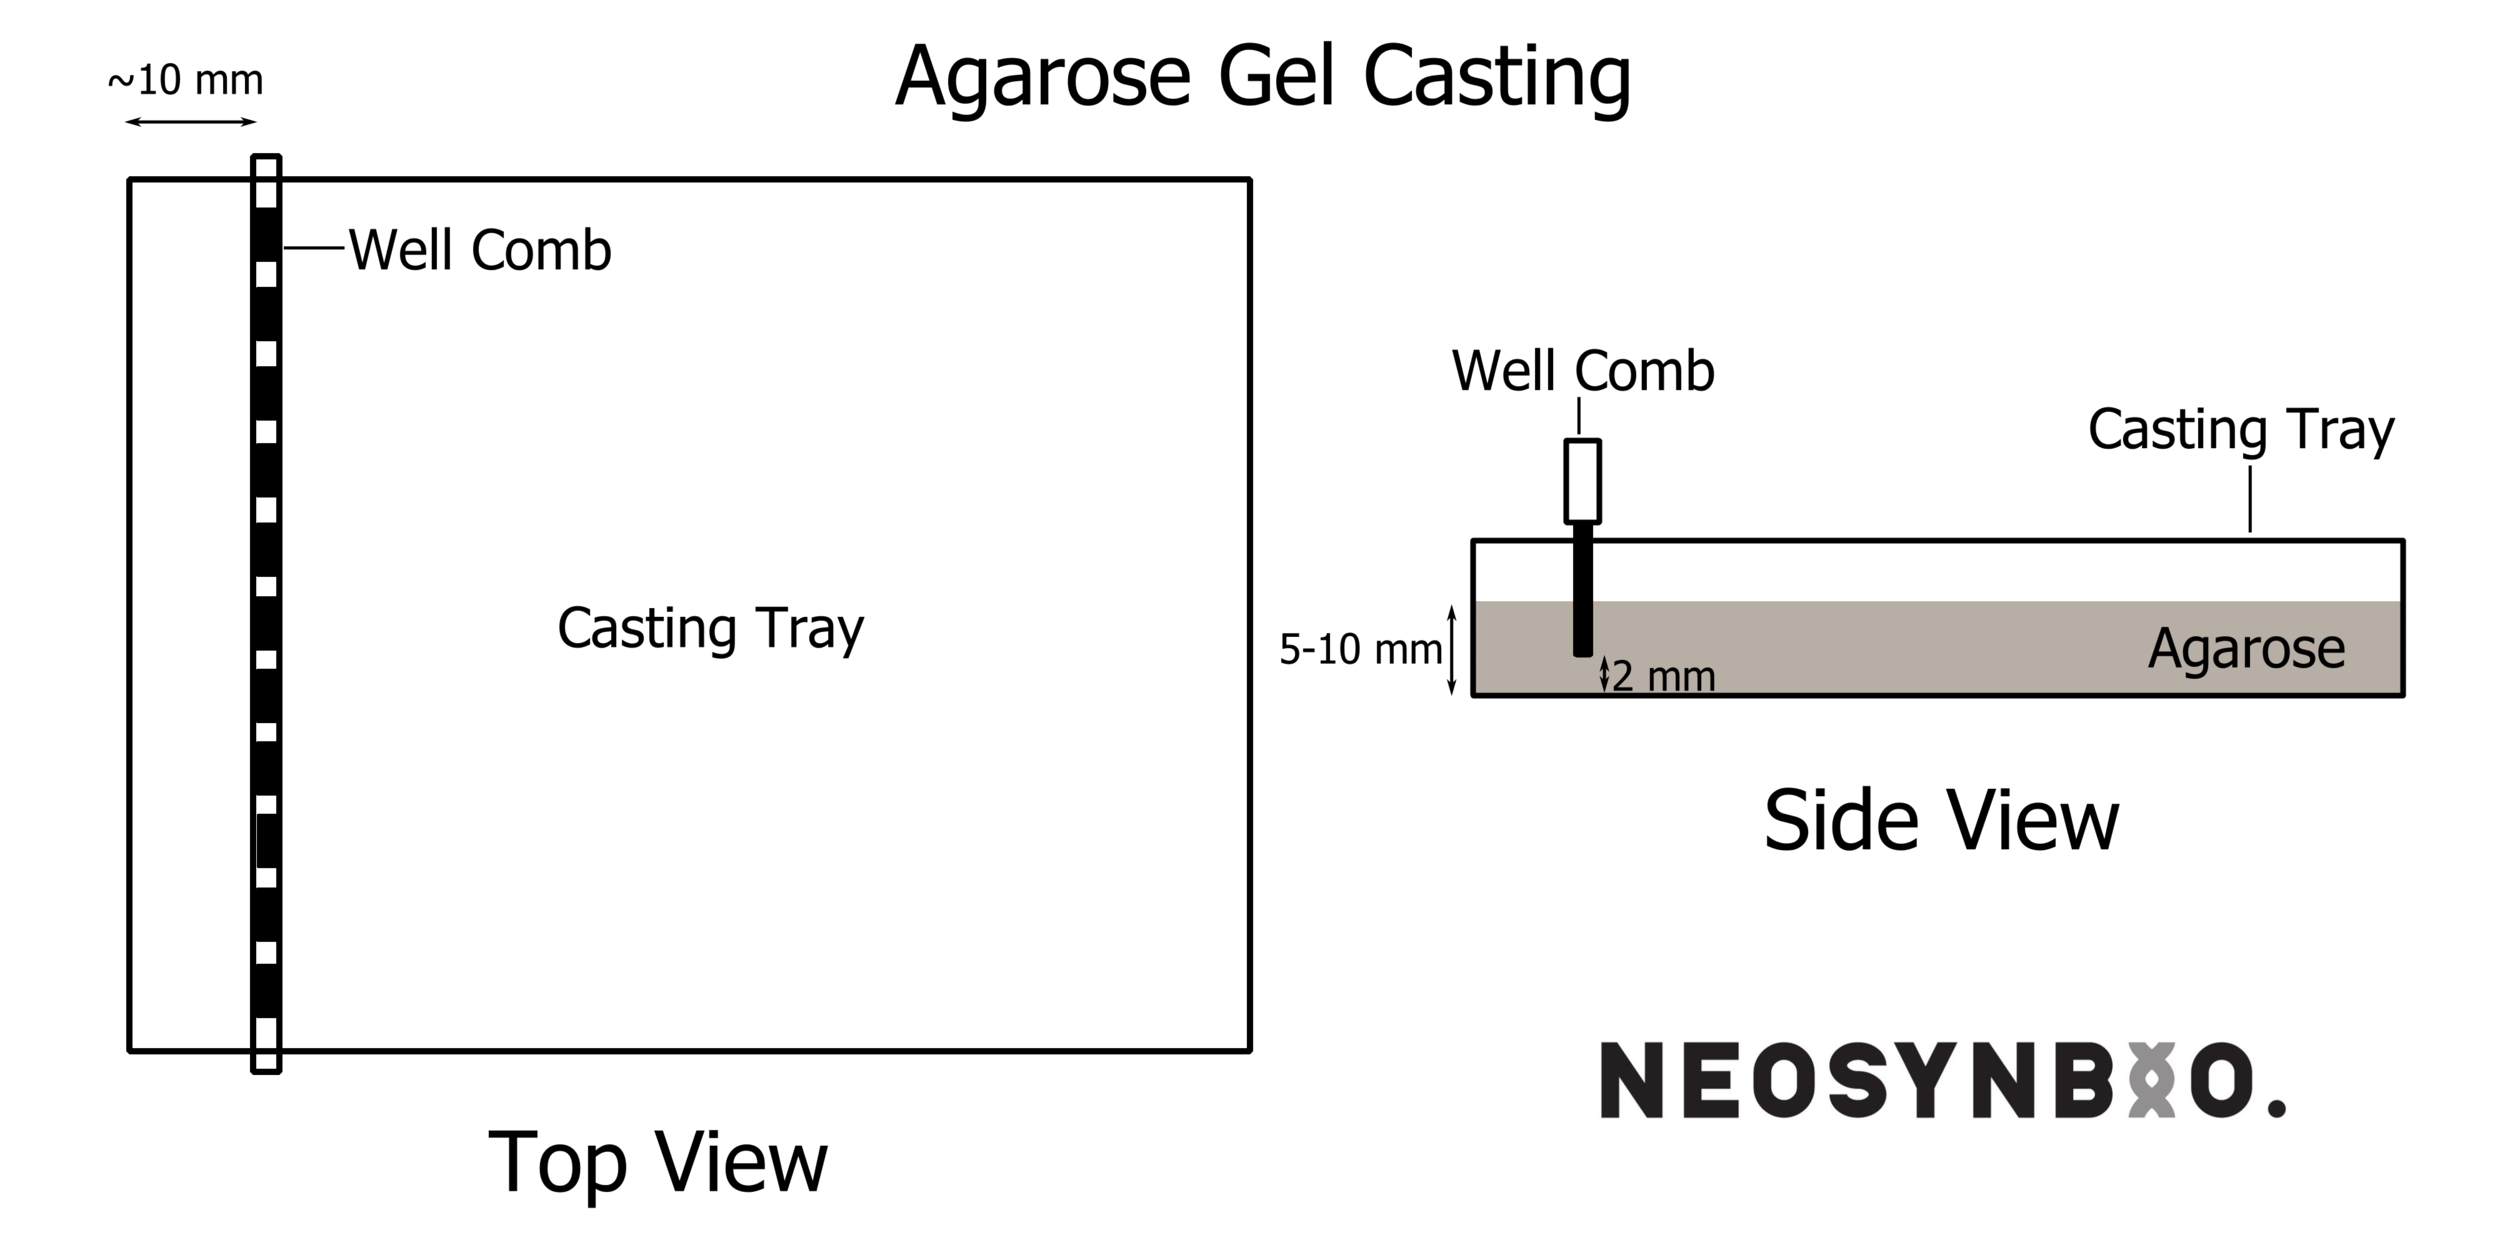
5. Weigh out the appropriate amount of agarose powder (NOT AGAR!) for the correct % agarose gel that you calculated in step 2 into a small, clean, dry conical flask, then pour in the appropriate volume of TBE or TAE buffer. Stir gently, ensuring no agarose is stuck on the edges, then put in microwave, and heat on high for 1 minute.
6. Put on heat resistant gloves, then take out to examine whether all the agarose is dissolved. If the solution is still cloudy, replace for another 30 sec on high power, and repeat examination and heating until all dissolved.
Be very cautious of overboiling! The surface tension of agarose can lead to violent eruptions of molten agarose. Heat resistant gloves are a necessity, don’t put your face near the conical flask opening
7. Pre-Stain: While the agarose is nice and fluid, add an appropriate amount of your intercalating staining dye to the gel and gently swirl the conical flask to mix it thoroughly.
If you do not have instructions on the specific dilution of your dye, may need to figure out the correct amount by trial and error. Too much will lead to a lot of background fluorescence during imaging and too little will result in your samples not showing up.
If you’re using EtBr here, you should use full PPE
8. (if using plastic end-formers): using a p-1000 pipette, pipette a thin line of agarose along the bottom edge of the end-formers, where they meet the base of the casting tray – the aim is to seal this crack through which agarose can potentially leak out. Allow 30 sec or so for this agarose seal to set.
9. Pour the molten agarose into the casting tray. Use a single smooth motion, don’t stop and start. Stop when the agarose is 3/4 of the height of the ‘teeth’ on the well-forming comb. Or alternatively, stop when you judge the wells are deep enough to hold the amount of sample that you need to load.
What you DON’T want to do is over-fill the agarose so that it goes over the teeth – this will result in a channel that connects all the wells, and subsequent cross-contamination of the samples.
Thinner gels provide better images, however the wells are shallow and can contain less sample.
10. Allow the gel to set, this takes about 15 minutes. You can use this time to arrange your samples in the ice box according to your load order, quickly defrosting the DNA ladder in your hands before leaving it on ice.
11. When gel is set, pour a little of the appropriate buffer (TBE or TAE) over the top, then carefully pull out the well formers (straight up, don’t yank them side to side or forwards and back). The reason for the buffer is to stop the wells collapsing on themselves (this can happen with thin wells at lower % agarose). Then pull out the end-formers or take off the masking tape.
12. Fill the gel tank up with the appropriate buffer so that it fills the reservoirs on both sides of the gel, and so that it *just* covers the gel (by 1-2 mm).
13. Prepare a row of spots of loading buffer on a Parafilm strip, of appropriate volume and number. The NEB Purple loading buffers are 6x conc, so e.g. you will need 2 µl spots if you are loading 10 µl samples.
You can mix the dye directly into your samples if this gel is your final step and you do not wish to use them again.
15. Mix your DNA ladder with first blue spot by pipetting up and down (avoiding any bubbles) and then load the entire volume of the spot into the first well. Steady the pipette tip with the finger of your non-pipetting hand to ensure accurate dispensing. The tip needs to be just inside the well, don’t push it all the way down in the well. Change tips, mix up the next sample with blue dye, and load again. Repeat for all samples according to your written load order. If you make a loading mistake, take note of this on the load order.
The role of the loading dye is to track the movement of the DNA in the gel AND to weigh it down so that it sinks into the well. This is why it is important to ensure it is mixed well with the sample before loading.
16. Put the lid on the gel box, check that the terminals are connected correctly (negative terminal should be closest to the wells, positive terminal is far from the wells, ie. Run towards Red). Run the gel at ~50 volts up to ~300 V, depending on the buffer system and gel size (see later section for more detail). Check that you have current (non-zero milliamps), and gas bubbles at the electrodes (in clear tanks). If not, check all the wire connections. Running the gels at lower voltages generally gives better resolution of bands (maybe! depends also on other factors).
100V is a good starting point
Amps will be relative based upon voltage and resistance through the gel and buffer. If your amps are very low, you may need to replace your buffer.
17. Stop the gel when the fast-running blue dye (bromophenol blue) (= usually the only blue dye) is near the end of the gel (this may take 10-120 min depending on gel size and voltage). You may need to run longer to get good separation of large products (>5 kb). Run for a shorter time for small products (<500 bp), or they may run off gel.
18. Pre-Stain: If you added intercalating dye to the gel before pouring, it is now ready to image on the transilluminator. Follow machine specific instructions and take an image while illuminating at a wavelength that corresponds to the emission spectrum of your chosen dye. Otherwise, follow post-stain procedure.
19. Post-Stain: Add gel to 100 ml of post-stain solution to plastic tray, gently slip your gel into the solution and then cover the tray with foil. Stain gel on rocking platform or orbital shaker (gentle shaking!) for 30-60 min or overnight. This staining solution can be reused a few times. Keep the post-stain solution covered in foil and keep in a closed plastic box so it doesn’t evaporate.
Quantification via Illumination & Photography
tl;dr: How to snap great gel pics.
Gene Extraction
Agarose electrophoresis is not just useful for quantification, it is actually an excellent purification tool. If you want to perform either protocol, it is critical to not damage the DNA you are trying to extract by exposing it to UV light. You will need to follow the instructions in the illumination & photography protocols to pick an intercalating DNA dye that can be imaged in the visible spectrum - ideally on a blue light transilluminator.

A 35 cycle PCR of two insulin genes that I was excited to try purify…
100bp Ladder (Lane 1) is extremely faint in ambient light. GelGreen on an IORODEO blue light transilluminator.
Gel Slicing protocol (Blue Light Transilluminator:
Take a sharp and clean razor blade and cut away the excess agarose around your gene of interest.
Trying to minimise the amount of agarose in the slice, careful excise your bright band from the gel.
Using gloves hands, squish the gel slice into a microcentrifuge tube and label accordingly.
Proceed to either:
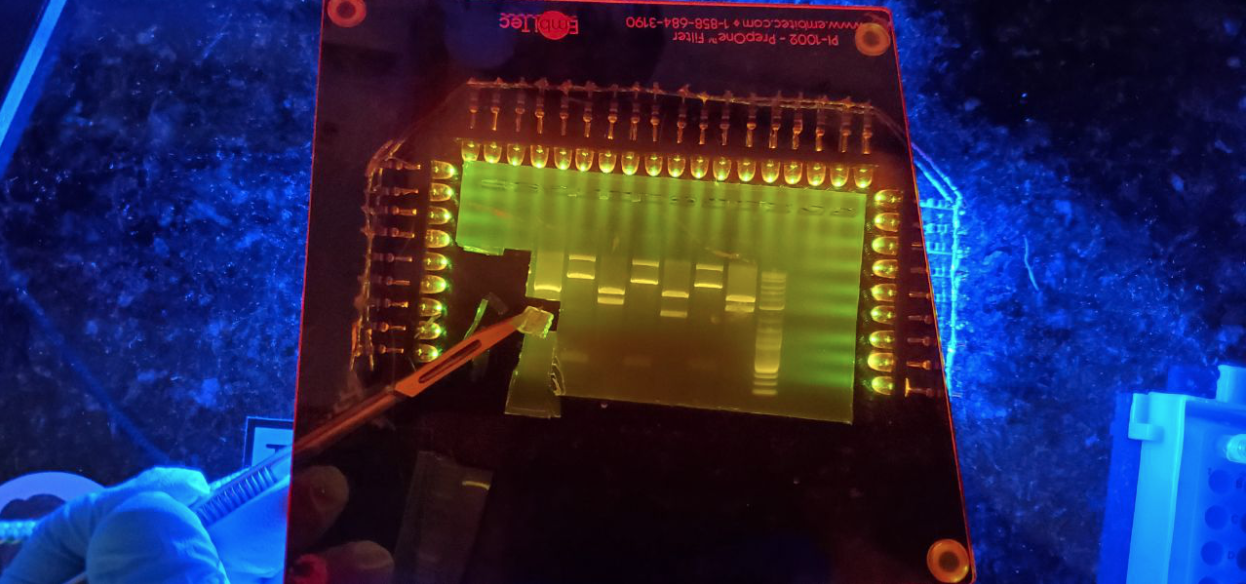
Image Credit: Sebastian S. Cocobia as he works on his Infinite Discovery Machine: https://docs.google.com/document/d/10Y4NgXjMRvG_Vd5D4o2lPJp1ehY2R516gpfrh2PZWfw/edit
GEL Slicing PROTOCoL (UV Transilluminator Only)
If you only have UV dyes or a UV transilluminator and can’t perform the above easy protocol, Coleman labs have a clever workaround that ensures you catch your gene without having to expose the gene itself to the UV light. This protocol requires you to be able to run very even gels.

Test strip of Agarose Gel
Run one lane with a small amount of the sample (e.g. 5 µl; ‘test lane’), then leave a space, then load the rest of the lanes with the remaining sample (e.g. 6 x 50 µl).
After the gel has run (and stained), slice off the ‘test lane’ and view on the UV transilluminator.
Do not expose the DNA that you want to use for cloning to UV light! Only expose the test lane.
If this is a really old fashioned one, you might be able to switch it on while open - if you take this risk, be sure to wear full PPE and a facemask! UV is very dangerous for your eyes.
Once visualised, turn off the lamp and try to make a make a notch in the test strip of agarose corresponding to your position and width of your band of interest (see pic for an example)
Check it again in the transilluminator to ensure your notch is in the correct place. If it isn’t, make a second notch, using your first as a rangefinder. You should get it this time.
Line up test gel slice with main part of gel, cut out across the other lanes in line with your notch.
Cut Vertically to separate each lane and then add the gel slices to labelled tubes.
Proceed to either;
There are two ways to approach the purification of a gene from your gel slice;
Using the really nasty chemical buffer QG
(standard industrial approach)
or
Using Cotton Wool & a centrifuge
(MacGyver method)
Reagent Optimisation:
The following are some Buffer and staining options for agarose gel electrophoresis. This is not a complete list, but rather recommendations for purpose from Coleman Labs:
"One size fits all" protocol. Use 1% Agarose gel made in TBE (0.5x). Add 1μL of a dilute GelGreen stock per 10mL of gel while gel is molten (after cooling to pouring temperature ~50°C). Use TBE (0.5x) as the running buffer. Run at 150-180V (small tanks) or 200-250V (large tanks).
"Time is of the essence" protocol. Use 1% Agarose gel made in LAB (1x). Add 1μL of a dilute GelGreen stock per 10mL of gel while gel is molten (after cooling to ~50°C). Use LAB (1x) as the running buffer. Run at 250V. WARNING! this gel will be done in ~15 min.
"Higher-resolution required" protocol (DNA sizes >1.5 kb). Use 0.8% Agarose gel made in TAE (1x). Add 1μL of dilute GelGreen stock per 10mL of gel while gel is molten (after cooling to pouring temperature ~50°C). Use TAE (1x) as the running buffer. Run at <100V
"Higher-resolution required" protocol (DNA sizes <1.5 kb). Use 1.5-2% Agarose gel made in TBE (0.5x). Add 1μL of dilute GelGreen stock per 10mL of gel while gel is molten (after cooling to ~50 °C). Use TBE (0.5x) as the running buffer. Run at 150V (small tanks) or 200V (large tanks).
"Nice gel for publication" protocol. Use either of the above high-resolution protocols, but don’t add GelGreen in the gel OR loading buffer. Instead, after the gel has run, add it to 100 ml of post-stain solution. Stain gel on rocking platform or orbital shaker (gentle shaking!) for 30-60 min. This staining solution can be reused a few times. Keep the post-stain solution covered in foil and keep in closed plastic box so it doesn’t evaporate.
Notes on recycling buffers: Its OK to recycle TBE or LAB buffers quite a few times, but its important to use the same *batch* of buffer for both gel and tank buffer e.g. don’t use fresh buffer for gel and recycled buffer for the tank. Don’t recycle TAE – the acetate component is lost after the gel is run.
Notes on loading buffers: For all samples, use loading buffer that has GelGreen added to it (1 uL GelGreen per 1 ml loading buffer) – this pre-loading with dye helps to prevent the faster-running DNA bands from ‘sweeping up’ all the GelGreen in the agarose. For restriction digests, use loading buffer that has SDS added (purple lid for NEB buffer). For all other DNA samples, use loading buffer with no SDS (white lid for NEB buffer).
Pre stained No-SDS loading dye: 1µL gel green stock concentrated stock per mL of loading dye (purple capped tube for NEB reagent)
Pre stained SDS loading dye for digest samples: 1µL gel green stock concentrated stock per mL of loading dye (white capped tube for NEB reagent)
Dilute Gel Green stock: 1µL Gel Green in 50µL RO water.
Post Stain Solution: 10 µL of conc. GelGreen dye in 100 mL RO water.
Acknowledgements:
Coleman Protocols 2017 + 2019 http://coleman-lab.org/