
Gel Illumination & Photography
So you’ve run an experiment, loaded your product onto an agarose gel, performed electrophoresis and now you want to look at the results.
It is a well kept secret just how critical the illumination and photography process is to obtaining and interpreting your results in synthetic biology. Most labs default to spending an awful amount of money on equipment and software to expedite this process, if you have such a machine - please go read the online manual to learn how to use it. If the money is already invested, you may as well use it.
However the most beautiful gel images I’ve seen come from a man who built all his equipment himself. I’m yet to replicate his results completely, but the above hyperlink leads to his lab notebook that contains every step of his journey. Most of my lessons on illumination & photography were originally taught to me by Sebastian.
Imaging at the Right Wavelength
The wavelength that you image your sample at is based entirely upon which intercalating dye you chose to use. You want to illuminate at the peak excitation wavelength of your dye and then filter as much of that light out without interfering with the emission wavelength. For UV light, it’s almost impossible to get specific wavelength LEDs, so you’ll likely have to resort to broader wavelength fluorescent tubes - remember to use appropriate safety equipment if you do so.
Here are some examples of how to use the excitation and emission spectra of Intercalating DNA dyes to determine the optimal way to illuminate;
Ethidium bromide (Etbr)

The OG DNA stain, now out of fashion because it’s just a bit too carcinogenic for most labs.
Peak excitation around 300 nm
Image with UV and an orange filter

thiazole orange
Previously used mostly for RNA staining, TO actually is an excellent DNA stain.
Excitation peak: 514 nm
Emission peak 533 nm
Image with a green light, no filter

sybr green
One of the commercial ‘safe dyes’ that utilises a larger molecule to prevent cell entry and possible carcinogenicity. Other examples include GelRed and GelGreen.
Excitation peak: 497 nm and a second peak at 254 nm
Emission peak: 520 nm
Image with cyan light or UV with a green filter
Transillumination vs. Cisillumination
Should the bulbs go under the gel or run alongside the gel? Most commercial machines are ‘transilluminators’ which is a reliable system, albeit with a few drawbacks. Some cameras will capture the outline of the bulbs underneath the gel, and the transparency of the imaging platform will deteriorate over time - resulting in a shadow behind your gels.
Sebastian’s solution to this was to make a gel tray that illuminates gels from the side, a cisilluminator. This results in less light diffusion to the middle of the gel, but gives outstanding clarity of bands while solving the above challenges.

https://iorodeo.com/products/mini-led-transilluminator
This was the first transilluminator that I ever bought and it can give surprisingly clear results (even in ambient light) without breaking the bank.

https://docs.google.com/document/d/10Y4NgXjMRvG_Vd5D4o2lPJp1ehY2R516gpfrh2PZWfw/edit
I built according to the specifications in the Open Lab Notebook by Sebastian - but with the wrong wavelength of bulbs, wasting a huge amount of time! Don’t be me!
UV Light Enclosure
If you’re planning to image with UV light and don’t have access to a commercial machine - you’ll need to employ sufficient safety precautions to avoid exposure to your eyes or skin.
Commercial machines won’t even turn the UV light on if the imaging tray is slightly ajar.
Find yourself a pair of polarised glasses, or even better a facemask. Wear a long sleeved lab coat and gloves.
Build a UV safe enclosure (most materials will work) that has a slot that your smartphone can cover. I’ve included the model for the one I built.


TFW someone buys you polarised glasses and your eyes are finally safe.

My DIY UV imaging enclosure ft. smartphone camera.
DIY Imaging Enclosure: Parasolid File, STL File
Photography
Living in the age of the smartphone, I’ve not been impressed by the standard of camera that I’ve found in transilluminators. This is more likely due to the fact that most of my equipment has been second-hand - upcycled from what universities have considered trash.
Nonetheless, Sebastian clearly proves that you can get publication quality gel images from a smartphone camera. This is a little like comparing apples and oranges, since I don’t have a good photo of the same gel taken with both systems... but here is a comparison of an XRS+ Camera (from the BioRad Chemidoc) vs. a smartphone camera image.

This is an old gel image from when I used to use a Chemidoc XRS+ to image my gels. This is probably the best image I ever got from that old machine.

I’ve left in the bulbs for effect, Sebastian normally crops them out. Nonetheless, you can clearly see absolutely everything you need to on this gorgeous gel.
Regardless of how good contemporary commercial systems are, it’s hard to go wrong with a smartphone camera. You may even want to try ripping the old camera out of a second hand imaging dock and see if you can get better pictures with your iPhone.
Filters

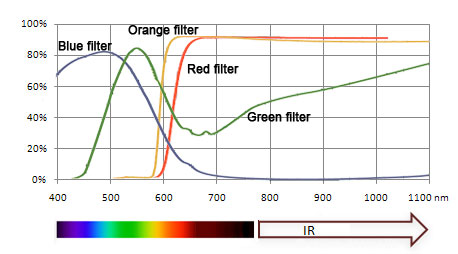
Another extremely important component of the imaging system is the filter. An ideal gel image will have all of the unnecessary background light filtered out - in order to enhance the clarity of your DNA bands. You want to block out light from the excitation wavelength, while allowing light from the emission wavelength to pass through. Use this chart as a handy guide.
Pre-Stain vs. Post-Stain
Pre-staining involves adding the intercalating dye to the molten agarose prior to pouring. It is a preferable method for everyday lab screening as it takes less time and gives accurate results.
Post-staining involves soaking the gel in dilute intercalating dye overnight after electrophoresis. It is a preferable method for obtaining the perfect gel image for publication as the bands tend to be crisper and tighter when post-stained.
Acknowledgements
https://docs.google.com/document/d/10Y4NgXjMRvG_Vd5D4o2lPJp1ehY2R516gpfrh2PZWfw/edit
https://www.vision-doctor.com/images/stories/filter/farbfilter/Spectrum_multiple_color_filters.jpg
https://onlinelibrary.wiley.com/doi/pdf/10.1002/cyto.a.22065
https://commons.wikimedia.org/wiki/File:SYBR_Green_I_spectra.png