
Restriction Digest Analysis
So you’ve screened a bunch of colonies and found one that you’re almost certain is perfect. Time to perform a large miniprep or midiprep and digest that plasmid to see if it cuts into bands of the expected size.
Notes from Nick: When making recombinant clones, we need to have several lines of evidence that the new plasmid has the correct structure. It is not sufficient to rely solely on the junction PCRs. For example, if the same insert has been cloned twice (head to tail) into the vector, of if there is a deletion in the middle of the insert DNA, the junction PCRs will look fine, but the overall structure will be wrong. Doing digests of the new plasmid provides another line of evidence for the correct structure, and also it allows us to quantitate the plasmid accurately, which is usually needed in any case for further work.
Selecting the right restriction enzyme(s) for your experiment
Here is an example of how you might simulate your gel before actually running it. It’s good practise to pre-register your hypothesis, no matter what area of science! https://slideplayer.com/slide/4567991/
Use software such as Snapgene or Benchling to examine your plasmid for restriction enzyme sites.
If you don’t own any restriction enzymes and want to save money, try focus on the enzymes that cut twice - that way you only need to purchase one enzyme!
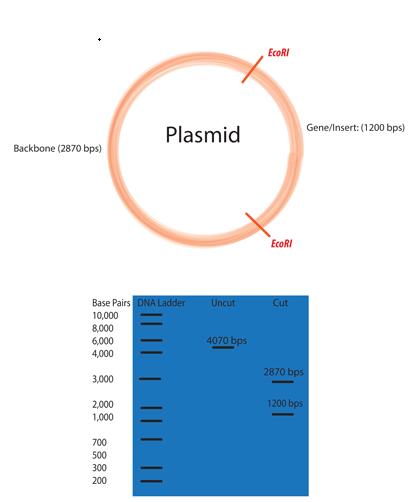
Ideally the plasmid will be cut twice. 3-4 cuts is okay, but any more than that will quickly become confusing.
One cut should be within the original plasmid backbone
One cut should be within the inserted gene fragment.
The two fragments produced by cutting the plasmid twice should be of significantly different size to make them easy to distinguish on an agarose gel. Producing two identical sized fragments will not help you much.
Ensure that you simulate an agarose gel to pre-register your hypothesis on the size of the bands produced by your digest.
You can use software or just a pen and paper to do this.
Equipment and Consumables:
100 ml sterile LB Media in sterile culture flask
50ml Falcon Tubes
Microcentrifuge Tubes
Shaking Incubator
Large centrifuge capable of spinning 50 ml tubes
Weighing scale
Oven or Heat Block at 60°C
Buffer P1 Resuspension Buffer
Buffer P2 Lysis Buffer
Buffer N3 Neutralisation Buffer
Buffer PB Wash Buffer 1
Buffer PE Wash Buffer 2
TE (or) EB (or) Water Elution Buffer
Heat Block or Incubator at 37°C
Vortex
Restriction Enzyme #1 (and #2)
These are often extremely heat sensitive. They will be in glycerol stock and thus do not need hand thawing. Move immediately from the freezer to the ice box.
Appropriate Restriction Enzyme Buffer
Powerpack capable of between 50-300V DC Power Supply
Red + Black cables
Gel Casting Tray
Gel Well Comb
Gel Electrophoresis Bath
Conical Flask
Heat Resistant Gloves
Transilluminator (with wavelength corresponding to your intercalating dye adsorption spectrum)
Agarose
One of either TBE/TAE/LAB Buffer Stock solution
One of either 0.5x TBE Buffer Solution or 1 x LAB Buffer Solution or 1 x TAE Buffer Solution
100 bp DNA Ladder
1 kb DNA Ladder
Sample Loading Dye
Parafilm
Intercalating DNA Staining Dye
Post-Stain: Rocking Table, Plastic Tray capable of holding gel and Aluminium foil
Ice in an ice box
Miniprep of Target Plasmid
DAY 1: INOCULATION
Using the plasmid map as a guide add 100 µl of the appropriate antibiotic to your 100 ml of sterile LB media.
Set up a sterile workspace.
Flame your inoculating loop and use sterile technique to transfer the colony confirmed by the Colony PCRs to the flask.
Leave the lid loose enough for air transfer, then incubate at 37 degrees with shaking 8-16 hrs or overnight.
DAY 2: MINIPREP
Pellet cells in two 50 ml Falcon tubes by centrifuging at max speed for 5 minutes. You can balanace the centrifuge by adding sterile RO water to the lighter sample.
Pour off the supernatants.
Resuspend pelleted bacterial cells in 250 μl Buffer P1 Resuspension Buffer by vortexing or by using your micropipette to disturb the cell pellet. Transfer all of the suspension to a microcentrifuge tube.
Return the tube of P1 to the fridge as soon as you're done - it contains RNAse which will slowly denature at RT.
Equip yourself with a lab-coat and gloves if you haven't already and consider wearing goggles. The next few buffers range from mild to extremely toxic, consult the buffer mixing guides to learn more.
Add 250 μL Buffer P2 Lysis Buffer to each tube and invert gently 8-10 times. Incubate the tubes on the bench for 10 minutes.
Note; no vigorous shaking from here onward, you will shear your plasmid DNA.
Add 350 μL Buffer N3 Neutralisation Buffer to each tube and invert gently 8-10 times.
You should see a thick precipitate form, white if you are not using indicator. If you are using indicator dye, keep inverting until all traces of blue disappear.Centrifuge for 10 min at 13,000 rpm (~17,900 x g) in a table-top microcentrifuge. A compact white pellet will form.
Always be extremely careful to balance your centrifuge before spinning.
If your centrifuge can't go this fast the pellet will not be very compact, but you can overcome this with careful pipetting in the next step.
While you wait, assemble your silica spin columns and capture tubes. Label them carefully to match their corresponding tubes (currently spinning in the centrifuge). Also label a fresh set of 1.5 ml centrifuge tubes with the same label - these will be the tubes we eventually elute our DNA into for storage in the freezer.
Once the spin finishes, line all the tubes up in your tray to minimise the risk of pipetting errors.Carefully remove the supernatant without disturbing the white pellet of cell debris and decant it into the top of the silica spin column.
You can throw out the tubes containing the white precipitate, all your plasmid DNA is in the supernatant.
Centrifuge the silica spin columns in their capture tubes for 60 s at max speed.
If you notice some of the liquid hasn't passed through the silica then your max speed may be a bit low. Compensate by spinning for longer.
Optional: You can repeat this plasmid capture step step to improve yield. .Open the centrifuge and one-by-one remove the silica column + capture tube, pick up the flow-through in the capture tube with your pipette and add it back into the top of the spin column. Don't worry about it falling through the silica and onto the bench, it won't. Respin the tube 60s, max speed, to push the plasmid DNA through the silica filter a second time, potentially doubling the amount captured.
Discard the flow through into your miniprep waste container, it should not go with other liquid waste. Remember to follow proper disposal protocols.
Your plasmid DNA should now be bound to the silica column.
Wash the silica spin column by adding 500 μl Buffer PB Wash Buffer 1 and centrifuging for 60 s. Discard the flow-through into miniprep waste.
Wash the silica spin column by adding 750 μl Buffer PE Wash Buffer 2 and centrifuging for 60 s. Discard the flow-through into miniprep waste.
Centrifuge silica columns at full speed for an additional 1 min to remove residual wash buffer.
Remove silica columns from their capture tubes and place on a kimwipe and into 50°C Oven for 15-30 minutes
Alternatively place the columns into fresh capture tubes and leave in a heat block at 60°C for 15-30 minutes
Place the silica spin column in the clean 1.5 ml microcentrifuge tube that you labelled earlier. To elute DNA, add 30-50 μl Water/EB Elution Buffer to the center of each silica spin column, let stand for 1 min, and centrifuge at max speed for 1 min.
Don’t use TE! It contains EDTA which will inhibit your enzyme during the next step!
Keep an eye on the lids of the tubes when you place them in the centrifuge since they will be hanging loose. If they're going to slap into the walls of the centrifuge, snip them off with a pair of scissors and label a fresh set of tubes to move your elution into after the centrifuge step.
Less volume of Elution Buffer will result in a higher concentration of plasmid DNA. If you can’t see bands on the gel, perhaps you could try reducing your elution volume.
If you’re noticing significant volume loss at this stage, consider increasing the length or speed of the spin.
Optional: As with the capture spin, you can repeat this elution step with the same volume of liquid to potentially increase your yield. Using a micropipette, extract the eluted Plasmid DNA and place it back onto the spin column , let it stand for 1 min, then centrifuge at max speed for 1 min.
Dispose of the spin column, then fasten the lid on your microcentrifuge tube. Double check the label before storing at -20°C or proceeding to restriction enzyme digest
You should still store the left-over plasmid at -20°C at the end of the day, you won’t use much!
A really clean purification of Plasmid DNA in TE that is stored at -20°C can last for more than a decade.
The EDTA in TE will inhibit any enzymatic reactions however, so consider using EB or Water if you plan on using any enzymatic reactions downstream. The purified plasmid DNA will still last multiple years before degrading.
Restriction Enzyme Digest
Calculate how much volume of plasmid you need to use to get 250 ng – call this ‘X’, and calculate how much water to add to the digest, call this ‘Y’; that is Y = (100 – 10 – 2 – X).
If you have no way to quantify your plasmid, start with X = 5 μL
Retrieve 10x restriction buffer from freezer, thaw completely, and vortex to mix. The same tube of buffer can be used many times, if you are careful with your aseptic technique.
Retrieve the plasmid from the freezer, allow to thaw, (e.g. in 37°C water bath, or rub in your hands, or on bench etc), then put it on ice when it is thawed. If you just purified your plasmid using the above miniprep, it’s already thawed and on ice!
Retrieve the restriction enzyme(s) from the freezer, put IMMEDIATELY on ice. These are heat-sensitive and you need to look after them. Do not leave them at room temp. Keep on ice while setting up the reaction, then immediately put back in freezer. These don need to be thawed, they are in a glycerol solution which doesn’t freeze at -20°C.
Label your tube(s), then set up the digest(s) by adding the ingredients in the following order. Make sure you use excellent aseptic technique, and change tips every time. Its OK to set this up at room temp, the reaction tube doesn’t have to be on ice.
- 10 ul of 10x restriction buffer
- ‘Y’ µl of sterile MQ water
- ‘X’ ul of plasmid DNA
- 2 µl of (each) restriction enzyme
------------------------------------------------
Total 100 µl
Mix by flicking, then tap on bench to get liquid to bottom of tube. Incubate at correct temperature for approx. 2 hours. (1 - 4 hr is OK, but overnight digest is too long; this can lead to ‘raggedy ends’ of the plasmid even if it looks OK on a gel; this is due to non-specific nuclease activity)
100 µl seems like a large volume to use, but this helps dilute any impurities in the plasmid prep. Increasing the total volume of the digest and/or reducing the volume of plasmid added often help to improve the quality of a poor digest.
If the digest fails but the plasmid bands are really clear, try again but with a lower value for X. Sometimes less is more.
Agarose Electrophoresis:
After thermocycling is completed, run your PCR reactions out on an agarose gel to check their size and yield by comparing the size of the bands to a DNA ladder. Typically, we would load 5 µl of PCR mixture. Colony PCRs will typically have uneven or ‘wavy’ bands due to the impedance of DNA migration through the gel by cellular debris. If you don’t have a 24 well agarose gel (that’s a massive gel) consider running 2-3 gels. If you’re lucky, you’ll have a few positive clones early on and it won’t be depressing. Alternatively, accept the limited bandwidth of your lab and produce patch plates with 10-11 colones.
Write down a “Load Order” of samples. Remember to leave the first (and possibly last) lane free for your DNA ladder and also include a lane for ‘uncut plasmid’
Decide what agarose concentration, running buffer and staining method are appropriate to maximise band resolution.
Set up your gel-casting tray, ensure the well Comb is not touching the sides, or bottom of the Gel Tray.
Weigh out the appropriate amount of agarose powder (NOT AGAR!) for the correct % agarose gel that you calculated in step 2 into a small, clean, dry conical flask, then pour in the appropriate volume of TBE or TAE buffer. Stir gently, ensuring no agarose is stuck on the edges, then put in microwave, and heat on high for 1 minute.
Put on heat resistant gloves, then take out to examine whether all the agarose is dissolved. If the solution is still cloudy, replace for another 30 sec on high power, and repeat examination and heating until all dissolved.
Be very cautious of overboiling! The surface tension of agarose can lead to violent eruptions of molten agarose. Heat resistant gloves are a necessity, don’t put your face near the conical flask opening
Pre-Stain: While the agarose is nice and fluid, add an appropriate amount of your intercalating staining dye to the gel and gently swirl the conical flask to mix it thoroughly.
(if using plastic end-formers): using a p-1000 pipette, pipette a thin line of agarose along the bottom edge of the end-formers, where they meet the base of the casting tray – the aim is to seal this crack through which agarose can potentially leak out. Allow 30 sec or so for this agarose seal to set.
Pour the molten agarose into the casting tray. Use a single smooth motion, don’t stop and start. Stop when the agarose is 3/4 of the height of the ‘teeth’ on the well-forming comb. Or alternatively, stop when you judge the wells are deep enough to hold the amount of sample that you need to load.
Allow the gel to set, this takes about 15 minutes. You can use this time to arrange your samples in the ice box according to your load order, quickly defrosting the DNA ladder in your hands before leaving it on ice.
When gel is set, pour a little of the appropriate buffer (TBE or TAE) over the top, then carefully pull out the well comb (straight up, don’t yank them side to side or forwards and back). The reason for the buffer is to stop the wells collapsing on themselves (this can happen with thin wells at lower % agarose). Then pull out the end-formers or take off the masking tape.
Fill the gel tank up with the appropriate buffer so that it fills the reservoirs on both sides of the gel, and so that it *just* covers the gel (by 1-2 mm).
Prepare a row of spots of loading buffer on a Parafilm strip, of appropriate volume and number. The NEB Purple loading buffers are 6x conc, so e.g. you will need 2 µl spots if you are loading 10 µl samples.
You can mix the dye directly into your samples if this gel is your final step and you do not wish to use them again.
Mix your DNA ladder with first blue spot by pipetting up and down (avoiding any bubbles) and then load the entire volume of the spot into the first well. Steady the pipette tip with the finger of your non-pipetting hand to ensure accurate dispensing. The tip needs to be just inside the well, don’t push it all the way down in the well. Change tips, mix up the next sample with blue dye, and load again. Repeat for all samples according to your written load order. If you make a loading mistake, take note of this on the load order.
The PCR samples will be “cloudy” at the bottom due to cellular debris. Try to take your sample off the top part of the mixture in the PCR tube.
Put the lid on the gel box, check that the terminals are connected correctly (negative terminal should be closest to the wells, positive terminal is far from the wells, ie. Run towards Red). Run the gel at ~50 volts up to ~300 V, depending on the buffer system and gel size (see later section for more detail). Check that you have current (non-zero milliamps), and gas bubbles at the electrodes (in clear tanks). If not, check all the wire connections. Running the gels at lower voltages generally gives better resolution of bands (maybe! depends also on other factors).
Stop the gel when the fast-running blue dye (bromophenol blue) (= usually the only blue dye) is near the end of the gel (this may take 10-120 min depending on gel size and voltage). You may need to run longer to get good separation of large products (>5 kb). Run for a shorter time for small products (<500 bp), or they may run off gel.
Pre-Stain: If you added intercalating dye to the gel before pouring, it is now ready to image on the transilluminator. Follow machine specific instructions and take an image while illuminating at a wavelength that corresponds to the emission spectrum of your chosen dye. Otherwise, follow post-stain procedure.
Post-Stain: Add gel to 100 ml of post-stain solution to plastic tray, gently slip your gel into the solution and then cover the tray with foil. Stain gel on rocking platform or orbital shaker (gentle shaking!) for 30-60 min or overnight. This staining solution can be reused a few times. Keep the post-stain solution covered in foil and keep in a closed plastic box so it doesn’t evaporate.
Example of Restriction Enzyme Digest Analysis Gels:

Figure 3: Double digest of constructs in pSB1C3 using EcoRI and PstI. Products were run on a 1.5% agarose gel in 0.5X TBE at 80V for 2 hours and post stained with GelGreen (Bio-rad) according to manufacturers protocol. http://2017.igem.org/Team:Sydney_Australia/Results
Acknowledgements:
Coleman Protocols 2017 + 2019 http://coleman-lab.org/
http://2017.igem.org/Team:Sydney_Australia/Results Our old wiki, please check it out! :)