
Site Directed Mutagenesis
Primer Design
All of the general Primer Design considerations apply for site directed mutagenesis, however the one we’re hoping to make use of most is:
3’ Homology is much more important than 5’ Homology.
Thanks to this wonderful loophole, as long as 15-20 bases at the 3’ end of the primer are absolutely conserved from the target sequences, we can add include a single nucleotide error in our primer sequence, resulting in a mutated product. Since the primer is incorporated into the newly assembled strand, all of the subsidiary strands in the chain reaction will also be mutated. This base pair change comes with the associated risk of dimers and hairpins, so be sure to check that the ΔG is high enough, ie. > -5 kcal/mol.
When designing mutagenic primers, you need to decide between;
Option 1: Performing a ‘round the world’ PCR
Design your primers to join back to back and then perform a blunt-end ligation
Requires phosphorylated primers (at least one primer should be ordered with a phosphate attached to the 5’ end) - this is a necessary for the ligase to perform blunt-end ligation.
Best for small plasmids as there will be the potential for accumulation of other errors during a longer PCR.
E.G.
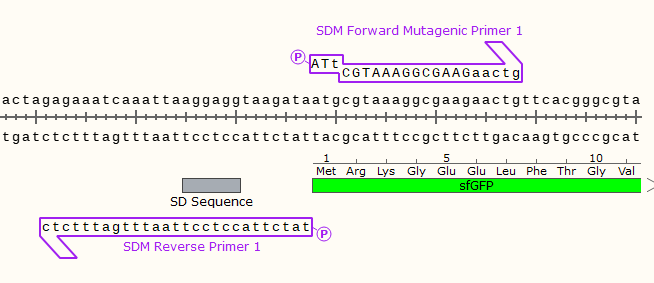
Only a single base in the start codon will be changed, turning off the expression of the downstream GFP gene.
It feels like overkill, but back in the days before CRISPR/CAS9 you had to make an entire plasmid just to change a single base.
When primer design doesn’t work, try, try again. I had terrible issues with dimers when I used that set, so I then moved onto a second set of primers - still got dimers. Then when I got the third set! These primers finally worked;

Oddly enough, moving the mutated base into the centre of the primer ended up working the best. This is more likely a result of a lack of primer dimers/hairpins, 3’ homology is still more important than 5’ homology. Keep in mind I would only ever use two primers at a time for this reaction, it’s not like LAMP!

Option 2: The ‘Megaprimer’ Method
Two stage PCR, primers A and M produce a mutagenic ‘megaprimer’ and then Primers M and B are used in a second PCR to produce a larger mutagenised fragment.
Will produce an equal mix of copies, so downstream screening will be very necessary. It would be especially useful to have a signal visible to the naked eye, such as GFP expression.
The best option for plasmids >5 kb
You’ll require nearby restriction sites to insert your mutagenic fragment into a new plasmid, be sure to consider this while designing your primers.
It may also be possible to design SDM to work with Gibson Assembly, but I’m yet to try this.
‘Simple Protocol’: https://www.future-science.com/doi/pdf/10.2144/99265bm15
Equipment and Consumables:
.dna Map of the Region you plan to replicate
DNA Polymerase
Appropriate DNA Polymerase Buffer
Primer 1 and Primer 2
dNTPs
Plasmid DNA Template containing Gene of Interest, purified via Miniprep
Ice in an ice box
T4 DNA Ligase
T4 DNA Ligase Buffer
Megaprimer method;
Appropriate Restriction Enzymes and Buffer
Primers A, M and B
New plasmid backbone
‘Round the World’ SDM
While you don’t technically need more than one PCR tube for this reaction, you may want to consider setting up a master mix for 4 tubes if your pipetting tolerance cannot handle these smaller volumes. Set up the following reaction on ice:
REACTION MIX (Final Conc.)
20 µl Sterile dH2O
2.5 µl 10x buffer (1 x)
0.5 µl 10 mM dNTPs (200 mM)
0.25 µl 50 µM Primer #1 (0.5 µM)
0.25 µl 50 µM Primer #2 (0.5 µM)
0.25 µl (5 U/µl) DNA Polymerase (0.05 U / µl)
1 µl purified plasmid DNA template
Aliquot out the master mix between all of the PCR tubes, putting 25 µl in each tube.
Put lids on tubes, ensure they are snapped on tight, place immediately in thermocycler. Double check your program parameters before starting. See below for detailed thermocycling instructions.
Return all reagents to the freezer.
Thermal Cycler Set-up
~~~~~~~~~~~~~~~~~~~~~~~~~~~~~~~~~~~~
Initial denaturation: 95°C, 5 min
~~~~~~~~~~~~~~~~~~~~~~~~~~~~~~~~~~~~
Denaturation: 95°C, 30 sec, 25-35 cycles
Annealing: X°C, 30 sec, 25-35 cycles
Extension: 72°C, Y min, 25-35 cycles
~~~~~~~~~~~~~~~~~~~~~~~~~~~~~~~~~~~~
Final extension: 72°C, 10 min
Hold: 15°C
~~~~~~~~~~~~~~~~~~~~~~~~~~~~~~~~~~~~
X = Annealing Temperature which primers will bind
Y = Extension Time that the polymerase will need in order to amplify your segment = size of entire plasmid
*You can leave the reaction to proceed overnight and start again in the morning*
Optional: If your primers were not phosphorylated, you may need to perform a phosphorylation step. This could also be included in an all-in-one kit, such as this one from NEB. Likewise you can consider using one of the purification steps mentioned below to purify your new fragment from the PCR reaction. Otherwise you can proceed to ligation without purification and hope that it works!
6. Retrieve the T4 ligase enzyme and buffer aliquot from the -20°C freezer and put them IMMEDIATELY on ice. These reagents are VERY heat sensitive, and must be handled with care, explained above.
7. Put your labelled tube(s) on ice, then set up the ligase reaction in this tube on ice. Be careful not to get ice or melted ice in the tube - this is not sterile! Add reagents in this order, change tips each time :
- 2 µl of 10 x ligase buffer
- 8 µl purified insert DNA
- 8 µl purified plasmid DNA
- 2 µl of T4 DNA ligase enzyme
------------------------------------------------
Total 20 µl
8. Mix by flicking briefly then incubate either 4°C overnight or room temp for 1 hour. Return the ligase enzyme immediately to -20°C freezer. Throw out any unused thawed ligase buffer.
9. Proceed to Heat Shock Protocol or Electroporation Protocol to insert your ligated plasmid into your host of choice.
10. If your plates have colonies growing on them after the recommended incubation period, proceed to the Patch Plate and Colony PCR Protocol to start the screening process.
11. If things don’t work, check below the ligation protocol for tips on troubleshooting ligations.
‘Megaprimer’ SDM
While you don’t technically need more than one PCR tube for this reaction, you may want to consider setting up a master mix for 4 tubes if your pipetting tolerance cannot handle these smaller volumes. Set up the following reaction on ice:
REACTION MIX #1 (Final Conc.)
20 µl Sterile dH2O
2.5 µl 10x buffer (1 x)
0.5 µl 10 mM dNTPs (200 mM)
0.25 µl 50 µM Primer A (0.5 µM)
0.25 µl 50 µM Primer M (0.5 µM)
0.25 µl (5 U/µl) DNA Polymerase (0.05 U / µl)
1µl purified plasmid DNA template
Aliquot out the master mix between all of the PCR tubes, putting 25 µl in each tube.
Put lids on tubes, ensure they are snapped on tight, place immediately in thermocycler. Double check your program parameters before starting. See below for detailed thermocycling instructions.
Return all reagents to the freezer.
Thermal Cycler Set-up
~~~~~~~~~~~~~~~~~~~~~~~~~~~~~~~~~~~~
Initial denaturation: 95°C, 5 min
~~~~~~~~~~~~~~~~~~~~~~~~~~~~~~~~~~~~
Denaturation: 95°C, 30 sec, 25-35 cyclesAnnealing: X°C, 30 sec, 25-35 cycles
Extension: 72°C, Y min, 25-35 cycles
~~~~~~~~~~~~~~~~~~~~~~~~~~~~~~~~~~~~
Final extension: 72°C, 10 minHold: 15°C
~~~~~~~~~~~~~~~~~~~~~~~~~~~~~~~~~~~~X = Annealing Temperature which primers will bind
Y = Extension Time that the polymerase will need in order to amplify your segment.
Run an Agarose Gel to see whether you produced the correct megaprimer
Optional: Perform a Gel Purification protocol to purify the megaprimer band, or simply add part of your 1 µl first reaction mix to the next PCR.
Set up REACTION MIX #2 (Final Conc.) - Again you can make up multiple (~4) reactions in a master mix if your pipetting tolerance is too low for a single reactions.
20 µl Sterile dH2O
2.5 µl 10x buffer (1 x)
0.5 µl 10 mM dNTPs (200 mM)
0.25 µl 50 µM Primer A (0.5 µM)
0.25 µl Purified Megaprimer (or) 1 µl of Reaction 1
0.25 µl (5 U/µl) DNA Polymerase (0.05 U / µl)
1µl purified plasmid DNA template
Aliquot out the master mix between all of the PCR tubes, putting 25 µl in each tube.
Put lids on tubes, ensure they are snapped on tight, place immediately in thermocycler. Double check your program parameters before starting. See below for detailed thermocycling instructions.
Return all reagents to the freezer.
Thermal Cycler Set-up
~~~~~~~~~~~~~~~~~~~~~~~~~~~~~~~~~~~~
Initial denaturation: 95°C, 5 min
~~~~~~~~~~~~~~~~~~~~~~~~~~~~~~~~~~~~
Denaturation: 95°C, 30 sec, 25-35 cyclesAnnealing: X°C, 30 sec, 25-35 cycles
Extension: 72°C, Y min, 25-35 cycles
~~~~~~~~~~~~~~~~~~~~~~~~~~~~~~~~~~~~
Final extension: 72°C, 10 minHold: 15°C
~~~~~~~~~~~~~~~~~~~~~~~~~~~~~~~~~~~~X = Annealing Temperature which primers will bind
Y = Extension Time that the polymerase will need in order to amplify your segment.
Run an Agarose Gel to ensure you’ve produced product of the correct size.
Optional: Perform a Gel Purification protocol to purify the band of the correct size. Perform a quantification step with a nanodrop to determine the concentration of your purified product.
Calculate how much volume of plasmid you need to use to get 250 ng – call this ‘X’, and calculate how much water to add to the digest, call this ‘Y’; that is Y = (100 – 10 – 2 – X).
Retrieve 10x restriction buffer from freezer, thaw completely, and vortex to mix. The same tube of buffer can be used many times, if you are careful with your aseptic technique.
Retrieve the plasmid from the freezer, allow to thaw, (e.g. in 37°C water bath, or rub in your hands, or on bench etc), then put it on ice when it is thawed. Its not good to leave the plasmid stock at room temp or above for prolonged periods or it may degrade due to traces of nucleases.
Retrieve the restriction enzyme(s) from the freezer, put IMMEDIATELY on ice. These are heat-sensitive and you need to look after them. Do not leave them at room temp. Keep on ice while setting up the reaction, then immediately put back in freezer. These don need to be thawed, they are in a glycerol solution which doesn’t freeze at -20°C.
Label your tube(s), then set up the digest(s) by adding the ingredients in the following order. Make sure you use excellent aseptic technique, and change tips every time. Its OK to set this up at room temp, the reaction tube doesn’t have to be on ice.
- 10 ul of 10x restriction buffer
- ‘Y’ µl of sterile MQ water
- ‘X’ ul of plasmid DNA
- 2 µl of (each) restriction enzyme
------------------------------------------------
Total 100 µl
Mix by flicking, then tap on bench to get liquid to bottom of tube. Incubate at correct temperature for approx. 2 hours. (1 - 4 hr is OK, but overnight digest is too long; this can lead to ‘raggedy ends’ of the plasmid even if it looks OK on a gel; this is due to non-specific nuclease activity)
100 µl seems like a large volume to use, but this helps dilute any impurities in the plasmid prep. Increasing the total volume of the digest and/or reducing the volume of plasmid added often help to improve the quality of a poor digest.
If the digested plasmid is for the purpose of ligation, we can use a large volume, since it will be column-purified & concentrated anyway.
Calculate how much volume of insert DNA you need to use to get 250 ng – call this A, and calculate how much water to add to the digest, call this B; that is B = (100-10-2-A).
Label your tube(s). Set up digest by adding ingredients in the following order. Make sure you use excellent aseptic technique, and change tips every time. Its OK to set this up at room temp.
- 10 µl of 10x restriction buffer
- ‘B’ µl of sterile MQ water
- ‘A’ µl of insert DNA
- 2 µl of (each) restriction enzyme
------------------------------------------------
Total 100 µl
Mix by flicking, then tap on bench to get liquid to bottom of tube. Incubate at correct temperature for approx. 2 hours. (1 - 4 hr is OK, but overnight digest is too long)
Optional: You can now proceed to the Ligation Protocol, but the chance of success is quite low. It can be significantly improved by adding either an inactivation or a purification step here.
Retrieve the T4 ligase enzyme and buffer aliquot from the -20°C freezer and put them IMMEDIATELY on ice. These reagents are VERY heat sensitive, and must be handled with care, explained above.
Put your labelled tube(s) on ice, then set up the ligase reaction in this tube on ice. Be careful not to get ice or melted ice in the tube - this is not sterile! Add reagents in this order, change tips each time :
- 2 µl of 10 x ligase buffer
- 8 µl purified insert DNA
- 8 µl purified plasmid DNA
- 2 µl of T4 DNA ligase enzyme
------------------------------------------------
Total 20 µl
Mix by flicking briefly then incubate either 4°C overnight or room temp for 1 hour. Return the ligase enzyme immediately to -20°C freezer. Throw out any unused thawed ligase buffer.
Proceed to Heat Shock Protocol or Electroporation Protocol to insert your ligated plasmid into your host of choice.
If your plates have colonies growing on them after the recommended incubation period, proceed to the Patch Plate and Colony PCR Protocol to start the screening process.
If things don’t work, check below the ligation protocol for tips on troubleshooting ligations.
Agarose Electrophoresis Analysis:
During SDM you will need to run a number of agarose gels to see if the reaction was successful and produced a consistently sized product. Since your primer isn’t perfectly homologous to the target sequence, it is common to see non-specific product in poorly optimised reactions.
Follow the troubleshooting tips on the PCR page if you’re failing to obtain consistently sized product, consider performing a gradient PCR to determine the perfect annealing temperature. Consider increasing the extension time if you’re obtaining lots of undersized product.
Purification
Based upon your agarose gel, you should know the quality of sample you’re working with. If you’re able to obtain a crisp tight band, you’re welcome to use any of the following purification protocols. However, if you’ve non-specific product bands close in size to your intended target, don’t use the column protocol, instead focus on using the gel extraction protocols, starting with the excision steps described on the gel electrophoresis page.
Buffer QG Gel Purification (Industry standard but extremely toxic)
Cotton Wool Gel Purification (Easy and safe, significant loss of yield)
You can combine 4 PCR reactions into one tube to obtain the desired volume for this protocol (100 µl) or perform 2-4 separate purifications in order to balance your centrifuge.
If you want to be thorough, run another Agarose Gel to check that the purification was successful.
Purification isn’t always a necessary step for success, but it significantly improves the chance that nothing will go wrong!
Downstream Reaction
You now have your desired plasmid, but it’s in a delicate state. Best to heat shock it into a plasmid and then repurify after a few generations have replicated it into a stable product. You can then store this purified plasmid for a later date.
Acknowledgements:
UNSW Biotechnology and Synbio coursework
https://www.nebiolabs.com.au/applications/cloning-and-synthetic-biology/site-directed-mutagenesis