
Sterile Technique
Sterile technique is a vast discipline that dates back to the earliest days of the biological sciences. The first step is to create a sterile workspace as well as to find a way to sterilise equipment & consumables. For more, read;
Protocol: Creating a Sterile Workspace
Thanks to the cone of protection provided by your bunsen burner, you’ve now accounted for every potential contamination source… except for yourself. Sterile technique is about minimising the impact of you (the researcher) on your work. This means following a few simple rules:
RULE 1: You Do Not Breathe on Your Cultures
No matter how much time you invest into creating a sterile space, a heavy breath onto an exposed plate will quickly compromise your experiment. Practise breathing lightly, to the side, or upwards. The second rule of Biology Club is:
RULE 2: You Do Not Touch Your Cultures
The protocols on this page are going to teach you how to manipulate, move around and maintain pure cultures of your organism while never having to use your hands directly. There is never any excuse to let your skin or gloves touch your culturing zone.
RULE 3: Don’t reach over your work or the Bunsen
The sterile space created by the updraft of the Bunsen flame will only push away airborne bacterial and fungal cells that might fall out of the air onto your plates, it won’t provide the same protection for items that pass underneath the flame. I know it’s not pleasant to think of yourself as some lurching giant, shedding live bacteria into the air like dandruff - but you are, so deal with it. Reaching between the bunsen and your work will nullify your efforts at sterility. When there are cultures open in your workspace, reach and grab them from the side or underneath - not from above.
Don’t reach over the Bunsen flame itself, it is extremely hot and will leave burn scars. I know multiple people in this field who have matching wrist burns, each from a single absent-minded moment. Respect the flame!
Should you use PPE for Sterile Technique?
Some scientists will argue until they’re blue in the face that gloves and a labcoat are necessary for sterile technique – while others will argue that it’s both unnecessary and counterproductive. I’d recommend you assess the safety of each experiment and decide whether PPE is appropriate.
Since you’ll be in constant proximity to a flame and sprayed down with ethanol, some gloves provide a greater risk to your safety than bare hands. Spraying down bare hands with ethanol spray provides sterility similar to gloves (but will not disable RNAses! If the ethanol spray dries out your skin, consider using a moisturiser.
Lab coats in biotech labs will not be sterile unless there is a rigorous cleaning schedule in place - most coats just sit in the lab and accumulate godknowswhat. A lab coat provides minimum protection to your work, and comes with the encumbrance of sleeves that can drag over your plates. Wear one for your own protection if you’re working with nasty buffers, but keep those sleeves tied up and be extra careful not to pass your arms over exposed plates. When culturing K12 derived E. Coli I tend to avoid the unnecessary PPE and just wear a short or tight sleeved shirt that I’ve recently laundered. However if I’m working with PB Buffer, I’ll wear a labcoat, gloves and even goggles.
These discretionary rules only apply while you’re working with the safe non-pathogenic lab strains that most synbio experiments rely upon. If you step into the world of culturing pathogens, suit up! PPE may be what saves your life and learning good habits early can be a blessing.
Sterile Transfer
This section is broken up into 4 discrete protocols, distinguished by the media type being transferred from and to;
Solid > Solid - How to pick up a colony from an agar plate and move it to a fresh plate in order to obtain discrete colonies of pure culture.
Solid > Liquid - How to pick up a colony from an agar plate and use it to inoculate a culture flask containing liquid media with pure culture.
Liquid > Solid - How to transfer an aliquot of liquid bacterial culture to a fresh agar plate and get nice discrete colonies of pure culture (and a confluent lawn).
Liquid > Liquid - How to transfer an aliquot of liquid bacterial culture to inoculate a culture flask containing liquid media with pure culture.
Once you master these 4 Sterile Transfer techniques, you’ll be able to manipulate your chosen organism with skill and confidence.
Equipment and Consumables
Remember: The bunsen only provides a cone of protection when turned to the Hot (Blue) Flame.
You’ll also need an appropriate fuel source. I love my portable bunsen. I can take it anywhere.
Or you can be fancy and use a Laminar Flow Hood or Biosafety Cabinet!
Culture plate containing culture of interest (+antibiotic?)
Culture flask containing culture of interest (+antibiotic?)
Sterile LB Agar (or) Sterile LB Liquid Media that contains a matching antibiotic concentration to your original culture.
For Liquid > Solid protocol only;
Glass rod - melted in the bunsen so that it has a 90° curve, shaped like a hockey stick. Be sure to use tongs if melting yourself, it gets hot!
~50-100 ml Pure ethanol (in a jar with a lid - large enough that glass rod can be dipped into)
Parafilm - Not necessary for sterility! This lovely stuff helps keeps the internal humidity of the plates high so that they dry out more slowly, but the shape of a Petri dish is more than sufficient to maintain internal sterility. Parafilm is a nice luxury, it’ll also save you from ruining a culture should you drop a plate because it sticks the sides of the petri dish together… but it is not critical for sterile technique.
Protocol 1: Solid > Solid Transfer
Move your culture plate (contains the culture you wish to transfer) and a sterile LB Agar plate under your cone of protection. Unwrap any parafilm.
Holding your inoculating wand by the handle (keeping your hand well away from the flame), hold the nichrome loop in the hottest part of the flame until it is red hot (2-3 seconds), then steadily pass the rest of the wire through the flame, heating 3-4 centimeters of wire until it it red hot. Reverse the motion, working your way back down the wire until the loop is red hot again. Your loop is now sterile.
Open the lid of your culture plate. You can place the lid on the bench (with the inside facing up), but ideally hold it up at a 45° angle over your plate using your other hand to provide maximum sterility).
Search for a section of agar that looks nice and sterile. Dip the red hot end of your loop into this clean section of agar for a satisfying ‘hissss’ sound as the loop cools down to an acceptable temperature.
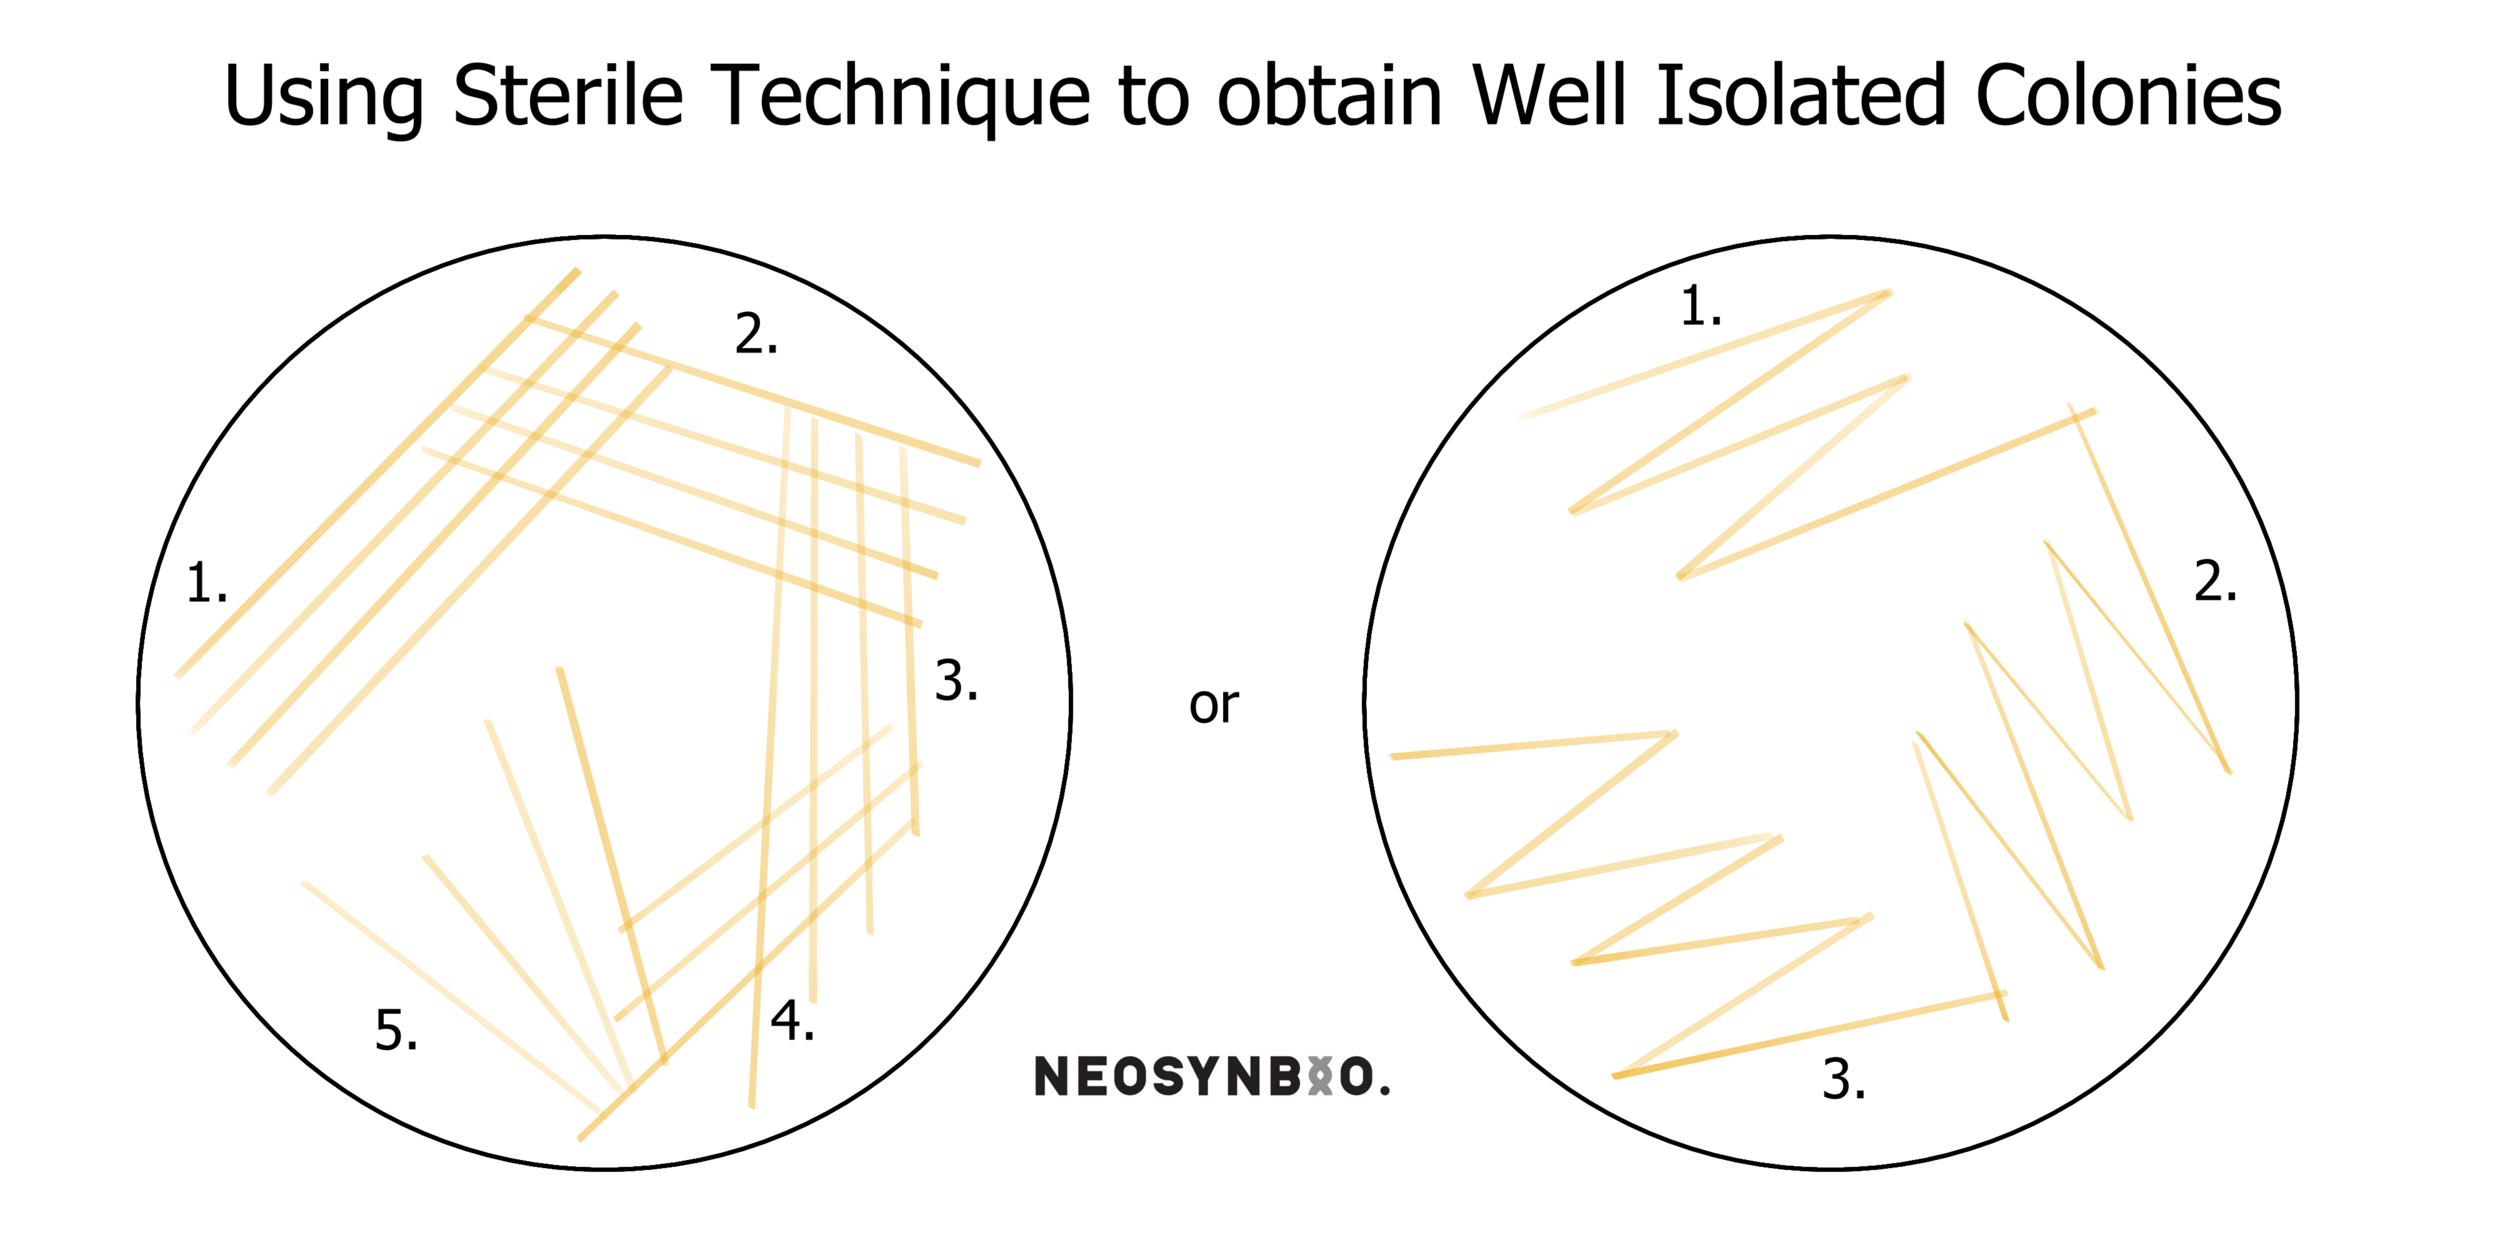
Search for a well isolated colony on the culture plate. This will ensure the plate you inoculate is genetically homogenous and prevent downstream variability in your experiment. Gently scrape your loop across the colony to collect some cells. Try to avoid cutting into the agar, instead let your loop slide across it and the E. coli will collect on the wire.
Replace the lid on your culture plate.
Remember to be careful to hold your loopful of cells away from your body and mouth/breath.
Don’t put down the loop while it is carrying the culture, ensure it stays within the cone of protection.
Don’t wave the wand around excessively, synbio may be magic, but this will mess up your experiment.
Don’t move the loop too close to the flame.
Open the lid of your Sterile LB-Agar-(Antibiotic) plate. You can place the lid on the bench (with the inside facing up), but ideally hold it up at a 45° angle over your plate using your other hand to provide maximum sterility).
Gently scrape the loopful of cells in four straight lines along one side of the agar dish. Try not to cut into the agar, just gently slide the loop across the top, leaving cells behind as you go.
Re-sterilise your nichrome loop. Start by burning off any remaining cells, then proceed up and down the loop as before, heating until it is red hot and any noticeable cell mass has popped off.
Dip the red hot loop into the agar and wait for the ‘hissss’ sound to signify the loop is cool enough.
Gently drag the loop across the agar plate with four long straight lines that start by intersecting the ends of the lines you last drew on the plate.
Repeat steps 10-12 twice more. You’re attempting to dilute the original lines of cells to the point where the final scrapes on your plate have nice discrete colonies. There are several patterns typically used for this, featured below;
14. Label your new plate with Date-Name-Gene-Plasmid-Cell and check that the antibiotic is still labelled. Then parafilm your plates. Store the culture plate in the fridge at 4°C and incubate your freshly inoculated plate with the conditions specified by your protocol (probably overnight at 37°C).
Protocol 2: Solid > Liquid Transfer
Move your culture plate (contains the culture you wish to transfer) and a bottle/flask of Sterile LB Media under your cone of protection. Loosen the lid on the culture bottle until it is a half-turn from being open.
OPTIONAL: If you’re attempting to culture something that contains a plasmid, you need to add liquid antibiotic stock to the sterile LB media at this stage. If you followed our Antibiotic Stock Solution mixing guide, the calculation is easy (15 ml of culture = 15 µl of antibiotic stock, 100 ml of culture = 100 µl of antibiotic stock, etc.) Lift the lid of the tube, use a micropipette to add the correct amount of antibiotic (ensuring it lands in the liquid and not on the side of the tube) and then replace the lid and swirl gently.
Holding your inoculating wand by the handle (keeping your hand well away from the flame), hold the nichrome loop in the hottest part of the flame until it is red hot (2-3 seconds), then steadily pass the rest of the wire through the flame, heating 3-4 centimeters of wire until it it red hot. Reverse the motion, working your way back down the wire until the loop is red hot again. Your loop is now sterile.
Open the lid of your culture plate. You can place the lid on the bench (with the inside facing up), but ideally hold it up at a 45° angle over your plate using your other hand to provide maximum sterility).
Search for a section of agar that looks nice and sterile. Dip the red hot end of your loop into this clean section of agar for a satisfying ‘hissss’ sound as the loop cools down to an acceptable temperature.
Search for a well isolated colony on the culture plate. This will ensure the liquid culture you inoculate is genetically homogenous and prevent downstream variability in your experiment. Gently scrape your loop across the colony to collect some cells. Try to avoid cutting into the agar, instead let your loop slide across it and the E. coli will collect on the wire.
Replace the lid on your culture plate.
Remember to be careful to hold your loopful of cells away from your body and mouth/breath.
Don’t put down the loop while it is carrying the culture, ensure it stays within the cone of protection.
Don’t wave the wand around excessively, synbio may be magic, but this will mess up your experiment.
Don’t move the loop too close to the flame.
Using the hand that isn’t holding the loopful of cells, pick up the bottle of sterile LB media and lift off the lid using the fingers of the same hand.
This motion can be a bit tricky to learn. You can do this however you feel most comfortable, but the aim is to remove the lid of the bottle, under the cone of protection, while holding the loopful of cells.
Removing the lid earlier is an option, but increases the risk of contamination.
Quickly pass the lip of the bottle through the flame
Don’t do this with plastic culturing flasks
Honestly, I’m not sure that this actually does anything, but doctrine insists…
Dip your loopful of cells into the liquid media and gently stir it around to dislodge some cells.
Don’t shake the wand so vigorously that it bangs into the sides of the tube, the handle is not sterile.
You don’t actually need to see the cell pellet dislodge. Simply dipping it in and stirring gently will dislodge sufficient cells
Tighten the lid and label your new culture tube with Date-Name-Gene-Plasmid-Cell-Antibiotic. Re-parafilm your culture plate. Store the original culture plate in the fridge at 4°C and incubate your freshly inoculated culture with the conditions specified by your protocol (probably overnight at 37°C).
Protocol 3: Liquid > Solid Transfer
Move your culture plate (contains the culture you wish to transfer) and a bottle/flask of Sterile LB Media under your cone of protection. Loosen the lid on the culture bottle until it is a half-turn from being open.
Set a micropipette to 100 µl (volume doesn’t matter too much here and may be protocol specific). Attach a sterile tip.
Open the lid of your culture bottle and flame the lip. Pick up 100 µl of liquid culture using your micropipette and replace the lid.
Lift the lid of your petri dish and gently squirt the liquid into the centre of the dish. Replace the lid and eject the pipette tip to sharps waste.
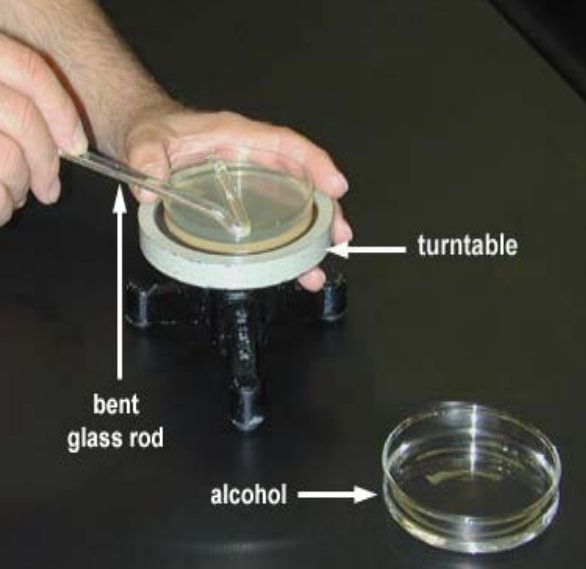
Take your hockey-stick-shaped glass rod and dip the short end (apparently hockey players call this part of the stick “the blade”) into the jar of ethanol. Let it drip-dry a moment over the jar, then replace the jar lid.
Take care to ensure you hold the glass rod at an angle that doesn’t allow the ethanol to drip down the rod and onto your hands. The reason for this should be immediately apparent in the next step.
Pass the ‘blade’ of your glass hockey stick through the flame and let the ethanol burn itself off. The glass rod is now sterile.
Open the lid of your plate and place the lid on the bench (with the inside facing up) somewhere within your cone of protection.
Place the ‘blade’ of your glass rod onto the agar
Slide the sterile ‘blade’ of your glass rod across the agar, it should slide freely. Using your other hand, rotate the plate while you slide the glass rod up and down, spreading the liquid evenly across the plate. Keep sliding for 20-30s or until the plate feels faintly ‘sticky’ as you slide the rod across it.
While looking for sources I found out that some people use a turntable to help with this step. I’ve never done so, but it sounds fun!
Replace the lid of your plate and label with Date-Name-Gene-Plasmid-Cell-Antibiotic. Parafilm the plate to maintain internal humidity.
Tighten the lid on your culture bottle. Store the original culture tube in the fridge at 4°C or throw out to culture waste and incubate your freshly inoculated plate with the conditions specified by your protocol (probably overnight at 37°C).
Protocol 4: Liquid > Liquid Transfer
Move your culture flask (contains the culture you wish to transfer) and a bottle/flask of Sterile LB Media under your cone of protection. Loosen the lid on both culture bottles until they are a half-turn from being open.
At this point, I consider flaming the lip of a tube to be the laboratory equivalent of a toast to the heroes of microbiology. Still not sure it does anything practical.
OPTIONAL: If you’re attempting to culture something that contains a plasmid, you need to add liquid antibiotic stock to the sterile LB media at this stage. If you followed our Antibiotic Stock Solution mixing guide, the calculation is easy (15 ml of culture = 15 µl of antibiotic stock, 100 ml of culture = 100 µl of antibiotic stock, etc.) Lift the lid of the tube, use a micropipette to add the correct amount of antibiotic (ensuring it lands in the liquid and not on the side of the tube) and then replace the lid and swirl gently.
Untwist the lid on the first culture tube and flame the lip. Using your micropipette, pick up (100 µl) of culture (subject to protocol) while avoiding the lip or edges of the tube. Replace the lid on the culture tube.
Untwist the lid on the Sterile LB Media culture tube and flame the lip. Hold your pipette over the top of the tube and then depress the plunger all the way to the ‘hard’ position to squirt it all into the fresh media. Eject the pipette tip into the sharps waste.
Replace the lid and then tighten the lids of both tubes.
Ensure you label your new culture with Date-Name-Gene-Plasmid-Cell-Antibiotic.
Store the original culture tube in the fridge at 4°C or throw out to culture waste and incubate your freshly inoculated culture with the conditions specified by your protocol (probably overnight at 37°C).
What does success look like?
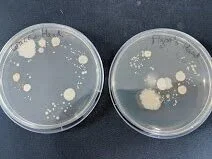
Ideally you want a pure culture; a plate with discrete (alone on the plate), homologous (look the same) colonies. There can be some variance in size, especially if you leave bacteria to incubate longer than 24 hours. Here are some E. coli containing a fluorescence gene that are slightly overgrown but otherwise quite clearly a pure culture.

Left: Concentrated by centrifuging after heat shock protocol. Right: Unconcentrated sample after heat shock protocol.
What does failure look like?
Here are some photos of intentionally contaminated plates. Note the odd shapes and differing colours - these are immediate warning signs;


Acknowledgements and References:
UNSW Microbiology coursework
Coleman Protocols 2017 + 2019
https://www.maltosefalcons.com/tech/yeast-propagation-and-maintenance-principles-and-practices
https://fac.ksu.edu.sa/sites/default/files/140_mic_10_th_lab.pdf