
Gibson Assembly
Design Considerations
Gibson assembly allows for scarless cloning, since you’re the one who will choose which base pairs overlap between your target genes. This can be done in one of two ways.
The first option is to linearise your plasmid backbone very close to the insertion site using Restriction Enzyme Digest. If this is your approach, you will need to design and order a Synthesised Gene fragment with 40 bp of homology to either side of where you wish to insert the gene. Digest the plasmid and then proceed to the Gibson Assembly reaction with your Gblock. This option is only possible if you have a unique restriction enzyme site local to where you wish to insert your gene.
The second option is to use the Flanking Sequence Addition protocol to make the ends of your target gene and backbone homologous to one another using two separate PCR reactions. The steps for designing these primers and the Gblock are featured below.

This is a one-tube-reaction if you ignore the two reactions required to produce the fragment and plasmid with the correct flanking sites (A + B).
The Gibson Reaction: 4 specially designed primers are used to amplify the plasmid & gene-of-interest, adding flanking homologous sites. A 5' T5 exonuclease will digest the DNA fragments, removing bases from the 5’ strand and leaving 'sticky' ends on the remaining 3’ strand. These matching ends allowing for complementary base pairing between plasmid and insert. Phusion DNA polymerase repairs the gaps and Taq Ligase repairs the backbone.
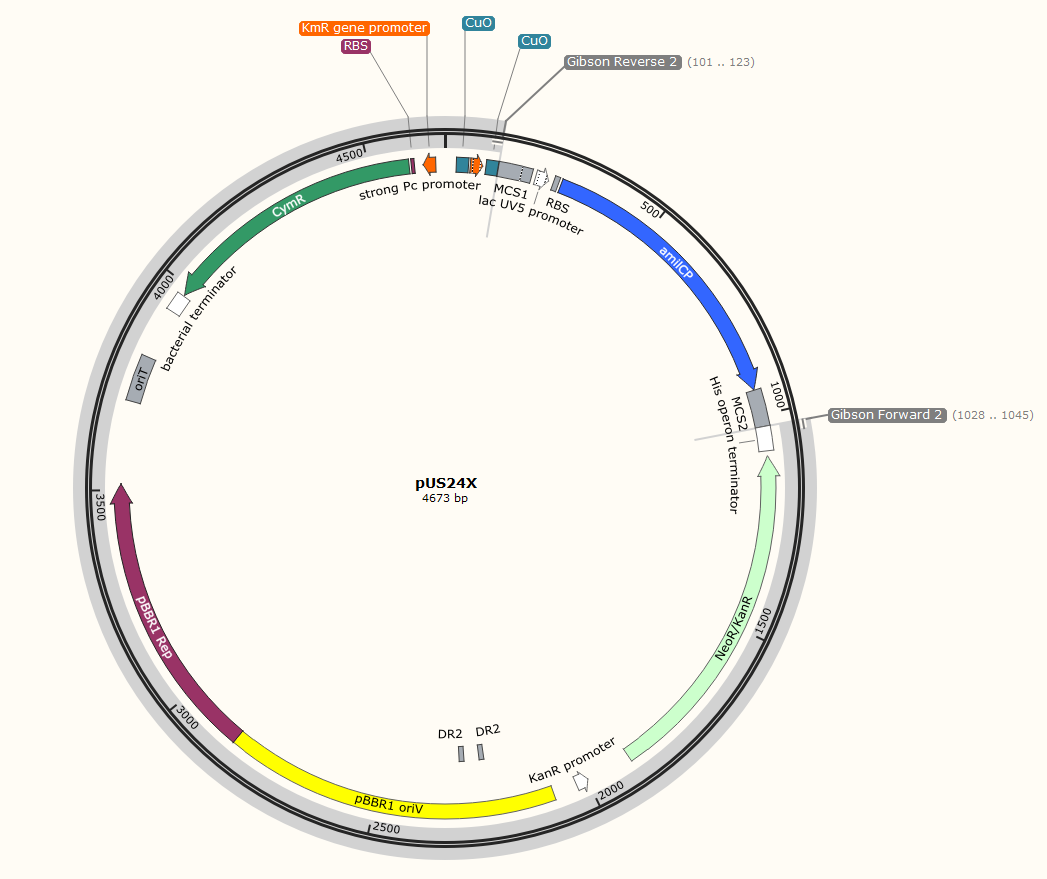
In order to ensure that the ends match, we’re going to need to use software to design our primers. In this example, I will attempt to insert a proinsulin gene into an expression plasmid from USYD.

The plan is to insert the gene on the right (Proinsulin G. Block) into the plasmid on the left (pUS24X), in between MCS1 and MCS2 (multi cloning sites) replacing the amilCP gene. Don’t squint too much, we’ll zoom in on the important annotations.
1) Locate exactly where you want the two parts to join together, then create and annotate that sequence. This is as simple as “Highlight Desired Sequence”, Ctrl-C, Ctrl-V, repeat. For more advanced tips on the correct spacing of genetic parts, read the page on Gblock Design.

We can ignore the rest of the plasmid backbone, focussing on the junctions flanking our gene. Lets zoom in on the left junction.
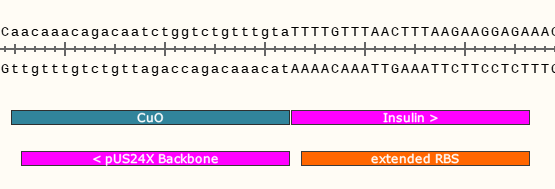
In the hot pink, you can see where the two DNA parts will join together at the left junction after the Gibson reaction. It will look similar for the right junction, albeit the sequences encoded will be different.
2) Now you have the sequence of your desired finished product, it’s time to use it to design the primers. Start with the top strand and examine the sequence to the right of your junction. Starting with the 5’ end at the junction, design a primer for the top strand that has an annealing temperature around 60°C. Ensure the primer sequence ends in G (G Clamp). Don’t order this primer, but do take note of the Tm for later.
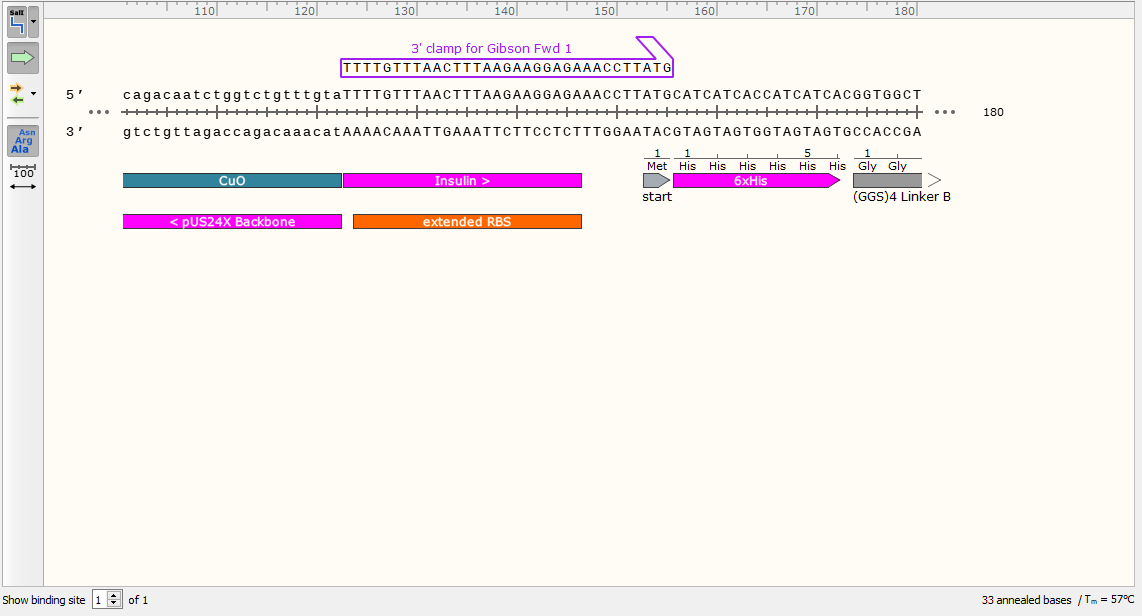
This is the part that will bind to your gene when we try to amplify it. We will now add a 5’ sequence homologous to our backbone to ensure scarless cloning. Note the Tm at this stage, as it will be more relevant than the Tm of your finished primer.
3) Extend out the 5’ end of the primer by 20 base pairs.

This is the first forward primer (Fwd 1). When used to amplify the gene during PCR, it will add a compatible 5’ end for gibson assembly with your intended plasmid.
4) Use Primer Design software to check the primer for potential hairpins or loops. Tinker with it if necessary.
5) Repeat for the bottom strand, creating a primer with a 3’ clamp that anneals around 60°C.
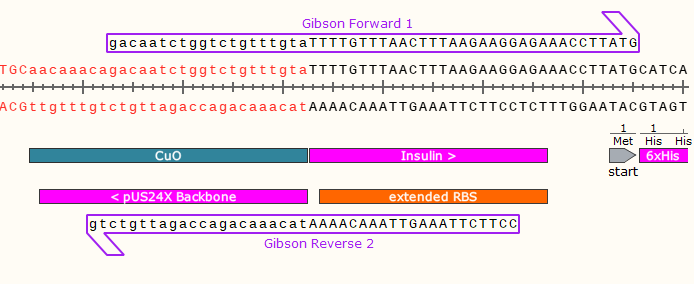
The Reverse Primer 2 (Rvs 2) will be used in a separate PCR reaction (with Fwd 2), to amplify the plasmid so that it has compatible ends with your gene.
6) Repeat for the right junction, creating the Forward 2 and Reverse 1 primers.
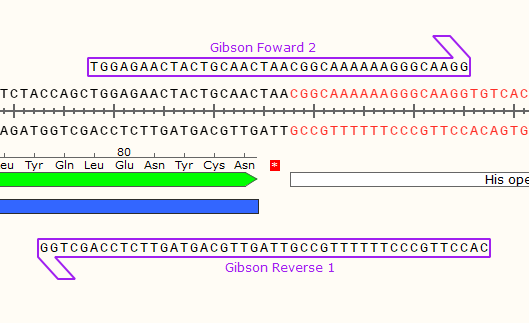
Same design rules apply. Keep in mind that the #1 primers go together and the #2 primers go together
7) Use Primer Design software to check if dimers will be an issue for;
Reaction 1: (Fwd 1/Rvs 1)
Reaction 2: (Fwd 2/Rvs 2).
8) You can now order your 4 primers!
9) Once your primers arrive: The PCR reactions you will carry out before the Gibson reaction will use your intended target sequences as template. In this example, one reaction would have pUS24X purified plasmid as the template and the other would have the Proinsulin Gblock as template;
You should include the length of the overhangs in your annealing temperature calculations.
Insert amplification:

The Biobrick Prefix and Suffix, originally intended for RE digest, are now replaced with homologous regions to pUS24X. This is a surprisingly simple adaptation of an older Gblock to a newer methodology. Imagine if it was this easy for computer coders…
Backbone Amplification:
We’ll amplify all the useful parts of the backbone, while adding on our homologous ends and cutting out the amilCP gene. This will be a significantly longer thermal cycle than the gene, but you may be performing Gibson Assembly with relatively equal size parts.
10. Once you’ve performed a PCR reaction and run an agarose gel to check that it was successful, you can finally move on to the Gibson Cloning Protocol. However, gel purification or column purification would help a great deal to improve the success rate, especially if you plan for the assembly of more than two fragments.
You can proceed with raw PCR reactions if you’re keen to save time, but it will come at the risk of false positives or complete failure.
Equipment & Consumables:
Nanodrop or yield results from Agarose Electrophoresis
Insert Fragment PCR Reaction(s)
Gibson Assembly Master Mix
Chemically Competent Cells (DH5α or similar transformation strain)
Sterile LB-Agar-Antibiotic Plates, corresponding to the resistance gene you’re working with
Heat Block (42°C & 50°C)
Can use thermal cycler at a single temperature instead.
Ice in Ice Box
Protocol:
Set up the following reaction mix:
X µl Insert PCR reactions (total volume of all inserts)
Y µl Vector/Plasmid/Backbone PCR reaction (if one fragment is significantly larger)
10 µl Gibson Assembly Master Mix
10 - X - Y dH2O
2-3 Fragment Assembly: 0.02-0.5 pmols
4-6 Fragment Assembly: 0.2-1.0 pmols
pmols = (weight in ng) x 1,000 / (base pairs x 650 daltons)
50 ng of 5000 bp dsDNA is about 0.015 pmols.
50 ng of 500 bp dsDNA is about 0.15 pmols.
Measure weight via nanodrop or agarose electrophoresis.
Optimized cloning efficiency is 50–100 ng of plasmid with 2–3 fold of excess inserts. Use 5 times more of inserts if size is less than 200 bps.
Total volume of unpurified PCR fragments in Gibson Assembly reaction should not exceed 20%.
Incubate samples at 50°C for:
2-3 Fragments: 15 minutes
4-6 Fragments: 60 minutes
Store samples on ice.
Add 2 µl assembly reaction to 50 µl thawed chemically competent cells and allow to sit on ice for 15-30 minutes.
Make sure you include a positive and negative control (2 µl uncut plasmid, 10 µl dH2O)
Take your esky of ice over to the 42°C waterbath or 42°C heat block. Put tubes in a floatie (or) hold in the water bath (or) push tubes into the slots of the heat block. Allow 45 seconds for heat shock. (Plus or minus 10 seconds, this needs to be exact!). Then transfer the cells straight back onto ice (embed into ice, as above, don’t just rest on top).
Allow transformation mixtures to sit for 2 min on ice, then add 1 ml sterile LB broth to each tube. You can also use more fancy media (e.g. SOC or SOB), but there is not that much difference.
Incubate on 37°C shaker for 1 hour. Put the tubes horizontal so they get good shaking action. eg. put the tubes laying flat on the shaker platform and masking-tape into place. Make sure the lids are tight! You can incubate without shaking, and you can incubate for less time (30 min), but it won’t work as well in these cases.
The role of this ‘recovery’ step is to allow the cells to create the proteins required for antibiotic resistance.
Recovery is not necessary for Ampicillin resistance plasmids. Proceed to plating.
Label the LB-antibiotic plates before starting the next bit; you need two plates for each ligation condition or plasmid type, since we will plate out two different cell concentrations of each to ensure we get countable/pickable numbers of colonies. Double check the plates to ensure you are using the correct type of antibiotic(s) for the type of plasmid(s) you are using.
Pipette 100 µl of the first cell suspension onto one LB-antibiotic plate (label ‘100 µl’ in addition to other info) and spread it over the plate using the glass rod (liquid > solid) Sterile Technique.
Spread 100 µl of the remaining samples, each onto a separate, appropriately-labelled plate.
Centrifuge all the tubes at ~15,000 rpm for 1 minute in a micro-centrifuge. Pour off most of the supernatant into culture waste (being careful not to touch the tubes on the edge of the culture waste bottle). Leave a little bit of liquid behind (about one or two drops).
The purpose of this spin and second plating is to ensure you avoid getting too few colonies or a confluent lawn when you check your plates tomorrow.
Vortex the cells in the remaining liquid for about 10 seconds, until they are not sticking to tube anymore, and you have a nice smooth, even, cell suspension.
Pipette the cells from the first cell suspension onto the appropriate pre-labelled LB-antibiotic plate (label with ‘pellet’ in addition to other info), spread plate as above. Repeat for the remaining samples and controls.
Incubate all plates at 37°C overnight. Note that for some plasmids and ligations, it may be beneficial to instead try room temp for 2-3 days – this lowers the copy number of pUC type plasmids, and is useful to allow retrieval of clones that might be toxic to the host.
If you get nice discrete colonies on your target plate and nothing suspicious on your positive and negative control plates, you can proceed to the Confirmation of Edits protocols.
Positive control should have many colonies/a confluent lawn of growth.
Negative control should have no growth.
Check Ligation Troubleshooting for more advice on rectifying unpredicted results on control plates.
Acknowledgements:
https://www.nebiolabs.com.au/protocols/2012/12/11/gibson-assembly-protocol-e5510
https://www.protocols.io/view/Gibson-Assembly-Protocol-E5510-imss45
https://www.nebiolabs.com.au/products/e5510-gibson-assembly-cloning-kit#Product%20Information
https://www.protocols.io/view/Gibson-Assembly-Protocol-E5510-imss45
https://warwick.ac.uk/study/csde/gsp/eportfolio/directory/pg/lsujcw/gibsonguide/